Explore The 8 Best Places to Take Pictures in Tokyo 2024

8 Best Places in Tokyo To Take Pictures

The US military had destroyed Tokyo by a series of bombings during World War II on 9-10 March 1945. But nowadays, Tokyo has become one of the most famous tourist spots not only in Japan but also all over the world. According to a tourism report, 15 million people from other countries visited Tokyo in 2019. In 2022, 3.3 million international people visited Tokyo and saved their memories in this city.

Millions of people visit Tokyo and capture amazing photos in different places. Because this city has traditional, regional, cultural, digital, and natural places.

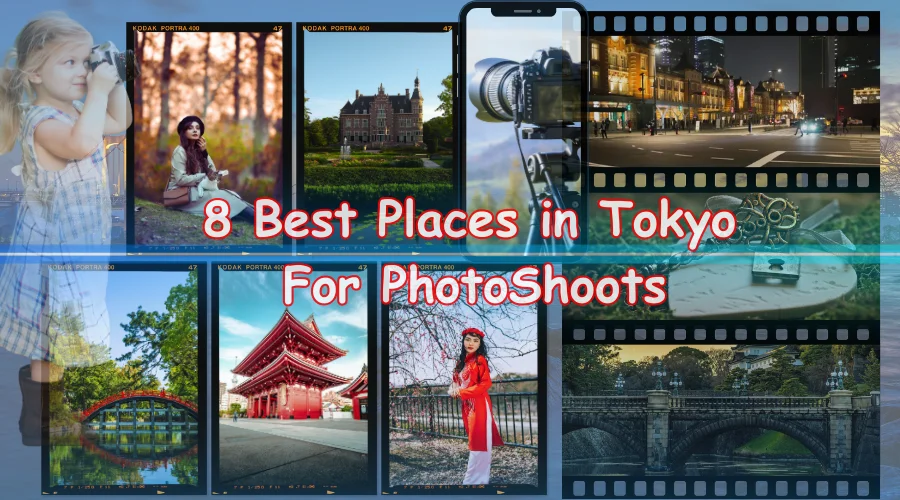
In this article, we will inform you about the 8 best places to take pictures in Tokyo. Each of these eight places is special in its beauty. So we can’t compare to one another, but you can choose which is the best place to take pictures for you in Tokyo, Japan. Listen to Podcast

The 8 Best Places to Take Pictures in Tokyo

Everyone wants to take attractive pictures, but very few people know the factors behind the best picture. There are a few things involved in capturing the best photo. Camera, lens, angle, framing, lighting, timing, weather, and background are so important.

Besides these factors, location is one of the most crucial reasons to make or break your pictures. Let’s look at the list of the 8 best places to take pictures in Tokyo.Ā 

01. Shinjuku Gyoen National Garden (Park)
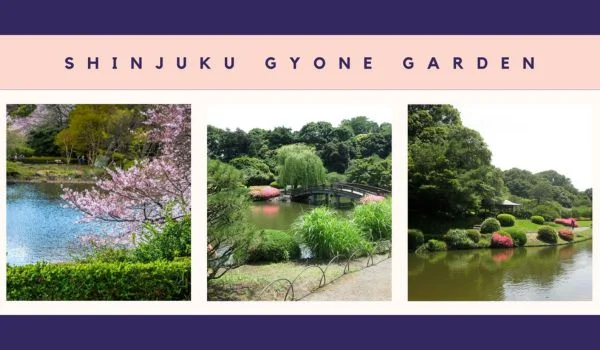
Shinjuku Gyoen National Garden, The 8 Best Places to Take Pictures in Tokyo, Graphicscycle

Shinjuku Gyoen (locally known as ‘ꖰå®æå¾”č‹‘’) is a big and famous park in Tokyo. You can enjoy the beautiful nature and take pictures in this place. This is a great place to take a break in this busy city and take some amazing pictures. A nice walking path, big grassy areas, and peaceful views make this park apart from others. The ꖰå®æå¾”č‹‘ is worldwide famous for the cherry blossom view in spring.

Shinjuku Gyoen is like a 3-1 garden because it has three different types of gardens and 3 gates to entry. The first one has traditional Japanese stuff like ponds and cool pavilions. The second one has a formal French style, and the third has an English style with open lawns and 400 cherry trees.

These gardens present a long history, from the Edo period to World War 2. Many trees in this garden can change the color of their leaves, especially the maple tree. So, Shinjuku Gyoen Park can be the first choice of the 8 best places to take pictures in Tokyo.Ā 

Ā Pros of the Shinjuku Gyoen Park as a Photoshoot Spot

  • This is the best place to take gorgeous pictures in different places inside this park.
  • Your pictures will have different backgrounds, such as calm ponds, green grass, trees, and sitting places.
  • In spring, the park becomes like a pink wonderland with the Cherry Blossom Show.
  • 400 Cherry trees are blooming in your picture’s background!
  • The historical place carries a different culture like Japanese, French, and English
  • No off-day in the Cherry Blossom Season.

Cons of the Shinjuku Gyoen Park as a Photoshoot Spot

  • If you want to take pictures in this park with the cherry blossom, you have to plan to come here in the spring. Otherwise, you can’t take pictures with this pink wonderland!
  • The Shinjuku Gyoen gets too busy in the Cherry blossom season, so you might not be able to take pictures as you want.
  • An entry fee of 500 yen, around $4 might be too much for someone.
  • There are some restricted areas to sit or have a picnic. So you might not have full freedom in some areas.

The number one of the Graphic Cycle’s ‘The 8 best places to take pictures in Tokyo’ has a different schedule for different seasons. Please check the schedule and closing day before planning to visit the park for a photo session.Ā 

02. Kokyo Gaien Garden & (Imperial Palace)

Kokyo Gaien Garden

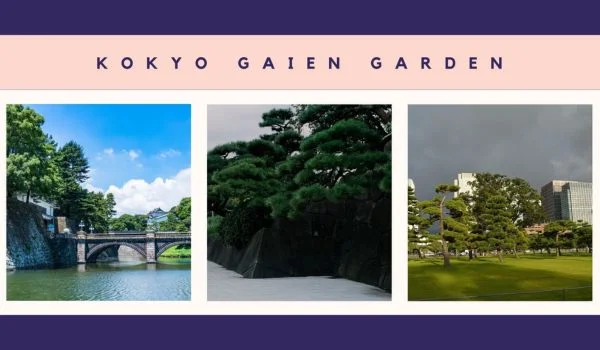
The Imperial Palace of Tokyo is one of the best photoshoot places in Tokyo. Though you have no access to inside the palace, there is a beautiful national Garden, Kokyo Gaien Park. The park is on the south side of the palace. In this place, you will have many options to choose your photography locations.

Huge open space, 2000 Japanese Black Pine Trees, and the beautiful breeze are mind-blowing to take pictures. You can see and take pictures of the strong stone walls around the palace with a pond.

Besides taking amazing pictures, you can also learn about the history of Japan and the Imperial Palace. Kokyo Gaien National Garden is a great place of the 8 best places to take pictures in Tokyo. Open areas, history, stone walls, and the pretty light in the late afternoon can provide an excellent experience in photography.Ā 

Pros of Kokyo Gaien Garden and Imperial Palace

  • Kokyo Gaien Garden has lots of open areas and green space where you can take stunning pictures.
  • 2000 Japanese Black Pine Trees that look like a bonsai garden.
  • The garden is around the Imperial Palace, which is full of history about Japan’s past. When you take pictures of this place, you will have historical feelings inside you.
  • The garden, the Stone walls of the palace, the moat, and the breeze are amazing places for photoshoots.
  • Late Afternoon sunlight highlights stone walls, so you can capture stunning photos at this moment.

Cons of Kokyo Gaien Garden and Imperial Palace

  • Sometimes, especially near the Kikyō-mon Gate, it can get busy with lots of people.
  • You have no access to take pictures everywhere in the garden. Some parts, like the East Gardens, might have limits on where you can go.
  • When lots of international tourists come to Tokyo, you might not get enough place and time to take pictures.
  • Understanding the history of this place might be challenging if you don’t understand the Japanese. So it is better to have a guide with you so that you can give the right expression with the historical elements while photoshoots.Ā 

This historical place may require a guide if you don’t know Japanese. The guide will help you to understand the history, and they are available from 10 AM to 1:30 PM, Tuesday to Saturday. The outside of the garden is open for everyone free. But if you want to use the Palace as one of the 8 best places to take pictures in Tokyo, you have to register first.Ā 

8 Best Places in Tokyo to Take Pictures 2024, Graphicscycle

Download The 8 Best Places to Take Pictures in Tokyo Infographics

03. Odaiba Island, Tokyo

Odaiba Island Tokyo, The 8 Best Places to Take Pictures in Tokyo

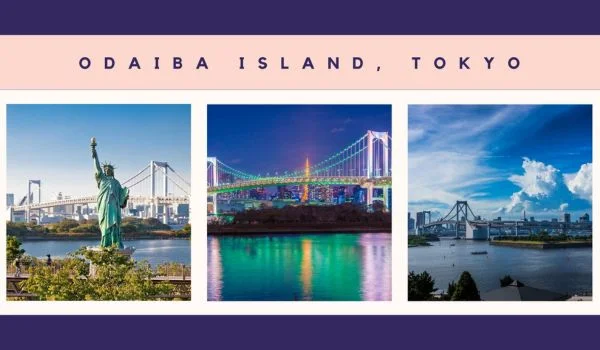
Odaiba Ireland is a very famous place for photography and tourism. This is an Artificial Ireland, a super place of modern technology and beauty. There are a lot of places available for capturing awesome pictures. You have to go there by crossing the rainbow bridge, which is another place for capturing stunning pictures.

We have included Odaiba Ireland in the list of the 8 best places to take pictures in Tokyo. Let’s see how many places you will have inside Odaiba Ireland to take pictures.

10 Best Photoshoot Locations in Odaiba Ireland, Tokyo

Place Name Short Description
Rainbow Bridge You have to go across the rainbow bridge to go to Odaiba Ireland in Tokyo. So why you will miss the chance to photoshoot on this beautiful bridge?Ā 
Palette Town Ferris Wheel Ā You can use the Ferris Wheel as a background for your photography. You capture the awesome views of Tokyo Bay, while you are at the top of the giant wheel.Ā 
Unicorn Gundam Statue ā€œMobile Suit Gundam Unicornā€ is a famous novel written by Japanese author Harutoshi Fukui. The Statue is located in this Odaiba Ireland. So it can be a good place to take pictures in Odaiba.Ā 
Odaiba Seaside Park Take a picture by using the background of the ocean, statue, and skyline.Ā 
TeamLab Digital Art Mind-blowing digital art. If you take pictures in the TeamLab Borderless, you will feel like you are in another world. Don’t miss a shot with the magical, glowing lights and colors.
Aqua City Odaiba This is a shopping mall, but it can be a beautiful space for taking pictures. Modern buildings, colorful lights, and the beauty of the sea, everything you can capture.Ā 
VenusFort VenusFort is another shopping mall, also a great place for taking pictures with royal vibes. Anyone will love this place and the view inside the building.Ā 
MegaWeb If you love to drive cars and take pictures with cars, MegaWeb is only for you. The car-themed park allows you to take pictures in a variety and stylish cars. So enjoy the car-themed park and captureĀ your memories.Ā 
DECKS Tokyo Beach Capture the lively vibe at DECKS Tokyo Beach. It’s a place for shopping, eating, and having fun.
Odaiba Statue of Liberty Odaiba also has a small Statue of Liberty. You can take photos with the Statue of Liberty in Odaiba, Tokyo.

Odaiba is a very beautiful Artificial Ireland with natural views of the sea and sky, glorified as the best photoshoot spot in Tokyo. If you are in Tokyo or you want to visit Tokyo, must take a tour of Odaiba Ireland.Ā 

04. Sensoji Temple Asakusa

Sensoji Temple Asakusa

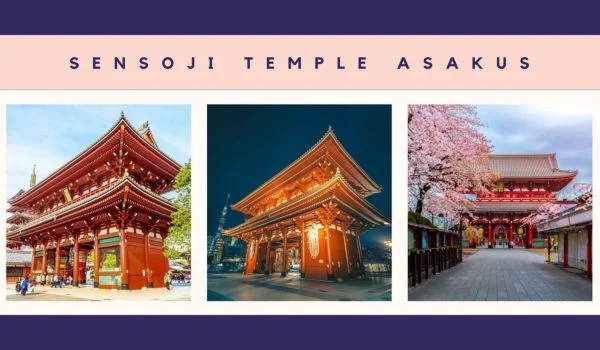
3rd number place of the 8 best places to take pictures in Tokyo is Sensoji Temple. This is one of the oldest and most colorful Buddhist temples, which is located in Asakusa. When you enter the Kaminarimon Gate, you must feel that you are in the best place to take pictures in Tokyo city.

The Sensoji Temple is locally known as the Asakusa Kannon Temple. The temple was completely built in the year 645. Despite 1400 years old’s temple, It has a very beautiful design and modern vibe. There is a huge photoshopping area you will find inside or outside the temple. Such as Nakamise-dori shopping street, and traditional stalls, outside the gate outer areas.

If talk about the inside of the temple Hozomon Gate, and a tall five-story pagoda, make your pictures look amazing. The main hall and the peaceful Asakusa Shrine are also great spots for photos. In spring, the garden around the temple blooms with pink cherry blossoms, making it a dreamy place for pictures.

Sensoji Temple Asakusa Opening Hours

Different places of the Sensoji temple open and close at different times. It may vary on where you want to take pictures, which month of the year you want to visit this place and festivals. Here are the best 5 places to take pictures in the Senso-ji temple and their opening hours.

  • Main Senso-ji Temple: Open from 6 AM to 5 PM, but from October to March 6:30 AM to 5:00 PM.
  • Asakusa Shrine (Sanja-sama): Always Open. You can take pictures at any time you want.
  • Shin-Nakamise Shopping Street: Opening time may vary for individual shopkeepers (10 AM to 8 PM is ideal). But you can take pictures on the beautiful street at any time.
  • Nakamise Shopping Street: Open at 9 AM and close at 7 PM, but same here it may depend on individual shops.
  • Dempoin Temple & Garden: This temple is also a good place for capturing pictures but, it is not available to the public. Sorry!

Do you know what is the best thing about these places in the Sensoji Temple Asakusa? These all are free to enter. You don’t need to pay a single coin to take pictures in these beautiful places. So you must consider Sensoji Temple one of the 8 best places to take pictures in Tokyo.

05. Tokyo Tower

Tokyo Tower Japan, Best Photography in Japan, Graphicscycle

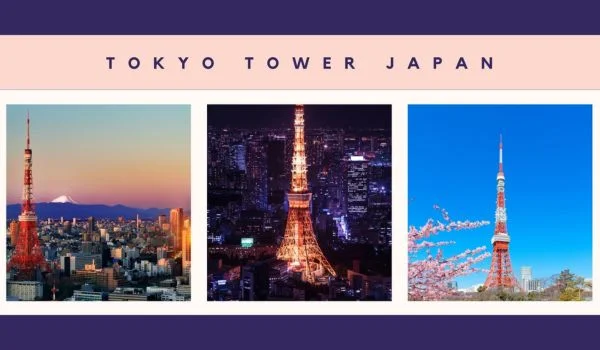
After the Tokyo Skytree, Tokyo Tower is the second-tallest tower in Japan. It can be a great place to take pictures. If you have taken a picture at the top of the Tokyo Tower, that means you have captured the whole Tokyo city within one frame. Especially if you can take photos of golden hours or night cities.

The Tokyo Tower is one of the best the 8 best places to take pictures in Tokyo. If you want to enjoy the sky view from above 250 meters, visit this place and capture some memories of the time you have spent in this tower.

If you don’t want to go to the top level (250 meters), you will have a second option also, 150 meters. Additionally, you can save some money if you choose the second one.Ā 

Tokyo Tower Opening Hours and Prices

The Tokyo Tower opens from 9 AM to 10:30 PM. But the last tour closed at 9:30/9:45 PM. So if you can book a tour between the evening and 7 or 8 PM, it will be the best time for the best view of the Tokyo Tower. Follow the table for the schedule and pricing of the Tokyo Tower as of January 2024.Ā 

Age Ticket Price
Main Deck (150 Meters) Top Deck (150 & 250 Meters)
4ā€“6 Years 500 Yen Online:1200 Yen, Counter: 1400
7ā€“15 Years 700 Yen Online:1800 Yen, Counter: 2000
16ā€“18 Years 1000 Yen Online:2600 Yen, Counter: 2800
19+ Years 1200 Yen Online:2800 Yen, Counter: 3000

Though this is an awesome place to take pictures of the Tokyo city and the beauty of the sky, the ticket might be expensive for someone. So if you are looking for a low-budget or no-budget place to take pictures, we have included free-to-visit places also in the list of the 8 best places to take pictures in Tokyo.

06. Meiji Jingu ShrineĀ 

Meiji Jingu Shrine, The 8 Best Places to Take Pictures in Tokyo

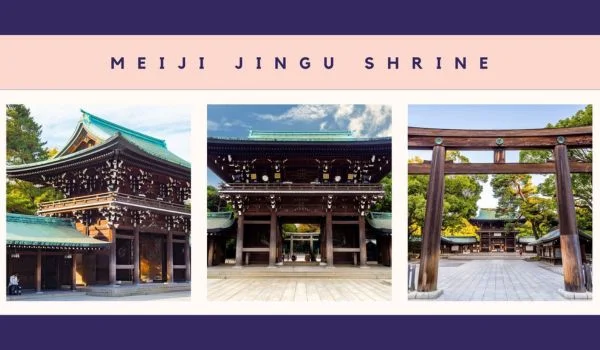
Meiji Jingu Shrine is a luxurious place for photography and visit in the middle of Tokyo. It has a peaceful oasis with a lot of green trees. This is not only a beautiful place to take pictures, but also it has a history.

This Shrine was constructed after the death of Meiji Jingu. Meiji was the first emperor, who had a dream for a digitalized Japan. People who go to the Meiji Jingu Shrine Must remember Emperor Meiji and Empress Shoken.

If you enter the big gate, you will feel that this is separate from the busy Tokyo city. Also, some scenarios are mind-blowing, such as nice paths, a big garden, and more. Many couples also have special weddings there.

Meiji Jingu Shrine is one of the 8 best places to take pictures in Tokyo. Below are the 3 Most Beautiful places to take pictures in the Meiji Jingu Shrine. Including their opening hours and admission fee.

  • Main Meiji Shrine: The shrine is always open and no closing day. You can visit and take pictures at any time without paying anything.
  • Inner Garden: The Garden is open from 9 AM to 4.30 PM, and they have no closing day. From November to February, the closing time is 4 PM, and It extends to the middle of Jun. The admission fee is 500 Yen to visit this Garden.
  • Meiji Jingu Museum: By giving 1000 Yen, you can visit and take pictures of the Meiji Period of Japan (1852-1912). You have to go there, except the Thursday, from 10 AM to 4 PM.Ā 

Download 8 Best Places to Take Pictures in Tokyo PPT

07. Yoyogi Park

Yoyogi Park Japan

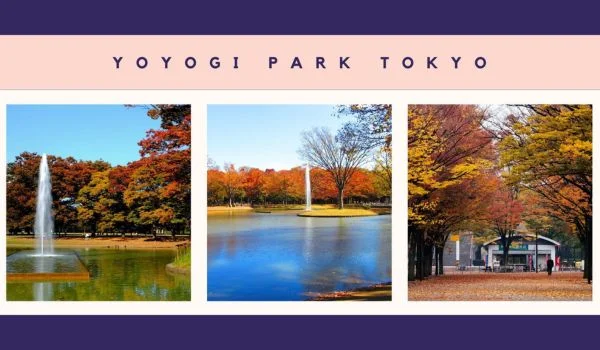
After visiting or completing the photo session at Meiji Jingu Shrine, you are kindly invited to the Yoyogi Park. This is only 1.5 kilometers far from the Meiji Jinku Shrink. So you can easily come here for a walk. No, money in your pocket? No problem. Already times up 5/6 PM?

No issue. You are always welcome in the big park to see the giant green space where you can relax. Yoyogi Park is one of the most beloved places of the 8 best places to take pictures in Tokyo

5 Reasons Why You Need to Go to Yoyogi Park to Take Pictures.

  • Free Admission: You don’t need to pay a single coin to visit and take photos in this beautiful park. Also, it is always open.
  • Lots of Pretty Views: Yoyogi Park has a lot of spots, where you can take stunning pictures. This has big lawns, a pond, a forest, and more options. You can capture different pictures in this all-in-one Park.
  • Lots of Space: There is a huge space. So if you want to go for a photo session with your team, go there. Also, it is a great place t spend time with your partner.
  • Seasonal Beauty: The Park changes with the seasons. It becomes most beautiful in the last of the march and first of April. At this time, Cherry Blossoms help become the most beautiful park.
  • Always Fun: Though this is a peaceful place and has a lot of free space if you love events like street dancing, guitar playing, and singing songs, you can contribute to others. This type of chill is always in this place.Ā 

08. Shibuya Crossing Tokyo

Shibuya Crossing Tokyo

Shibuya Crossing in Tokyo is a famous place and worldwide familiar to tourists. Thousands of people cross the street at once. This is the biggest crossing in Tokyo and Japan. Organized tall buildings, bright signs, and huge numbers of screens around the crossing make it so beautiful at night.Ā 

Photographers love Shibuya Crossing because it’s so different and always moving. Taking pictures here is like capturing the lively spirit of Tokyo. The crossing is like a symbol of how Tokyo is modern and full of energy, especially with young people. Download Summary

ConclusionĀ 

In summary, we have provided a list of the 8 best places to take pictures in Tokyo. Some places of these 8 are free to visit and some will charge from 500yen to 3000yen. Natural, Traditional, Artificial, Historical, Cultural, and Modern are all types of places you have got on the list. Where you want to take pictures, depends on you.

My recommendation is to visit Yoyogi Park to take pictures in various scenarios. Additionally, the park is free, Maybe if it was paid, I would suggest you go there. Among the paid places, the best one is Odaiba Artificial Island, Tokyo.

You can collect a lot of stunning pictures by visiting the 8 best places to take pictures in Tokyo. But, this is not enough for your photos. If you are a photographer, you already know the importance of photo editing. When you take pictures outdoors, maybe there is extra light, some spots on the subject’s face, or a color balancing problem. There can be a lot of issues with outdoor photography, you can’t find them without an expert photo editor.

We have a professional photo editor team with expertise in our Graphic Cycle. If you want to get precise and more attractive pictures of the best place in Tokyo, contact us for a free trial.Ā 

Read Our Recent Articles-

Frequently Asked Questions

Can You Take Pictures in Tokyo?

Absolutely! You can take pictures in Tokyo. Tokyo is a very beautiful city and has a lot of space like parks, Ireland, temples and more to take amazing pictures.

Can I Take Photos in Japan?

Yes, you can take photos in Japan. Because there are no restrictions or rules about photography in Japan. However, use your common sense and be careful about sensitive places such as temples, hospitals, museums, and shopping malls.

Is Street Photography OK in Japan?

Yes, street photography is allowed in Japan. But respect people’s privacy and ask them if you’re taking a close shot of individuals.

What Not To Wear in Japan As A Tourist?

There are no strict restrictions on the dress code for tourists in Japan. But you have to avoid dressing with offensive slogans and too short dress. Remember that Japan is a peaceful and cultural country.

Is It OK To Wear Ripped Jeans in Japan?

It is OK to wear ripped jeans in Japan, it is acceptable. But it is recommended to avoid too many ripped dresses. Because Japan is a cultural country.Ā 

Show your love

Pumpkin Drawing in Photoshop Step-by-Step Guide in 2024

How to Draw a Pumpkin in Photoshop, Pumpkin Drawing, GraphicsCycle

If you are a beginner in Photoshop learning, it will be best practice to draw different shapes or use Content-Aware Fill Photoshop tools. So let’s today learn how to draw different shapes. For example, pumpkin drawing could feel hard. It will be hard for beginners in Photoshop. But don’t worry it will be going to fun in this tutorial.

Drawing a pumpkinĀ in Photoshop is not a hard task for a beginner. All you need is just some basic knowledge of Photoshop tools and functions.

Suppose you are a stranger to Photoshop photo editing software and start learning. Then you are in the right place this tutorial is for you and is about pumpkin drawing. Or if you are a regular Photoshop user looking for answers to some queries, you will find your answer. You also can browse our FAQ section.

Pumpkin, Pumpkin Drawing, Graphicscycle

Photoshop Panels and Bars

If you are very beginner in Photoshop let’s First of all, letā€™s introduce to the tools which we will be going to use in this tutorial. Remember we just discussed the tools which are needed only in this tutorial for pumpkin drawing.

New Document Window

When you create a new document in Photoshop for drawing a pumpkin, a new window will appear with some measures and samples. On the left side of the image above the area is marked with a big rectangle there are sample examples for a new document. You can select any of them to start your work. All parameters are pre-determined in these sample examples.

Create New Document, Photoshop

On the right side, there are the parameters that you can customize according to your needs. At the top of the options panel, the name input box is present. By default, the ā€˜Untitled-1ā€™ name is inserted. You can change it and rename it as you want to name it for the pumpkin drawing or how to draw a pumpkin in photoshop. The parameters are as follows,

  1. Width: Width is the total width of your document. There are two input boxes, the right one is for the insert number amount, and the left one is for the unit of measurement. By default pixel is selected, you can change from the drop-down menu to inches, centimeters, Millimeters, points, and Picas. As a beginner ‘inches’ will be easier for you to measure the height and width of images.
  2. Height: like the width also enter number digits on the input box. There are also three options besides the input box first two for switching in height, and width respectively. The next one is called ‘Artboards’ Click on the checkbox if you want to use your new document as a canvas.
  3. Resolution: Resolution is the multiple of the height and width. In this case, Resolution is indicated as the number of pixels per unit. This is very important for the sharpness of your image.
  4. Resolution Unit: The resolution unit decides the pixel number per inch or centimeters. The given number’s pixels will consist of one inch or one centimeter.
  5. Background Contents: Here you can select the background of your document. Click on the arrow-down icon a drop-down menu will appear then select a background color. you can also select a transparent background.

Color Profile and Pixel Aspect Ratio

The Color Profile is the color that describes the color behavior of the monitor. By default ‘sRGB’ color profile is selected in Photoshop. The ‘Pixel Aspect Ratio is simply a fancy way of saying that the length of one side of a pixel is related to the length of the other. Listen to the Podcast on Drawing Pumking Step-By-Step

By default Pixel Aspect Ratio is ‘Square Pixels’ is selected. For the beginner both are good. So we don’t need to change anything on the color profile and Pxil Aspect Ratio.

How to Draw Pumpkin in Photoshop, Pumpkin Drawing, Graphicscycle

Download Pumpkin Drawing Step-By-Step Guideline

Photoshop Interface

After creating a new document with your desired height and width for the pumpkin drawing. You need to know about the Photoshop interface. ‘Adobe Photoshop‘ is very advanced photo editing software and is user-friendly.

You don’t have to select tools or option parameters on the menu every time. You will find the most used tools and options in different panels on the Photoshop interfaces. Let’s learn about different tools and planes of Photoshop interfaces.Ā 

Photoshop Interface

Main Menu

The area’s main menu is also called the menu bar of Photoshop. The menu bar consists of 11 items, ‘File’, ‘Edit’, ‘Image’, ‘Layer’, ‘Select’, ‘Filter’, ‘Analysis’, ‘3D’, ‘View’, ‘Window’, and ‘Help’. Each of those main menus has an additional sub-drop-down menu for related options.

The different drop-down option also has different sub-options. All tools and options of Photoshop software are available in the menubar. All options are categorized into 11 options.

OptionBar

The options bar exists under the menu bar. If you select any tool from the tool bar the available options of that tool are shown in the option bar. The options bar shows the options of the selected tool such as brush size, shape, effect, etc.

Toolbar

‘Adobe Photoshop’ is user-friendly photo editor software. Photoshop brings the most used and important tools together on the toolbar. If you are learning Photoshop you must know all the tools and usage of the toolbar.

Foreground And Background

At the bottom of the toolbar, you can change the color of your default background and foreground of your document. The background color is the background of your document.

If you erase any area of your document the erased the background will appear on the erased area. The foreground color is the color for your brush and pencil when you use them to make any drawing.

Rulers

Rulers help you position your document and elements precisely. Two rulers appear on the Photoshop interface. One is on the top of the active window and another appears on the left side of the active window which helps you to align and place elements on your document.Ā 

History

Into the history option, the history of your every movement of editing will be listed. If you need to undo any editing simply Go to history and click on the last edit you want to keep.

Color Panel

You can choose different colors for the color panel. To set the background color click on the bottom color preview in the tool bar. Then select a color from the color panel. Similarly to select foreground color select the top color preview or foreground color review option and select any color.

Adjustment and Properties Panel

The adjustment and properties panel contains different options for parameters and different properties. You can change and edit the shape, size, curve, and Hub/Saturation values of an element of your document.

Layer Panel

Layer panels show the layers of your document. Layer panels also contain different options such as opacity, layer mask option, layer curve, new layer, and delete layer option.

So now you know the names of the different bars and panels of Photoshop. We will learn about the brushes of the toolbar in another tutorial. You can also learn the usage of different brushes from the ‘Adobe Photoshop’ official website. Now let’s draw a Hallowing Pumpkin.Ā 

Drawing Pumking Step-By-Step

As you know the bars, panels, and height-width of Photoshop this tutorial will be easier for you. Follow our guidelines step by step and remember some of your brush’s parameters are not the same as the tutorial.

Step 1: Open Photoshop and Create a New Document

Photoshop Opening image, Pumpkin Drawing

First of all, open your Photoshop. If you have Adobe Photoshop on your PC, you will find it on the start menu. if you don’t have to install ‘Adobe Photoshop’ then first install it.

You will find many online tutorials on the topic ‘How to install Adobe Photoshop’. If you have a shortcut on your monitor double click on the Photoshop icon. Your Photoshop will start opening an image that will appear on the screen like the image above.Ā 

Create a new File, Photoshop

New File in Photoshop, Pumpkin Drawing, Pumpkin Tutorial

Wait till your Photoshop is ready to pumpkin drawing. Or until the Photoshop software opens with the interface like image two. Click on the ‘Create New’ button. A new window will open as red marked on the screen. We learn about this window at the beginning of this tutorial.

Set your Ā document’s Name. Set height-width and other parameters. You can also select a sample document from the right side.Ā 

Step 2: Draw an Eclipse

Eclipse Tool, How to Draw Pumpkin in Photoshop

At first in pumpkin drawing select the Eclipes tool from the toolbar of your Photoshop. The ā€˜Rectangle toolā€™ is shown by default, Right-click on it. If you don’t find the tool simply press the ‘U’ key on your keyboard.

A tool will be selected from the toolbar. If it is the ‘Eclipse Tool’ then it’s fine. If no Right-click on it. A drop-down tool list will appear select the ‘Eclipse Tool’ as shown in the picture above.

After selecting the eclipse tool go to the option menu. Set the ‘Sotroke’ color. which is the outline color of your Eclipse. Then Fill in the color of your pumpkin.

Set the same color for both Strock and Fill. Donā€™t be confused if the given picture of the pumpkin does not look like a pumpkin. But it is a part of pumpkin drawing.Ā 

Draw An Eclipse

Now draw an Eclipse, the height of the eclipse will be the height of your Pumpkin. Shape your Eclipse according to the slice of a Pumpkin. So draw a longish Eclipse as shown in the picture of the pumpkin drawing.

To draw an Eclipse, click and hold on the active window and drag the mouse toward the window’s bottom-right corner. If you are satisfied with the shape release the mouse button. The Eclipse will selected by default you can change the shape of the eclipse manually.

To deselect the Eclipse press the ‘Enter’ key on the keyboard. Just maintain the height and width like a slice of pumpkin. We will give a look-alike pumpkin on the other steps of thisĀ tutorial.Ā 

Step 3: Open Layer Style Window

Layer Style Window

Sometimes the Layer Style window is also called Blanding Options. Although there are other important layers style options are available. The options that are available on the Layer-style window are,

  • Blending Options
  • Bevel &Emboss
  • Stoke
  • Inner Shadow
  • Inner Glow
  • Satin
  • Color Overlay
  • Gradient Overlay
  • Pattern Overlay
  • Outer Glow
  • Drop Shadow

We will use only two of these options Bevel & Emboss (not all options) and Inner Glow for pumpkin drawing.Ā 

How to open Layer-Style Window

There are three ways to open the layer-style window.Ā 

Sl. Ways Methods Description
01 Open Layer-stye From the Menu bar Menu Bar > Layer > Laeyr Style > Inner Glow To open the Layer-Style window select the Eclipse layer on which we will draw the pumpkin.Ā  Click on ‘Layer’ on the menu bar at the top of the screen. Then go to ‘Layer Style’ a drop-down sub-menu will appear. For this tutorial select ‘Inner Glow’. Otherwise, you can select any of your desired options it will open the ‘Layer-Style window’.
02 Open Layer-Style From Layer Panel Layer Panel > Right-Click on Eclipse Layer > Drop-Down Menu > Blending Option > Layer-Style Window To open the Layer-Style Panel ‘Right-Click’ on the Eclipse layer. A drop-down menu will appear. The Blending Option will be the first option on the menu. Or just click on the ‘Blending Option’ the layer-style window will appear on the screen. Now select ‘Inner Glow’ to give the Eclipse inner glow effect.
03 The shortcut way Double-click on layer > Layer-Style Window To open the Layer Style Window simply double-click on the layer. Remember if you double-click on the layer name the layer name will become editable. So click on the layer beside the layer name and the eye icon of the layer.

Step 4: Give an Inner Glow EffectĀ 

When the ‘Layer-Style Window‘ opens click on the Inner Glow ‘CheckBox‘. It now will open the Inner Glow options. To open the Inner ‘Glow option panel’ click on the Inner Glow Option.Ā 

Set Inner Glow Effect, Inner Glow Effect Photoshop, Pumpkin Drawing

Now on the Layer-Style window set different parameters to give your Eclipse ‘inner glow effect’. Remember it could not be the same effect for the same parameters in every Photoshop for pumpkin drawing. So for better results don’t focus on the number of parameters.

Focus on the overall outcome of the pumpkin onĀ the preview panel. The options and parameters we use for the best result of Eclipse on our pumpkin drawing tutorials.

  • Blend Mode: Normal
  • Opacity: 100%
  • Noise: 0%
  • Color Option: Plane Color
  • Choke: 55%
  • Size: 40%
  • Range: 100%Ā 

you can use different numbers for the options above for your pumpkin drawing. Try and change these numbers if your color processor and Adobe Photoshop software are required for the best result.

Step 5: Bevel and Emboss Effect for Eclipse

Open Bevel an Emboss Option

The ‘Bevel & Emboss’ Option exists in the Layer-Style window, open it in any one way you feel comfortable. Open the Layer-Style panel and select the ‘Bevel and Emboss’ option from the window.

Bevel and Emboss Effect for Eclipse, GraphicsCycle

The parameters that we will change to give the best Bevel and Emboss effect to the Eclipse of pumpkin drawing are as follows,

  • Style: Inner Bevel
  • Technique: Smooth
  • Depth: 75%
  • Direction: Up
  • Size: 60 px
  • Soften: 15px
  • Sading Angle: 160 Degree
  • Sading Altitude: 30 Degree
  • Gloss Contour: linear
  • Highlight Mode: Normal
  • Highlight Color: #F1A95C
  • Highlight Opacity: 100%
  • Shadow Mode: Normal
  • Shadow Color: #864D10
  • Shadow Opacity: 100%

As we told you before, all software does not require the same parameters for the same outcome of pumpkin drawing. Try and change these numbers if your color processor and Adobe Photoshop software are required for the best drawing. Try to give a similar effect as shown in theĀ photo above.Ā 

Step 6: Duplicate and Rasterise Layer in Photoshop

Duplicate Layer in Photoshop

Like opening the Layer Style window you can duplicate one layer in Photoshop in three ways. These are described as follows,

Sl. Ways Methods Description
01 Duplicate form Layer panel Layer Panel > Select Layer> Double Click on The Layer > Select Duplicate To duplicate one layer Double-Click on the layer a drop-down menu will appear on the screen. select the duplicate layer from the drop-down menu. A dialog box will appear in the middle of the screen. Set the Layer name and press on the ‘OK’ Button. Your selected layer will be duplicated and a new layer will appear on the layer panel.
02 Duplicate Form Menu bar Select layer > Menu Bar > Layer > Duplicate Layer OR press ‘D’ You also can duplicate a layer from the menubar at the top of your screen on the Adobe Photoshop interface. First, select the layer that you want to duplicate for the pumpkin drawing. Then go to the menu bar and click on “layer”. From the drop-down menu select the ‘Duplicate Layer’ or press the ‘D’ key on your keyboard. A dialog box will appear. You can set a new layerā€™s name here. set the new layer name and press ok. Then continue your pumpkin drawing.
03 The shortcut way Select layer > press ā€˜Ctrlā€™ + ā€˜Jā€™ You can also duplicate one layer in a shortcut. Just select the layer you want to duplicate and then press ‘Ctrl’ + ‘J’ together.

Rasterize Layer

Rasterize Layer, Pumpkin Drawing Easy

Photoshop creates Type, Eclipes, and shapes in vector layers. When you zoom in, you can see the edges, made up of tiny squares. No matter how much you enlarge the layer the edges remain sharp and clear. Which can destroy the realistic look of your pumpkin drawing.

When you rasterize a layer, it loses its vector features. You can no longer edit the Eclipse or shapes without losing quality. it is good practice to keep one Duplicate before rasterizing any layer.Ā 

Layer Panel > Right-Click on layer > Rasterize layer

You can rasterize the layer from the layer panel. Please select the desired layer and right-click on it. Then from the drop-down menu select the ā€˜Rasterize layerā€™ to Rasterize the layer. Or ā€˜Rasterize layer Styelā€™ for rasterizing the Layer staples. Then follow the next step of pumpkin drawing.

Rasterize Layer from Menu bar

Menubar > Layer > Rasterize > Layer Styel

You can also rasterize the layer and layer style from the menubar. Click on the layer option of the menubar. Then select the Rasterize option from the drop-down menu. Another sub-drop-down menu will appear and select the ‘Layer Style’ Option.Ā 

The rasterizing of layers is very important. You cannot follow the next step of pumpkin drawing without rasterizing the layer.

Step 7: Skew with Shear ToolĀ 

Shear Tool

Menubar > Filter > Distor > Shear

You can skew one element of your Photoshop document by using the “Distor’s Shear” filter tool. If you use the CSS6 version or less yourĀ documents should have 8-bit images. Otherwise will won’t be able to use the Distor filter in the pumpkin drawing. ā€˜Shearā€™ is a Tool of the ā€˜Distorā€™ filter.Ā 

First Select the layer then go to the main menu and select ‘Filter’. A drop-down menu will appear. From the Drop-down menu click on ‘Distor’ a sub-menu will appear with the list of tools. From the sub-menu click on the ‘Shear’ option. Select Shear and continue your pumpkin drawing.Ā 

Shear Dialog Box

Shear Dialog Box, Pumpkin Drawing Ideas

In the bottom shear Dialog Box, you can see the Preview of the element. The skew of the element will be previewed in this preview section. Above the preview section, the Undefined Areas exist with two options.

  • Warp Around: Fills new Voids in the image with content from the opposite side of the image.
  • Repeat Edge Pixels: Extends the colors of pixels. Banding may result if the edge pixels are different colors.

On the Top left side, a square Edit workspace is available. On the workspace, by default, the element’s position is linear shown on the graph by a straight line. Click anywhere on the line and drag the mouse to make a curve.

The element will skewed and a preview will be shown in the preview section. you can add as many points on the curve as you want just click on the curve and a new point will appear.Ā 

Step 8: Skew the Eclipse and make a slice of Pumpkin

Skew with Shear Tool

Now give a shape as a slice of pumpkin to the new layer that you duplicate from the Eclipse To draw a pumpkin. To skew the eclipse click on the line in the middle of the workspace at ‘Shear Dialog Box’. A point will appear and add to the line. Now click and hold on that point and drag to the left to make a curve.

Look at the preview section. If your eclipse shape appears alike a slice of a pumpkin then press the ‘OK’ button on the top right corner. This is an important task in pumpkin drawing. You can practice this several times.Ā 

Skew with shear tool and arrange, Pumpkin Drawing

The eclipse was dear for the pumpkin drawing will be the middle slice of pumpkin and the skew eclipse will be the left and right slices respectively. To arrange the slices go to the layer panel click and drag down and birth the new layer to the bottom of the first Eclipse’s layer.Ā 

Select the move tool for the toolbar and move and arrange the left slice of pumpkin at its position. To move the Pumpkin slice click and hold on the eclipse on the active window then drag to the left of the middle slice of pumpkin. Place the Eclipse under the first eclipse as it looks like a left-side slice of pumpkin.Ā 

Step 9: A right side Slice of PumpkinĀ 

Now make the right-side slice of pumpkin. The procedure is the same as we do at Step 7. First, we have to make a new duplicate of the Eclipse from layer 1. Don’t flip the left side slice for the right, and then you will lose the drak effect of the right side of your pumpkin drawing.

Now click on the new layer and select the filter for the menu bar. Go to the distort and click. from the sub-menu click on ‘Shaer’. The shear dialog box will appear.Ā 

Skew right slice with Shear tool

Now click and drag the middle line on the workspace at the top left side of the Shear dialog box. Make a curve and give a prover shape to the eclipse alike a slice of pumpkin. If you are satisfied with the shape of the eclipse in the preview section press the ā€˜OKā€™ button.Ā Ā 

User Shear Tool, How to Draw Pumpkin in Photoshop, Graphicscycle

As we do in step 7 arrange the layer. Click on the layer on the layer panel and drag it to the bottom of the layers. Then select the ā€˜Moveā€™ tool move the eclipse and place it under the first layer so it looks like the right slice of pumpkin drawing.Ā 

Step 10: Make the rest of the slices of Pumpkin

Arrange after Skew with Shear Tool

Now make more 4 slices for the pumpkin drawing 2 for the left and 2 for the right. Give every slice of the pumpkin a proper shape from the ā€˜Shear Dialog Boxā€™. And arrange them according to the older to newer slices of pumpkin. Make individual duplicates from layer 1 for every slice of pumpkin.

Don’t get confused repeat Step 7 and Step 8, 2 items each. Take help from the picture given above for further clearance.Ā The result of this Step will look something alike the image above.Ā 

Arranging Pumpkin Slices, Pumpkin Drawing, Pumpkin Drawing Tutorial

Step 11: Merging All LayersĀ Ā 

Merging layers in Photoshop means converting all layers into one layer of pumpkin. Layers in Photoshop are like transparent sheets of paper that lie on top of one another and allow you to make precise edits to certain areas of the image. When you merge layers you combine two or more layers into a single layer.Ā 

Merging Layers

Menubar > layer > Merge Visible

Shortcut: Ctrl + Shift + E

To merge all layers into one layer, go to Menubar and click on the ‘Layer’. A drop-down menu will appear. From the drop-down menu select the ‘Merge Visible’ option. This option will keep the image the same as visible as the pumpkin drawing in the active window. You can also do it with a shortcut, press ‘Ctrl + Shift + E’ altogether.Ā 

Step 12: Change the shape to a Pumpkin shape with Liquify FilterĀ 

The liquify filter tools are used to push or pull, pucker pixels of your photos. You can give push or pull pixels of your image without losing quality. You can learn about the use of the liquify filter tools from our tutorial ‘How to Use Liquify Photoshop Filter Tool’.Ā 

Open Liquify filter, Pumpkin Drawing

Menubar > Filter > LiquifyĀ 

Shortcut: Ctrl + Shift + X

Click on Filter at the top of the screen at Menubar. A drop-down menu will appear. From the drop-down menu click on the ‘Liquify’ option. You can also open the liquify filters with a shortcut press ‘Ctrl + Shift + X’ together.Ā 

A new window of liquify filter will appear.Ā 

Liquify Window

Which is the Liquify filter window. The liquify filter tools are on the right side of the liquify window. The Tool options and parameters are on the right side of the window and the preview section is in the middle where we will give liquify effect to the photo.Ā 

Set Pucker Tool

First, we will use the Pucker tool. Select the pucker tool for the toolbar. Then increase the size of the tool as all the upper edges of the merged Eclipses are covered.

Ser Forward Wrap Tool, Pumpkin Drawing Ideas

Now apply the pucker tool to the all edges at once. Don’t bring the tool to the middle of the pumpkin. Fit all the edges at the arc of the tool and apply. Apply the Pucker tool at all edge upper edges and bottom edges for pumpkin drawing. Make the shape alike the shape of the image above. Bring all the edges closer but not at one point.Ā 

Applying Forward Warp Tool

Now select the ‘Forward Wrap Tool’ from the liquify toolbar at the left of the liquify window. You can also select this tool with a shortcut by pressing the ‘W’ key on your keyboard.Ā 

Now increase the tool size as you can push all the edges of the Eclipses at once. Then click on the top of the document and pull downward. The edges which are increased by applying the pucker tool will pull down. Similarly, push the bottom edges toward the center of the pumpkin.Ā 

Liquefying Pumpkin shape

Pumpkin Shape

Use the ‘Forward warp tool’Ā  and give a shape to your merged object like a pumpkin. Use the tools we used and the directions given in the picture. Use the tools as you wish. Use the directions just for the ideas, and make a Pumpkin. The result of using the liquify tool will be similar to the above picture.

Step 13: Drew the Stem of the Pumpkin

Setting Pen Tool

Now draw the stem of the pumpkin. We are going to use the pen tool to draw the Stem of the pumpkin. Select the ‘Pen Tool’ from the toolbar. You can also select the ‘Pen Tool’ by pressing the ‘P’ key on your keyboard.

Drawing Stem with Pen ToolĀ 

After selecting the pen tool set the ‘Tool Mode’ from the option bar above the active window. Set the Tool Mode to ‘Shape’ by default ‘Path’ is selected. Then set the stoke color to light green. we set the Stoke color as # 3d941a. Fill will get no color and the width will the 3 px.

Now draw the front part of the stem as shown in the direction. you can make nice curves by using the ‘Pen Tool. After drawing the front side of the stem click on the fill option on the option bar and fill it with a deep green color we use #1f6b0e to fill.

Drawing Pumpkin Stem

Pumpkin Stem

Now draw other parts of the stem as shown in the picture of the pumpkin drawing. Don’t forget to rearrange the shapes layer older to newer. Or arrange the shape for the similar result of number 5. Draw every part individually and fill it with color. First, set No color at the fill option. Then draw and then fill. It will help to bring the best result.Ā 

Pumpkin Drawing

Step 14: Merge and SaveĀ 

If you are satisfied with the result then merge all the layers of the pumpkin drawing. To merge all layers press ‘Ctrl + Shift + E’. It will merge all layers. If you want to save the document in a PSD format then skip Merging just save your photo.

Save photo from Menu bar

Save As Dialog box

Menubar > File > Save as > SaveĀ 

Shortcut: Ctrl + Shift + S > SaveĀ 

Save the photos from the menubar. Click on the ‘File option on the menubar and select ‘Save As’. A new window will appear. You can also over the ā€˜Save Asā€™ window by pressing ā€˜Ctrl + Shift + Sā€™. On the save as window set the name and the photo format. Then press the Save button at the bottom. Your photo will be saved.Ā 

Read More Articles-

Final Thoughts | Pumpkin Drawing

Don’t try to get the same result as you saw in the picture with the parameters we use. Because the parameter and their result will depend on your graphics processor and the resolution of your display. So try to bring a similar or better result with a similar parameter.

We suggest you focus on the method we want to discuss how to draw pumpkins in Photoshop. And don’t worry if not get the same visible result with the same parameters. just modify and make better results.Ā 

This tutorial is for the beginner in Photoshop. Beginners can practice our tutorial to develop a good skill in Photoshop. We want to make this tutorial easier so that beginners can understand it easily. Beginners can also practice our methods and draw similar shapes. Remember imagination is a powerful weapon to develop skills in Photoshop. Download Summary

Show your love

How to Use Liquify Photoshop Filter Tool | Ultimate Guide

How to Use Liquify Photoshop, GraphicsCycle

We see ā€˜Photoshop liquifyā€™ filtered photos on the internet, in newspapers, social media, and various social media.Ā  The Liquify Photoshop filter is one of the most powerful tools of Photoshop. The Liquify Photoshop filter is used for very special editing of photos. A liquid Photoshop filter is used to change the shape of a subject in a photo.Ā 

You will find a very detailed tutorial on the Adobe Photoshop official website. Besides, if you are interested in how to use the Photoshop liquidity tool this article is for you. In this article, we will discuss how to use Photoshop liquify. And also you can learn how to use Liquify in Photoshop.

To make this tutorial easier to learn, we will learn how to use the liquify tool in Photoshop with suitable examples and demonstrations.Ā 

Liquify Photoshop Image, GraphicsCycle

Liquify Photoshop Tool


Sl Tool Image Tool Name Shortcut Use
01 Forward Warp Tool Forward Warp Tool W Push or Pull pixels Forward to the direction you brag your mouse.
02 Reconstruct Tool, Liquify Photoshop, Graphicscycle Reconstruct Tool R ReConstruct the area currently edited.
03 Liquify Filter Smooth Tool, Liquify Photoshop, Photoshop Filter Smooth Tool E Makes Smooth the Edges of the targeted object, which is currently edited.
04 Twirl Clockwise Tool Twirl Clockwise tool C Twirl the pixels of the area where clicked Clockwise and Clockwise too.
05 Pucker Tool, Liquify Filter, GraphicsCycle Pucker Tool S Pull the pixels toward the center point of the brush.
06 Liquify Photoshop, Liquify Filter Bloat Tool Bloat Tool B Push the pixels toward the outside of the brush area or expen.
07 Push Left Tool Push Left Tool O When click and drag down push the pixels left. When drag moues Upward pull the pixels right.
08 Freeze Mask Tool Freeze Mask Tool F Freeze the area by marking. The frozen area will not be editable. no brush can be used in frozen areas.
09 Thaw Mask tool Thaw Mask tool D Thaw the frozen area to edit.
10 Face Tool, Liquify Photoshop Face Tool A Edit the faceā€™s expression shapes and sizes.
11 Liquify Filter Hand Tool Hand Tool H Hold the image and move to focus on the target area.
12 Zoom Tool in Photoshop, How to use liquify photoshop Zoom Tool Z To Zoom in/out photos for a better preview of the photos.


What is a liquified filter?

The liquify Photoshop filter is a powerful feather of Photoshop. With the liquify filter you can push, pull, rotate, reflect, pucker, and bloat any area of an image. The distortions can be subtle or drastic which you will create.

The liquified Photoshop filter in Photoshop is very useful for the artistic effects on the background or the creation of artistic design. A bust use of Photoshop liquify filter brush is demonstrated in the photos above.

Liquify Filter

Liquify Filter Image, Liquify in Photoshop

You will find the ‘Liquify Photoshop filter’ in the Main menu, go to ‘Filter’ and click on ‘Liquify’ A new window will open with the ‘Liquify brushes’ and options. The liquify Photoshop filter can be applied to 8 bits per channel or 16 bits per channel images.Ā 

Magnify and Navigate in the preview image

The new window will open with a preview photo panel, which will show a live demonstration of your editing. After opening the preview window, the first thing you should do is magnify your images and navigate. Adjusting the photo subject to fit the preview window will help you to perfectly apply the Photoshop liquify filter.Ā 

Magnify and Navigate Preview Image, Liquify Photoshop

Magnify and Navigating image

Magnify

To magnify select the zoom tool in the Liquify dialog box, and click on the preview image to zoom in. You can also hold down ‘Alt’ (Windows) or Option (Mac), and click or drag in the preview image to zoom In/Out. Also, you can specify a magnification level in the Zoom text box at the bottom of the dialog box.

Navigate

To navigate the photo select the hand tool in the Liquify dialog box, and drag in the preview image. Alternatively, hold down the spacebar with any tool selected, and drag in the preview image.

Liquify Photoshop Distortion Tools

Liquify Photoshop Distortion Tools

‘Adobe Photoshop’ adds various tools and brushes to the toolbar of the liquify filter in Photoshop. You can perfectly edit your photo with these brushes. For giving a perfect look to the subject face, or making an artistic design Photoshop liquify filter’ brushes are used randomly.

Forward Wrap tool (W)

Forward Warp Tool Example, Forward Warp Tool

This Brush of liquify filter in Photoshop is used to push pixels forward. Select the Forward warp tool from the Tool dialog box at the left side of the Liquify Photoshop filter window.

To destroy the texture of the pixels in a photo or pull, push, and drag the pixels of the photos. You can select this brush from the toolbar or also can select this brush by hotkey. Simply press the ‘W’ key on your keyboard and drag it to the desired areas.

Reconstruct Tool (R)

Reconstruction Tool Example, Liquify Photoshop

The Reconstruct Tool of ‘liquify photoshop filter’ is used to reverse the distortion that has already been added to the photos. Select the reconstruct tool hold down the mouse button and drag to reconstruct the pixels that were distorted. You can also select the Reconstruct tool by pressing the ‘R’ key on your keyboard.

Smooth Tool (E)

Smooth Tool Example

The ‘liquify photoshop filter’s Smooth tool’ is for Soomth the texture of the pixels. You can use this ‘liquify Photoshop filter in Photoshop to smooth tool to remove any rough area like blemishes on the skin. Sometimes this tool does to give good results for the original photos.

You will find an effective result when you use this tool in an area where you used another brush or filter before the use of this tool.Ā 

Twirl Clockwise Tool (C)

Twirl Clockwise Tool Example

At the beginning of the article photos of roses are shown are distorted by using the Twirl clockwise tools. You should see various like these photos on the internet. These edits are done by using this ‘Lisuify filter’ brush. You also can make various artistic designs by using this liquified filter brush.

To twirl pixels clockwise adjust the size of the Twirl Clockwise tool brush then click and hold or drag. You can also twirl pixels counterclockwise by holding down ‘Alt’ (window) or ‘Option’ (Mac OS) by holding down the mouse button or dragging. The hotkey for selecting the ā€˜Twirl Clockwise Toolā€™ is ā€˜Cā€™ on the keyboard.Ā 

Pucker Tool (S)

Pucker Tool, How to Use Liquify in Photoshop

The ‘Pucker Tool’ is one of the most used tools of the liquify Photoshop filter in Photoshop. You can change one’s fat body to a slim one. The Liquify Filter Pucker Tool moves pixels toward the center of the brush area as you hold down the mouse button or drag. The hotkey for the Pucker Tool is ‘S’ on your keyboard.

Bloat Tool (B)

Bloat Tool Example

If you know the ‘liquify photoshop filter Pucker Tool’ Then this Bloat Tool will be easier to use for you. The ‘Bloat Tool’ works just like the opposite of the ‘Pucker Tool’.

The ‘liquify Photoshop filter Bloat Tool’ moves pixels away from the center of the brush area when you hold down the mouse button or drag. You can also select the ‘Bloat Tool’ by pressing the ‘B’ key on your keyboard.

Push Left Tool (O)

Push Left Tool Example

The use of this Liquify filter brush is implied by its name. The ‘Push Left Tool’ moves pixels to the left when you hold down the mouse button and drag the tool straight up. You can also use this tool to move the pixels to the right by dragging the tool straight down.

You can also drag clockwise or counterclockwise to increase or decrease an object’s size. The Hotkey of the ‘liquify photoshop filter Push Left Tool’ is the ‘O’ key on your keyboard.

Hand Tool (H)

Hand Tool Example

As we discussed earlier the ‘Hand Tool’ is used to adjust the position of photos on the review panel. You can hold the image and move in any direction to view the desired area of the photos in the preview section. Select this tool from the ‘liquify photoshop filter’ window toolbar.

You can also use the ‘liquify photoshop filter Hand Tool’ at any time no matter which Tool or brush is selected at the ‘liquify photoshop filter’ window toolbar. To use the ‘liquify photoshop filter hand tool’ at any time press and hold the spacebar on your keyboard. Or you can select the ‘Hand Tool’ by pressing the ‘H’ key on your keyboard.

Zoom Tool (Z)

Zoom Tool Example

The Zoom Tool is used to zoom in and out on a photo. The ‘Zoom Tool’ is positioned at the bottom of the ‘liquify Photoshop filter toolbar’. You can also select the ‘Zoom Tool’ by pressing the ‘Z’ key on your keyboard.

To zoom in on the preview photo on the ‘Liquify Filter’ Window select the zoom tool and click on the area you want to zoom in.

And to zoom out press and hold the ‘Alt’ key on the keyboard and click on the photo. You can also Zoom in and out by dragging the mouse while upper and down when pressed and holding the ‘Alt’ key.

Using Liquify Freeze Mask Tool And Thaw Mask Tool

You can freeze areas that don’t want to modify with the ‘liquify photoshop filter Freese mask Tool’. And the ‘thaw frozen tool’ thaw frozen area to make them editable again. As the ‘Pucker Tool’ and ‘Bloat Tool’, the ‘Freese mask Tool’ and the ‘Thaw mask Tool’ are opposite of each other.

Freeze Tool Before After, Liquify Photoshop

Freezing Areas

By using the liquify Photoshop filter’s ‘Freese mask Tool’ you can freeze a desired area. the frozen area will remain unchanged through the editing. you can select the ‘Freeze Mask Tool’ from the Liquify Photoshop filter window toolbar.

You can also select this tool by pressing the ‘F’ key on your keyboard. When you drag your tool on the photo the areas will marked with a color. Don’t worry if you use this ‘Liquify Filter Tool’ for the first time. That color is just a mark for the selecting areas. You can also freeze areas by using an existing mask, selection, or transparency.

Select the Freeze Mask Tool and drag over the area you want to protect. Shift -click to freeze in a straight line between the current point and the previously clicked point.

If you apply the ‘liquify photoshop filter to a layer with a selection of any of the Five icons’ pop-up menu in the mask Options area of the dialog box. These determine how areas of the preview image are frozen or masked.

Different Mask Options on the Mask Options Panel

Different Mask Options on the Mask Options Panel

‘All Mask’ Option

You can cover all areas of the photo by clicking the ‘All Mask’ option in the Mask options area of the dialog box.

‘Invert All’ Option

You can inversely select the area from the previous selection. If you want to edit on a desired area and none of the points of the photo. Then mark your desired area for the photos with the ‘Freeze Mask Tool’ and click on the Invert All option on the right side of the ‘liquify photoshop filter’ window.

The ‘None’ option

The None option will deselect your masks or selected areas.

  • Showing or hiding frozen areas: Select or deselect ‘Show Mask‘ in the View Options area of the dialog box.
  • Changing the color of frozen areas: Choose a color from the Mask Color pop-up menu in the View Options area of the dialog box.

Liquify Photoshop, Graphics Cycle

Mask Options with the Liquify filter

When you already have a selection, transparency, or mask in an image, the information is retained in the ‘liquify photoshop filter’ dialog box. With the Existing selection, transparency, or mask in a photo you can select one of the following mask options:

  • Replace Selection: Shows the selection, mask, or transparency in the Original image.
  • Add To Selection: Shows the mask in the original image, so that you can add to the selection using the freeze mask tool. Adds selected pixels in the channel to the current frozen area.
  • Subtract From Selection: Subtracts pixels in the channel from the current frozen area.
  • Intersect With Selection: Uses only pixels that are selected and currently frozen.
  • Invert selection: Uses selected pixels to invert the current frozen area.

Thaw Areas

Thaw tool Example

To thaw frozen areas of the preview image on the ‘liquify Photoshop filter’ window use any of the following,

  • Select the ‘Thaw mask Tool’ and drag over the area. Shift-Click to thaw in a straight line between the current point and the previously clicked point.
  • To Thaw all Frozen areas, Click the none Button in the Mask Options area of the ‘liquify Photoshop filter’ window.
  • To invert the frozen-thawed areas, click ‘Invert All’ in the Mask Options area of the dialog box at the ‘liquify Photoshop filter’ window.Ā 

Liquify Face With The Face Tool

Face Tool Example Before After

The ‘liquify Photoshop filter Face Tool’ was introduced in the ‘Adobe Photoshop’ CC2015.5 release. The Liquify Photoshop filter features advanced face-aware functionality that automatically identifies faces.

‘Adobe Photoshop’ makes its Face Tool very advanced and user-friendly. It can recognize Eyes, noses, mouths, and other facial features. Which makes it easy for you to adjust them.

The liquify Photoshop filter’s ‘Face Tool’ is great for retouching portrait photos. You can use Face-Aware Liquify as a smart filter for non-destructive editing

Adjust Facial Features using on-screen handles

Adjust Facial Features using on-screen handles, Facial Features, Liquify Photoshop

Step-01

In Photoshop, Open an image with one or more faces. Select Filter > Liquify. Photoshop opens the liquify Photoshop filter window.

Step-02

In the Liquify Photoshop filter window Tool panel, select ‘Face Tool‘ Or press ‘A’ on the keyboard.

The liquify Photoshop filter’s AI will automatically identify the faces. The identified faces are also listed in the ‘Select Faces‘ pop-up menu in the Face Tool properties panel.

You can select a different face by clicking it on the canvas or selecting it from the pop-up menu on the Liquify Photoshop filter window.

Face Tool Using Image, GraphicsCycle

Step-03

Adjust the sliders in the ā€˜Face_Aqare Liquifyā€™ area to make appropriate changes to the facial features. Weh youā€™re satisfied with the changes. Click OK.Ā 

Applying different ā€˜Face toolā€™ Settings in a photo

Eye Settings

Eye Setting Before, Liquify Photoshop

Eye Setting Using Liquify Photoshop, Graphicscycle

The ā€˜Adove Photoshopā€™ will provide individual slider options for each eye. You can edit eyes one by one on the ā€˜Eyesā€™ editing plane on the new Liquid y Photoshop window. Move the slider options for the left and right eyes to apply independent/asymmetrical effects to the eyes.

The preview panel will show the editing result live. If you are satisfied with the result then you can edit other parts you want to edit. You can also edit both eyes together. Click the link icon present in the middle of the sliders. This option will help to apply symmetrical effects to the eyes.

Nose Settings

Nose Setting - Before

Nose Setting - After

Edit nose height and width with the Liquify Photoshop tool. You can edit the nose on the live preview panel or use sliders to increase or decrease the nose height and width.Ā 

Mouth Settings

Mouse Setting

Mouth Setting, How to Use Liquify Photoshop

Now you can make smiling someone even in the photos too. The Adobe Photoshop AI works stunningly on the Liquify Photoshop Face tools. Making a sad face into a happy face is easy with Photoshop Liquify tools.

You can also change the size of the lips and mouth in a liquified Photoshop window. You can edit photos on the photo preview panel or at the liquify face tool editing panel by sliding left or right different sliders.Ā 

Face Shape Settings

Change the face shape at the ‘Face Shape‘ panel in the Liquify Photoshop window. You can change Chin height, Jawline, face width, and Forehead. Use the slider on the Face Shape panel on the left side of the liquify photoshop window. You can also edit at the previews photo panel.Ā 

PowerPoint Presentation of Liquify Photoshop Tool Overview

Download Liquify Photoshop PPT

Useful Considerations

  • Face-Tool of the liquify Functionality works best on facial features facing the camera. For best results, rotate any titled faces before applying the settings.
  • The Reconstruct and Restore All options don’t apply to Face-Aware Liquify changes. Use the Reset and All options in the Face-Aware Liquify area to reset the changes Applied to a selected face and all faces, respectively.

In Summary

Every tool on the Photoshop Liquify toolbar is unique and has its use to edit your photos. It will be better to know the use of individual tools and brushes separately. Don’t try to learn which part of the image edit with which tool. Every photo has a different texture of pixels. Selecting a perfect tool for editing is very important.

So we think our article will help you to learn the liquify tools and their uses. If you are reading this article to learn how to use liquify tools in Photoshop you should practice too. if you read many articles about a topic you can know very details but if you want to develop skills in a feature you have to practice.

Read Our Latest Articles

FAQ

Where do I find the liquify Tool in Photoshop?

The Liquify tools place the main menu on the top of the screen. Click on ‘Filter’ on the main menu, a drop-down menu will appear. From the drop-down menu select Lquify. You can also use a shortcut on your keyboard. Press ‘Crt’ (win) or Command (Mac) + Shift + X on your keyboard together.

What does the Liquify Tool do?

The Liquify Tool is a transform tool that allows you to modify pixel layers by pushing and pulling the layers in the direction.

With the liquify Photoshop filter you can push, pull, rotate, reflect, pucker, and bloat any area of a photo or an individual part of the photo. You can liquify only one layer at a time.

You also can change face size expression with the liquify tools.

How can I blend in Photoshop?

Click The Smudge tool for the Toolbar. If you can’t find it, click and hold the Blur tool to show its related tools. You can also select this tool from the menu at the top of the screen.

Click on Windows > Brushes and Search for Smudge Tool on the tool panel. Click Smalpe All Layers in the option bar to smudge using colors from all visible layers.

Click Finger Painting in the Options bar to smudge using the foreground color at the beginning of each stroke. Click and drag over the area where you want to smudge the pixels.

How to flip in Photoshop?

Sele the layer you want to flip. Press ‘Ctrl’ + ‘T’ (win), or ‘Command’ + ‘T’ (Mac). Then right-click on the activated area and choose Flip Horizontally or Flip Vertically.Ā 

Show your love

Canon EOS R8 vs. Canon EOS R5 Specs | Which is the Best

Canon EOS R8 vs. Canon EOS R5 Specs | Best Canon EOS 2024, Canon EOS R8 VS Canon EOS R5 Specs, GraphicsCycle

Canon is a leading company in the photography industry. They are improving their products with the latest technology day by day. Today, we will analyze two different products, the Canon EOS R8 VS Canon EOS R5 Specs and everything.

The EOS Canon R8 is an advanced camera that comes on the market in February 2023. The EOS Canon R5 Pro Mirrorless class was introduced back in July 2020. This 3-year age gap increases the curiosity that still we can compare Canon EOS R8 VS Canon EOS R5 Specs and price.

Both these cameras are part of Canon’s R series. The EOS R5 is more costly than the R8. R5 can pack more pixels than R8. But Canon EOS R8 comes with special autofocus features.

So, the big question is: which one should you go for? We’ll break down the details, weigh the pros and cons, and help you decide which camera best fits you.

Canon EOS R8 VS Canon EOS R5 Specs

We will discover the differences and similarities between the Canon EOS R8 vs Canon EOS R5 specs. We’ll look at things like weight, thickness, sensors, screens, and more.Ā 

Body, Weight & Thickness Comparison | Canon EOS R8 and Canon EOS R5

EOS R8 is smaller, measuring 5.22 inches (13.26 cm) wide, 3.39 inches (8.61 cm) high, and 2.76 inches (7.01 cm) deep, weighing 1.0 lb (ca. 454 g) with a battery. EOS R5 is a bit larger at 5.43 inches (13.79 cm) wide, 3.84 inches (9.75 cm) high, 3.46 inches (8.79 cm) deep, and weighs 1.62 pounds (0.73 kg).

Both have a 1/4ā€-20 tripod mount for stability. Besides the sizes of those cameras, we will discuss more Canon EOS R8 VS Canon EOS R5 Specs in the next section.

Physical Specifications (Body Dimension) of Canon EOS R8

  • Width: 5.22 inches (13.26 cm)
  • Height: 3.39 inches (8.61 cm)
  • Depth: 2.76 inches (7.01 cm)
  • Weight: With Battery and Recording Media: 1.0 lb (0.45 kg)
  • Body Only: 0.9 lb (408.23 g)

Physical Specifications (Body Dimension) of Canon EOS R5

  • Width: 5.43 inches (13.79 cm)Ā 
  • Height: 3.84 inches (9.75 cm)Ā 
  • Depth: 3.46 inches (8.79 cm)
  • Weight: 1.62 pounds (0.73 kilogram)
  • 1/4ā€-20 tripod mount for stability

Canon EOS R8 vs EOS R5 |Ā  Screen Comparison

When we talk about comparing the Canon EOS R8 VS Canon EOS R5 Specs or specific about the screen, the R5 is better than the R8. Both cameras have a fully articulated touchscreen. The screen or display of R5 is a bit bigger than R8.

The R5 has more screen dots, around 2.10 million. It also comes with special things like anti-smudge coating and manual brightness adjustment. These features make the R5 the more advanced option than the R8.

How Big is the Screen on the Canon EOS R8

  • Screen Size: 3 inches (7.62 cm)
  • Articulated LCD: Fully articulated
  • Touch Screen: Yes
  • Live View: Yes
  • Screen Dots: 1,620,000

How Big is the Screen on the Canon R5

  • Screen Size: 3.15 inches (8.01 cm)
  • Articulated LCD: Various-angle touchscreen
  • Screen Dots: Approx. 2.10 million dots
  • Touch Screen: Yes
  • Live View: Supported
  • Coating: Anti-smudge
  • Brightness Adjustment: Manual (1-7 Level)

Viewfinder Comparison | Canon EOS R8 and Canon EOS R5

Viewfinder Comparison, Canon EOS R8 vs. Canon EOS R5 Specs, GraphicsCycle

As we can see below, The R5 has a higher resolution of 5,760,000 dots, a larger size of 0.5ā€ view, and a greater magnification of 0.76x zoom. On the other hand, The Canon EOS R8’s regulation of 2,360,000 dots, a smaller size at 0.39ā€ view, and a magnification of approximately 0.70x zoom. So the Canon EOS R5 has a better viewfinder compared to the EOS R8.Ā 

Canon EOS R8 Viewfinder

  • Resolution: 2,360,000 Dot
  • Magnification: Approx 0.70x
  • Eye Point: 22 mm
  • Type: Built-In Electronic (OLED)
  • Coverage: 100%
  • Diopter Adjustment: -4 to +1
  • Size: 0.39ā€

Canon EOS R5 Viewfinder

  • Resolution: 5,760,000 Dot
  • Magnification: Approx. 0.76x
  • Eye Point: 23 mm
  • Type: Built-In Electronic (OLED)
  • Coverage: 100%
  • Diopter Adjustment: -4 to +2
  • Size: 0.5ā€

Canon EOS R8 and Canon EOS R5 Specs | Sensor Comparison

The Canon EOS R8 vs Canon EOS R5 Specs sensor comparison reveals which is best about the sensor. The Canon EOS R8 has a 24.0MP Full-frame CMOS sensor, and the R5 has 45.0MP. However, you have to understand that the sensor regulation is not the only thing for high-quality photos.

Optical components, low pass filter, and pixel size, also contribute to capturing the best photos. The R8’s 86% larger pixel area can enhance light-gathering ability. Here are the full specs for those sensors.

Canon EOS R5 Sensor Specs

  • Sensor: 45.0MP Full-frame CMOS
  • Processor: Digic X
  • Advantage: 21MP more than EOS R8, enabling larger prints and flexible cropping.
  • Considerations: Max sensor resolution isn’t the sole determinant of image quality.
  • Pixel Area: Smaller than EOS R8, potentially leading to higher noise levels in low light/high ISO conditions.

Canon EOS R8 Sensor Specs

  • Sensor: 24.0MP Full-frame CMOS
  • Processor: Digic X
  • Pixel Area: 86% larger than EOS R5. Suggesting the potential for better low-light performance with reduced noise.
  • Resolution: Enough for various shooting scenarios, allowing for quality prints and modest cropping.

Canon EOS R8 vs. Canon EOS R5 Specs

Download Canon EOS R8 vs. Canon EOS R5 Specs

Canon EOS R8 vs Canon EOS R5 | Battery life

Canon R8 and R5 cameras have different battery specifications. The Canon EOS R8 has a 1 x LP-E17 Rechargeable Lithium Polymer battery. This battery can capture up to 220 picture shots or 65 minutes of video recordings. This battery is removable or replaceable for extended use.

The Canon EOS R5 has a 1 x LP-E6NH Rechargeable Lithium-Ion battery. This battery can deliver 320ā€“490 Shots per charge. Same as the R8, the Canon EOS R5 also has a replaceable and removable battery.Ā 

Canon EOS R8 and Canon EOS R5 | Lens Comparison

If you are interested in purchasing a Canon camera, it is crucial to explore Canon EOS R8 VS Canon EOS R5 Specs. Additionally, you have to check the Comparison of Lenses for Canon EOS R8 and Canon EOS R5. Both cameras have the RF lens mount, which offers a pool of 43 native lenses that cover full-frame sensors.

The Canon R5 has a sensor-based stabilization system, that provides stability for all lenses attached. Correcting up to 8.0 stops of vibration, and meeting CIPA standards. The Canon R8 lacks these features, So you have to purchase a lens with optical stabilization.

The 5 Best Lenses for the Canon EOS R8 are-

  1. Canon RF 24-50 mm f/4.5-6.3 IS STM
  2. Canon RF 24-105 mm f/4-7.1 IS STM
  3. Canon RF 15-30 mm f/4.5-6.3 IS STM
  4. Canon RF 100-400 mm f/5.6-8 IS USM
  5. Canon RF 600 mm f/11 IS STM

The 5 Best Lenses for the Canon EOS R5 are-

  1. Canon RF 15-35 mm f/2.8L IS USM
  2. Canon RF 24-70 mm f/2.8L IS USM
  3. Canon RF 70-200 mm f/2.8L IS USM
  4. Canon RF 100 mm f/2.8 Macro IS USM
  5. Canon RF 85 mm f/1.2L USM

Ā Canon EOS R8 VS Canon EOS R5 Specs | Features Comparison

In this feature comparison between two cameras, we’ll break down every single feature. This is an important part of this post about ‘Canon EOS R8 VS Canon EOS R5 Specs’.

We have already discussed basic information, now we will inform advanced features. We want to help videographers and photographers to pick the best one for their profession.Ā 

Canon EOS R8 Camera Specifications

  • Announcement Date: 2023-02-08
  • Image Sensor: Full-frame CMOS Sensor, 24MP Resolution
  • ISO Range: ISO 100ā€“102400 (Expands to 50ā€“204800)
  • Lens Mount: Canon RF Mount
  • Display: 3.00ā€ Fully Articulated Screen
  • Viewfinder: Electronic Viewfinder, 2360k dots
  • Continuous Shooting: 6.0fps (40.0fps Electronic)
  • Video Capabilities: 4K (UHD) Video Resolution: 3840 Ɨ 2160
  • High-Speed Video: 180fps
  • Connectivity: Built-in Wireless
  • Min Shutter Speed: 60p to 24p drops to 1/4 s.
  • Exposure Modes: Shutter Priority/Aperture Priority/Manual Exposure Mode
  • Additional Features: Exposure Compensation/Custom White Balance/Image Stabilization
  • Flash: No Built-In Flash. External Flash Supported.
  • Memory Card Slots: 2 Card Slots (Slot 1: SD (UHS-II), CFExpress Type B, Slot 2: N/A, SD (UHS-II)))
  • Voice Memo: No
  • Headphone Jack: Yes
  • Microphone Jack: Yes
  • Bluetooth: Yes
  • Wi-Fi: Yes
  • USB Type: Type C 3.2 Gen 2
  • Weather Sealing: Yes

Canon EOS R5 Camera Specifications

  • Announcement Date: 2020-07-09
  • Sensor: 45MP, Full-frame CMOS Sensor
  • ISO Range: 100ā€“51200 (Expands to 50ā€“102400)
  • Lens Mount: Canon RF Mount
  • Image Stabilization: Sensor-shift Image Stabilization/In-built Image Stabilization (Sensor)
  • Display: 3.20ā€ Fully Articulated Screen/Touchscreen
  • Continuous Shooting: 12.0fps (20.0fps Electronic)
  • Video Capabilities: 8K Video Resolution: 8192 Ɨ 4320, 120fps High-Speed Video
  • Max Video Bit rate: 2600mbps
  • Connectivity: Built-in Wireless, Bluetooth, WiFi
  • USB Type: Type C 3.1
  • Weather-sealed Body: Yes
  • Anti-dust Shutter: Mechanism
  • Number of Focus Points: 5940
  • Max Mech. Shutter: 1/8000s
  • Color Depth: 25.3
  • Max Video Resolution: 8192 x 4320
  • Memory Card Slots: 2 Card Slots (Slot 1: CFExpress Type B, Slot 2: SD (UHS-II))
  • LCD Screen: Rear LCD Size: 3.2ā€
  • LCD Resolution: 2.1 million dots/Fully Articulating LCD
  • Voice Memo: Yes
  • Headphone Jack: Yes
  • Microphone Jack: Yes
  • Flash and GPS: Built-in Flash: No
  • GPS: No

According to the Canon EOS R8 VS Canon EOS R5 Specs and features, you have to choose one of them based on your needs. The EOS R8 launched in February 2023, and the EOS R5 available since 2020. R8 has a 24MP sensor, you can capture 4K videos with this camera.

The EOS R8 lightweight camera is cheaper than the R5. The EOS R5 has a 45MP sensor with built-in image stabilization. You can capture 8K video with this camera.Ā 

Canon EOS R5 vs Canon EOS R8 Specs | Price Comparison

There is a big amount of difference between the two cameras. If you want to purchase the Canon EOS R5, you have to pay nearly $3000. On the other hand, if it is about Canon EOS R8, you can get it for only $1300 or fewer prices. When you have no problem with your budget, then you can go with the R5.

Otherwise, if you’re finding a lower range of cameras then, the R8 is best for you. R5 is too expensive a camera, and the lenses of R5 are also expensive.

As a professional photographer, you have a lot of expenses besides the camera, such as a flashlight, lens, and studio setup. Before purchasing the expensive Canon EOS R5, think overall everything.

Advantages & Disadvantages | Canon EOS R8 vs Canon EOS R5Ā 

Advantages and Disadvantages of Canon R8 Camera Over R5, GraphicsCycle

Advantages and Disadvantages of Canon R5Ā 

The Canon EOS R5 has a lot of reasons to select over the R8. It has a 45-megapixel sensor, which is 1.86X than the R8. It also, includes dual card slots, IBIS, better battery life, and a faster continuous smoothing rate.

The main weakness of Canon EOS R5 is expensive. Not only the camera, but lenses of R5 are also expensive. Canon EOS R8 VS Canon EOS R5 Specs, pros, and cons are detailed here. Now choose the best fit according to your budget and needs.

Advantages and Disadvantages of Canon R8Ā 

The EOS R8 is lightweight than the R5. The biggest benefit of deciding the R8 is saving money. If you have a limited budget, then you can easily go through the Canon EOS R8. However, it has a drawback of in-body image stabilization (IBIS).

Final Thought | Canon EOS R8 vs Canon EOS R5 Specs

Canon company makes those cameras for different types of photographers and videographers. We have covered in this blog post all about Canon EOS R8 VS Canon EOS R5 Specs, price, and features comparison. Due to the huge difference in the pricing, we have not noticed a big distance in the output results.

You will get some extra advantages on the Canon EOS R5. The benefits are a 45-megapixel resolution, in-built image stabilization, a faster mechanical shutter, dual card slots, 8K video recordings, and a high-resolution electronic viewfinder.Ā 

Budget-conscious content creators and travel vloggers encourage buying a Canon EOS R8. It comes with an extended recording time for video and an affordable price. R8 can be a cost-effective solution for you. And the Canon EOS R5 is excellent for high-resolution photo and videography.Ā 

Read Our Latest Content

FAQs | Canon EOS R8 vs Canon EOS R5 Specs Guide

Is Canon EOS R8 Worth Buying?

The decision to buy the Canon EOS R8 depends on your specific needs and budget. It offers a range of features at a more affordable price, making it a good choice for budget-conscious users.

Is the R5 A Professional Camera?

Yes, the Canon EOS R5 is considered a professional camera. Because of its high regulation, in-built image stabilization, and advanced features.Ā 

Is EOS R8 Good for Astrophotography?

The EOS R8 can be good for astrophotography for its 24.2-megapixel sensor and 4K video capabilities. But it has no in-built image stabilization, that’s why it might be not good enough for long-exposure shots.

Is Canon R5 A Cinematic Camera?

No, The EOS R5 is not a cinematic camera, but the 8K regulation and high-quality processor can be considered as a cinematic camera. Canon has another version of the R5 model for cinematography. The cinematography camera is Canon EOS R5 C.Ā 

Is Canon R8 Good At Night Photography?

Yes, Canon EOS R8 is good at night photography. But you have to use external stabilization equipment for the best results in low-light conditions.

Show your love

15 Best Travel Tripods for Photographers in 2024

15 Best Travel Tripods in 2023-min

Imagine you’re on a wild adventure, bro. Sunsets that paint the sky like a juicy mango, mountains that poke the clouds, waterfalls that roar like a rock concert. You gotta capture it, but your camera shakin’ all over the place. That’s where the best travel tripods come in.Ā 

A good quality tripod allows you to get rid of blurry messes. So, taking clear photos becomes more accessible for a photographer.Ā 

However, tripods are about more than just clear pics. They allow you to show the worldā€™s real aesthetics to the viewers. Tripod’s your buddy.Ā  You can capture dramatic low-angle shots of a mountain or a blurry sky with the help of a tripod. And when you’re miles from civilization, needin’ a group selfie to remember the epic journey?Ā 

Tripod’s your BFF, extendin’ its legs like a friendly giant. Yet you need to get the best travel tripods that suit your purpose. You are at the right place to find the best one for yourself. Here, I will introduce you to the best tripos in 2024.Ā Ā 

Things to Look Out to Choose the Best Travel TripodsĀ 

Before going to the product section, you must be clear about the type and quality of tripod you need for your travel photography.Ā 

The best travel tripods give you stability and flexibility. You can capture amazing photos even in hard conditions. But not just any tripod. Your tripod has to be sturdy, compact, and lightweight. So, you can handle whatever terrain you throw its way.

Therefore, before choosing a tripod, you should consider a few things. Here are factors based on what we have chosen as the 15 best tripods for travel photography:Ā 

  • You need a portable, lightweight tripod that can easily move anywhere.Ā 
  • Find one that can hold the weight of the camera and lens.Ā 
  • Choose a stable that does not wobble in windy or uneven conditions.
  • Choose a versatile tripod compatible with both the camera and mobile devices.
  • Ensure the tripod has adjustable legs to take photos from different heights and angles.

Therefore, consider the tripod’s weight, versatility, stability, portability, and adjustability. Letā€™s learn about the top 15 best travel tripods in 2024. These tripods comply with these factors that will help you capture beautiful tour moments.Ā 

15 Best Travel Tripods Available in 2024

A tripod is the best buddy of a travel photographer. We interviewed some of the best travel photographers in the world to make our list. They love these tripods; you will also get the solution to messy travel photos.Ā 

You can find all these products on Amazon. However, the pricing may vary depending on several things. Letā€™s jump into the main topic.Ā 

Peak Design Travel Tripod

Peak Design Travel Tripod, Best Travel Tripods

The peak design travel tripod has a #74 best-seller rank among the complete tripod units on Amazon. It will give you a level of stability in capturing photos.Ā 

Moreover, the payload capacity allows you to use a full-frame DSLR and telephoto lens setup. The ergonomic design makes it easy to handle.Ā 

Reasons to Buy

  • Suitable for mirrorless or DSLR cameras
  • 4.7-star rating out of 5
  • Dimensions of 15.35 x 3.11 x 0.83 inches and 3.43 pounds weight make it portable
  • Durable carbon fiber construction
  • A built-in smartphone clip makes it versatile
  • Smooth ball head

Reasons to Avoid

  • The Peak Design Travel Tripod is more expensive than the others.
  • The maximum load capacity is 20 lbs (9.1kg). It is a drawback for this tripod.

3-Legged Thing Leo 2.0 AirHead Pro Lever Kit

3-Legged Thing Leo 2.0 AirHead Pro Lever Kit

The 3-Legged Thing Leo 2.0 is the best travel tripod for phones. It takes away the worries of travel photographers. The carbon fiber is foldable down to just 14.8 inches. The ball heads allow quick and safe movement of your camera.

Moreover, a load capacity of 66 pounds helps you use even heavier setups.

Reasons to Buy

  • Compact and ergonomic design
  • 4.4-star rating out of 5
  • Weighs only 4.1 pounds
  • Folds down to 14.7 inches, so easy to move
  • The high-quality carbon fiber material makes it durable
  • Smooth and precise ball head
  • Can load up to 66 pounds
  • Multiple Mounting options
  • Convertible to a monopod

Reasons to Avoid

  • Expensive, though its features justify the price
  • No smartphone clip

K&F Concept Travel TripodĀ 

K&F Concept Travel TripodĀ , Travel Tripods, Best Travel Tripods

K&F Concept is one of the best travel tripods for budget-minded travelers. The aluminum body makes it lightweight and folds down to 16.5 inches. So you can easily carry this tripod.Ā  Moreover, the ball head is super smooth. You can rotate it 360 degrees, giving so much flexibility while shooting.Ā 

Reasons to Buy

  • 360 degrees super smooth ball head
    Durable aluminum body
  • Converatble to a monopod
  • Easy to set up
    Affordable price
  • 17.6 pounds max load capacity

Reasons to Avoid

  • No carbon fiber
  • Twist leg locks
  • Limited leg angle adjustment
  • No smartphone clip

Benro Mefoto Roadtrip Aluminium Tripod Black

Benro Mefoto Roadtrip Aluminium Tripod Black

The Mefoto Roadtrip is another travel-friendly tripod. You can carry this tripod easily in your backpack. But, the tripod is extendable to overĀ  5 feet. So, it gives an extensive height range to capture some fantastic photos.Ā Ā Ā Ā Ā Ā 

Moreover, you can easily remove the legs and enter the collum to convert them into a monopod. You will get a case and a dust bag. It protects your tripod while traveling.Ā 

Reasons to Buy

  • 3.59 pounds of weight makes it portable
  • The aluminum body makes it durable
  • Quick release plate
  • HyperLock leg system
  • Convertible to a monopod
  • Affordable price

Reasons to Avoid

  • Limited height
  • No smartphone clip
  • Aluminum body

JOBY GorillaPod Rig

JOBY GorillaPod Rig, Best Travel Tripods, GraphicsCycle

JOBY GorillaPod Rig is another of the best travel tripods for Photographers. It is not a typical tripod. The flexible leg of the tripod makes it perfect for the low-angle photoshoot. The rubberized grips make it durable and easy to handle even in the most brutal tracks of mountains.Ā 

Reasons to Buy

  • Ergonomic socket design with rubberized grips.
  • Ensure stability with a smooth ball head and Arca-Swiss quick plate
  • Usable for both cameras and smartphoneĀ 

Reasons to Avoid

  • Limited heights
  • Single-handed hustle

Manfrotto Befree Advanced Tripod

Manfrotto Befree Advanced Tripod, Best Travel Tripods

MeFOTO Road Trip Air Tripod is the perfect option for travel photographers. This compact tripod folds down to just 10 inches. You can carry the tripod easily in your backpack. And only 1 pound of weight. Thatā€™s why it is the best lightweight tripod for backpacking.Ā 

Reasons to Buy

  • It is a compact king
  • A mix of aluminum and carbon fiber building materials makes it super light
  • Twist-lock leg system
  • Ball head bonanza

Reasons to Avoid

  • Expensive
  • Height is only 59.9 inches
  • No carrying case
  • No built-in smartphone clip

BZE 40-Inch Extendable Tripod

BZE 40-Inch Extendable Tripod

The BZE 40-inch Extendable Tripod is best for travelers who want to take group selfies. It is a lightweight travel tripod. And the stick is extendable between 8.07 to 40 inches.Ā 

The built-in Bluetooth allows you to control the control shutter remotely. So, you can take group photos or photos of yourself.Ā 

Reasons to Buy

  • Lightweight
  • Bluetooth control
  • Up to 40 inches extendable sticks
  • Rotatable holder for phone
  • Adjustable angle
  • Durable aluminum construction
  • Multiple mounting options
  • Affordable price

Reasons to Avoid

  • Limited load capacity

Vanguard VEO 2 GO 265AB

Vanguard VEO 2 GO 265AB

Vanguard VEO 2 GO 265AB is an affordable tripod. The tripod supports 17.6 pounds and folds down to just 16.5 inches.Ā 

This tripod will give you 20Ā°, 45Ā°, and 80Ā° leg positioning. So, you can shoot more precise photos by changing the angles.Ā 

Reasons to Buy

  • Only 2.6-pound weight
  • Folding down to 15.8 inches
  • Easily carryable on a backpack
  • Aluminum alloy build material
  • Affordable

Reasons to Avoid

  • Limited height
  • Limited load capacity

Sirui AM-254 Travel Tripod

Sirui AM-254 Travel Tripod

Sirui AM-254 Travel Tripod is a professional tripod for travel photographers. This premium tripod hasĀ  4-section leg tubes. It allows you to take stable shots even in uneven terrains.Ā 

The carbon fiber marital make is durable and super light. The 17.3″ compact storage size makes it easy to carry.Ā 

Reasons to Buy

  • Only 2.25 pounds
  • Durable carbon fiber construction material
  • Smooth ball head
  • Innovative hook at the bottom
  • Multiple mounting options
  • Low price

Reasons to Avoid

  • Non-removable center column
  • Plastic locking knob
  • Limited height

Gitzo Legende Traveller Tripod Kit

Gitzo Legende Traveller Tripod Kit, Best Travel Tripods

The Gitzo Legende Traveller Tripod Kit is built of premium materials. This tripod folds down to a mere 15.8 inches, making it the king of carry-on compatibility.

Crafted from high-grade carbon fiber, it’s incredibly light (2.98 pounds) yet impressively sturdy.

Reasons to Buy

  • Unmatched compactness
  • Carbon fiber build material
  • The quick and secure twist-lock leg system
  • Precise and responsive ball head
  • The Arca-Swiss compatible head

Reasons to Avoid

  • Expensive
  • Height limitations

Utron 50-inch Camera Tripod

Utron 50-inch Camera Tripod

The Utron 50-inch Camera Tripod is a popular choice for travel photographers. The 1/4″ quick-release plate is compatible with most of the cameras. Also, it helps to move the 360 Ā°. So, you can capture better panoramic shots with this tripod.Ā 

Reasons to Buy

  • Extremely affordable
  • Lightweight
  • Durable aluminum body
  • Versatile ball head
  • 360 degreesĀ  movement
  • Multiple mounting options

Reasons to Avoid

  • Limited height
  • A bit heavier
  • Non-removable center column

Bushnell Advanced Tripod

Bushnell Advanced Tripod

Bushnell Advanced Tripod is durable. The setup is also easy. You can capture images in any situation. You will love this tripod for its versatility. Moreover, it is compatible with binoculars, scopes, and cameras.Ā 

Reasons to Buy

  • Aluminum build materialĀ 
  • Soomth and sturdy legs
  • 360 degrees rotation
  • Multiple mounting options
  • 4.5 starting ratingĀ 
  • Level indicator

Reasons to Avoid

  • Limited height
  • Single center column
  • No built-in smartphone clip

Zomei Z888C | Best Travel Tripods & Lightweight

Zomei Z888C, Best Travel Tripods

The Zomei Z888C is a popular travel tripod. Its compact size and lightweight make it perfect for travel photographers. The carbon fiber construction makes it durable.Ā 

Reasons to Buy

  • Can be folded down to 16.1 inches.
  • Only 2.3 kg weight
  • Quik leg adjustments
  • Affordable

Reasons to Avoid

  • Height limitations
  • Limited load capacity
  • No carrying caseĀ 
  • Center column wobble

Gosky Tripod -Travel Portable Travel Tripod

Gosky Tripod -Travel Portable Tripod

The Gosky Tripod is a budget option for travel photography. It has promising portability and versatility. The tripod is only 1.43 pounds. You’ll barely feel it on your journey. The aluminum build keeps the price tag low. Thus it becomes affordable for every travel photographer.

Reasons to Buy

  • Pocket-sized powerhouse
  • Affordability
  • Easy leg adjustments
  • Smooth ball head movementĀ 

Reasons to Avoid

  • XHeight limitations
  • XLimited load capacity
  • XSlight wobbliness reported

The SLIK Sprint PRO III Travel Tripod | Best Travel Tripods

The SLIK Sprint PRO III Travel Tripod


The SLIK Sprint PRO III Travel Tripod is also the best travel tripod among travel photographers. If you value lightweight portability, this tripod is the best option for you. You will get stable shots even in uneven situations.

Reasons to Buy

  • 2.4 pounds weight
  • Durable aluminum construction
  • 4-section legs
  • Easy to use
  • 360 degrees movement
  • Multiple mounting options
  • Low price

Reasons to Avoid

  • Limited height
  • No carbon fiber
  • Non-removable center column
  • Plastic locking knob

Final Thoughts | 15 Best Travel Tripods For Photographers

A tripod is an essential piece of equipment for travel photographers. And, most of the time they fail to choose the best product. The abovementioned tripods are the best in the market right now.Ā 

Buy any of these 15 best travel tripods and capture amazing photos.Ā 

Check Our Latest Articles

FAQ | Best Travel Tripods

How Do I Choose the Best Travel Tripods?

You have to think about the weight, durability, height, versatility, and price of the tripod to find the best one. These 15 best travel tripods are the best for travel photography at this moment.Ā 

What are the Best Tripod Angles?

There are different angled tripods available in the market. However, the eye-level angle is the most common.Ā 

Is a 60-inch Tripod Good?

According to the experts, the 60-inch tripod is the best for travel photography. You can surely get a 60-inch tripod for your photography.Ā 

Show your love