Flashgun Zoom is a great feature for a camera flash. This feature adjusts the zoom level of your camera lens. When you zoom out or in to capture a photo, the Flash Zoom feature helps to adjust the lighting. So, the photo can get the exact amount of light it needs. The distance of your subject does not matter when you are using the Flash Zoom feature.
Most professional photographers use this awesome tool to take attractive pictures. Clients are also happy to get a touch of magic in their pictures.
In this blog post, we will discuss all of Flashgun Zoom’s uses and benefits. This is not just a flash; it can take your profession to the next level. Using this feature will benefit you by working hand-in-hand with the lens. This feature is best used to vanquish shadows and make small details pop out.
How Does a Flash Gun Work in Photoshoots
In the world of photography, a Flash Gun is a smart helper for a professional photographer. When you press the button on the camera to capture a photo, it makes a burst of light. This automatic Flash Gun calculates the distance between the subject and the camera.
Additionally, it figures out the distance between your ceiling and the subject when you are doing indoor photography. That’s why this flash gun can provide the perfect lighting for the subject.
The Flash Gun can also find out the perfect angle of the subject by using the flashgun zoom effect. So you don’t need to worry about the right angle of the photoshoot.
Semi-Automatic Flash Gun Feature
There is also a mode called semi-automatic. In this mode, you can point the flash gun at a subject, and it stays pointed automatically. This is a handy way to capture and snap photos and portray natural photos.
Orientation Detectives
These smart flash guns can detect the photo horizontally or vertically. ‘They can tell you that your camera is a landscape or a portrait. Also, these flashes can adjust all by themselves. So you don’t need to change anything when you are taking regular shoots or portrait shoots.
Flash Photography Settings Indoors: Complete Guideline
As a professional photographer, you can take the best indoor pictures by using a flashgun zoom. But if you can’t choose the right setting for your camera, you will not get good pictures. So, this is crucial to know about the right setting of your camera.
Here are a few easy steps to pick the best setting for your indoor flash photography.
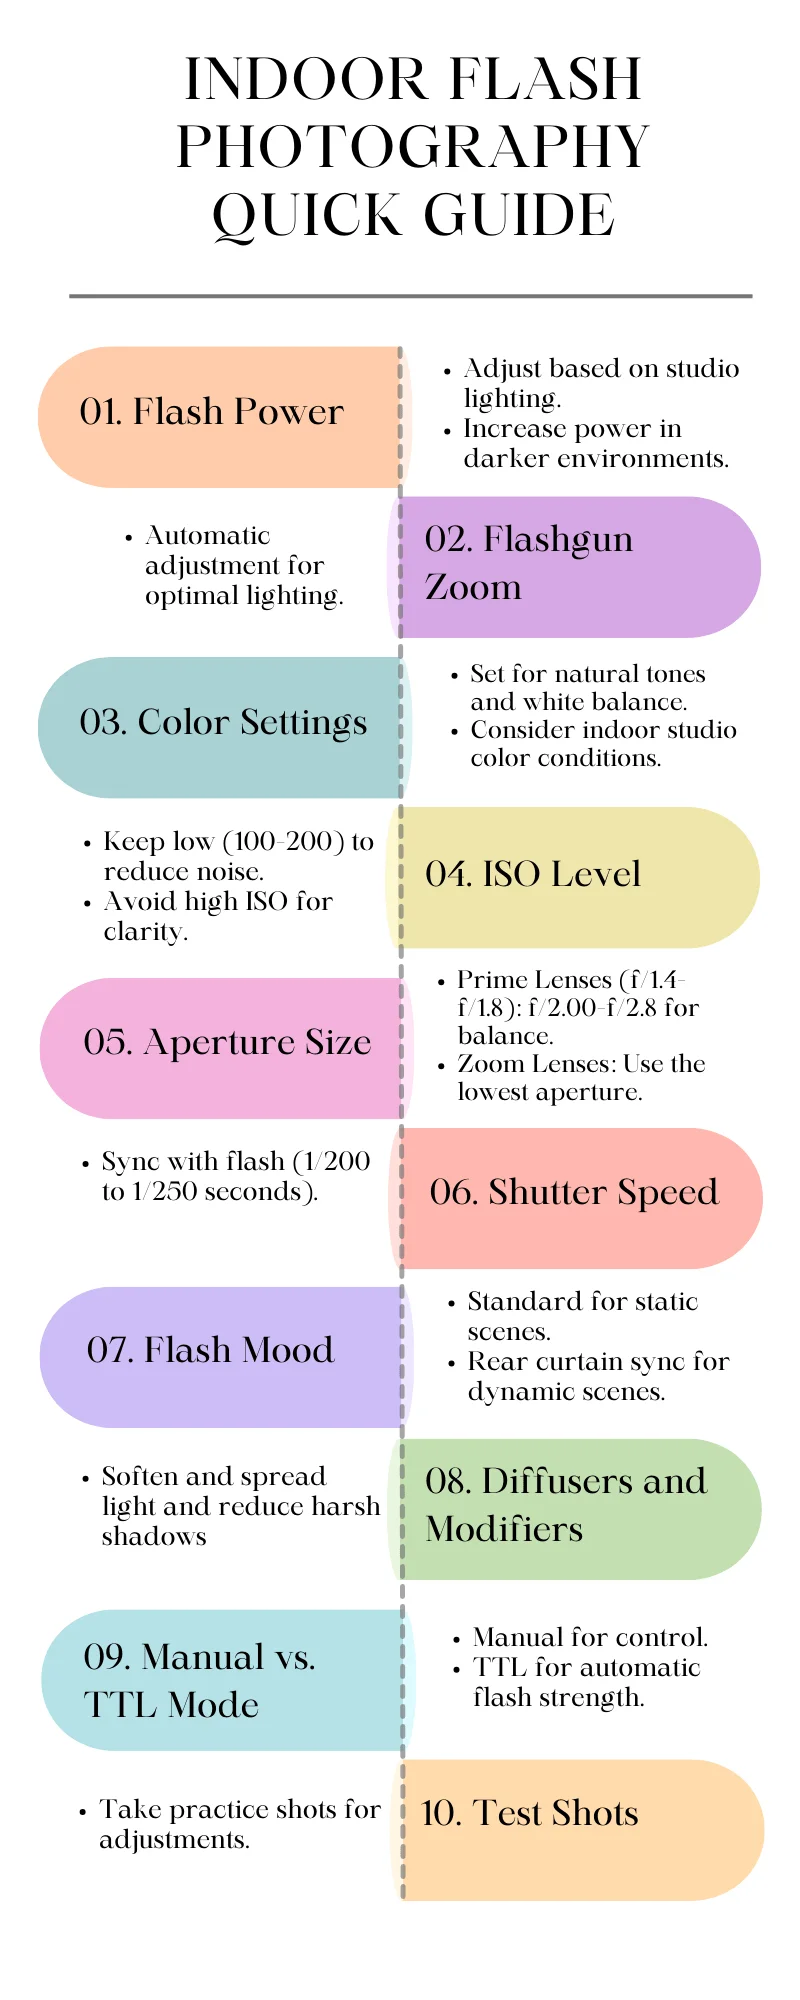
A. Flash Power Adjustment
Adjust the flash of your camera based on the lighting of your studio. If the studio is darkened, then you can increase the power of the flash. Otherwise, you need to use normal light.
Regarding the Flashgun Zoom feature, you don’t need to change anything, because the Flashgun light can provide perfect light to the subject automatically.
B. Color Settings
Set the right color and perfect white balance to make your photos natural. When you are setting color, You have to follow the color condition of your indoor studio.
C. ISO Level
Try to set the ISO level as low as possible, such as 100-200, so that the picture can show clearly. Try to avoid extra speckles on the pictures, which come with a high ISO level. But after setting the ISO-200, it still looks too dark; you can increase it a bit, but not too much.
D. Aperture Size
The aperture setting can vary depending on different things when you are doing indoor photoshoots. Two types of aperture settings here.
- For Fast Prime Lenses (f/1.4-f/1.8):
When you have a first-price lens, and your lens’s aperture is f/1.4-f/1.8. Set your camera aperture between f/2.00-f/2.8. The aperture’s right setting can help you provide balanced sharpness and background blur. - Variable-Aperture Zoom Lenses: If you are using a Zoom lens with the flashgun zoom feature, set the aperture to the lowest number available. Because the flashgun zoom can automatically focus on the subject. Don’t need an extra high aperture.
The aperture setting is the most important setting for your indoor photoshoots. So be careful about the aperture.
E. Shutter Speed
Sync the shutter speed with the camera’s flash sync speed. You can use the shutter speed of around 1/200 to 1/250 seconds. This amount of shutter speed helps avoid blurriness and makes the picture clear with the flash.
Download Indoor Flash Photography Infographics
F. Flash Mode
Flash mode depends on the scene and how complex the picture is. If you are going to click on statistical scenes or portrait pictures, then you can use the standard more. If you are in a dynamic situation to click a complex picture, you can use rear certain sync mode.
You can solve this problem with the Flashgun Zoom feature. This feature will adjust all your lighting to the subject perfectly. That’s why you need a Flashgun, as an external flashlight in your studio.
G. Diffusers and Modifiers
Add a diffuser or modifier to the flash. That will soften and spread the light of the flash. This helps to reduce the harsh shadow and make the picture more natural.
H. Manual vs. TTL Mode: Picking Your Flash Style
When you’re choosing how your camera’s flash works, think about what you like. If you want total control, go for manual mode. You get to decide how bright or soft the flash is. But if you want the camera to help out, select TTL mode. It figures out the right flash strength for you.
I. Test Shots: Making Sure It Looks Great
Before you start taking all your pictures, take some practice shots. Check them on your camera’s screen to see if everything looks good. If not, don’t worry! You can change the settings until your photos look just how you want them. It’s like a little rehearsal to make sure your real photos turn out awesome.
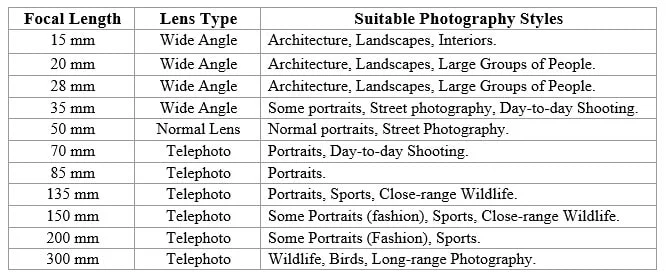
Camera Lens Distance Chart (Table) For Perfect Photography
As a professional photographer, picking the perfect lens is crucial. You have to get knowledge about the focal length of your profession. This table makes it easy by showing which lens works best for different types of photos.
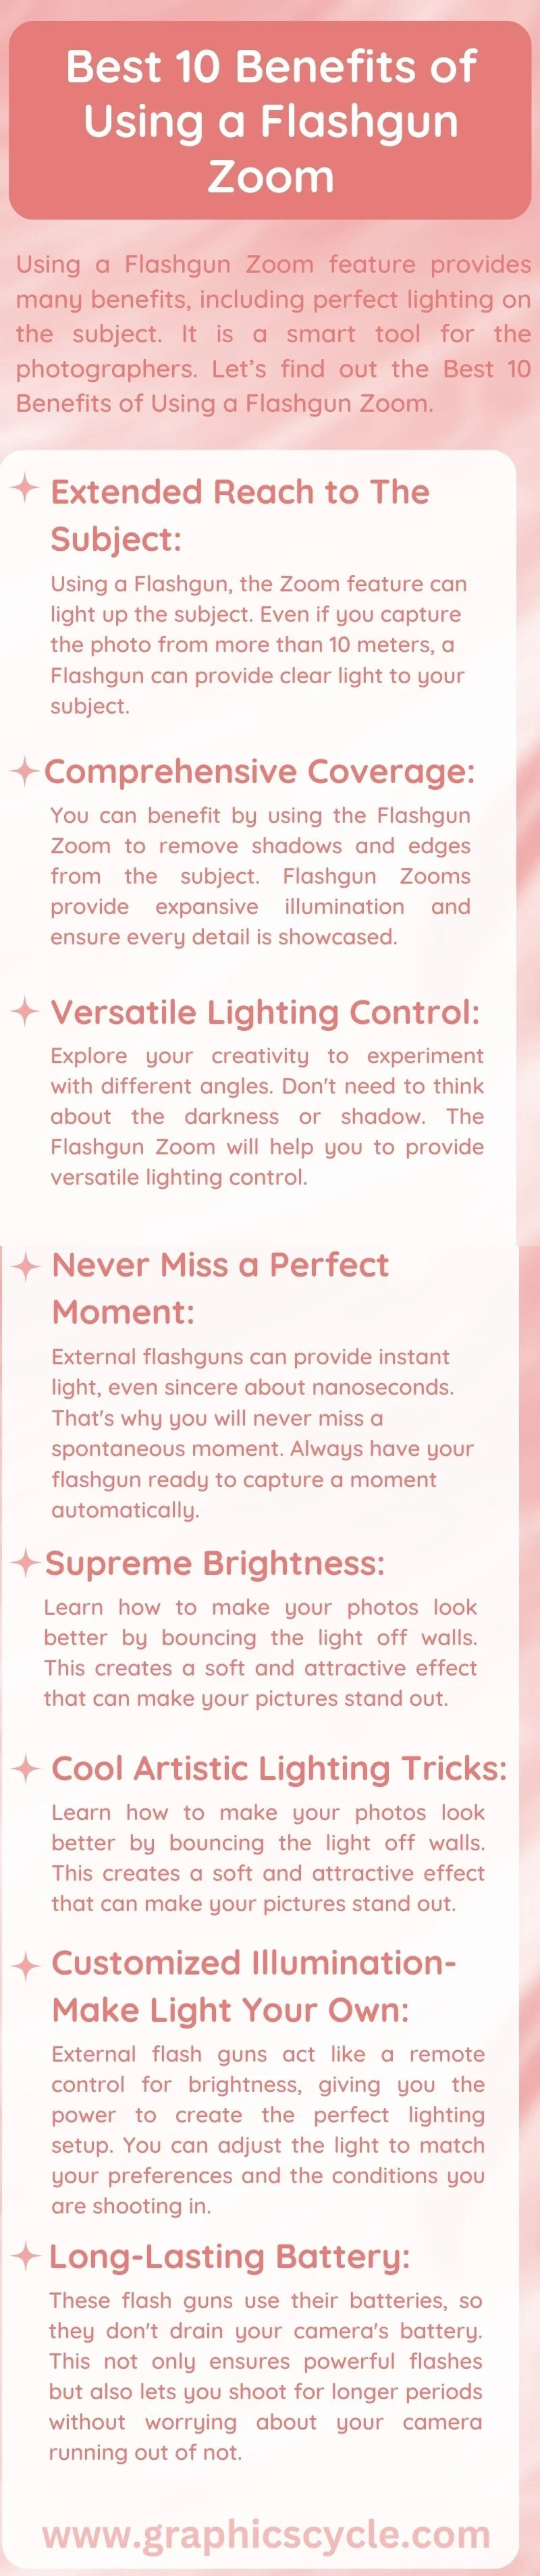
Best 10 Benefits of Using a Flashgun Zoom
01. Extended Reach To The Subject
Using a Flashgun, the Zoom feature can light up the subject. Even if you capture the photo from more than 10 meters, a Flashgun can provide clear light to your subject.
02. Comprehensive Coverage
You can benefit by using the Flashgun Zoom to remove shadows and edges from the subject. Flashgun Zooms provide expansive illumination and ensure every detail is showcased. Enjoy your photoshoots without any dark corners.
03. Versatile Lighting Control
Explore your creativity to experiment with different angles. Don’t need to think about the darkness or shadow. The Flashgun Zoom will help you to provide versatile lighting control.
04. Never Miss a Perfect Moment
External flashguns can provide instant light, even sincere about nanoseconds. That’s why you will never miss a spontaneous moment. Always have your flashgun ready to capture a moment automatically. If you try to make a perfect scene, it is time-consuming, but Flashgun Zoom is always ready.
05. Creative Freedom
The experimental space is unlimited when you are using a flashgun zoom in your studio. This can help you as an assistant. So you will have more opportunities to use your creativity. Without a flashgun, you have to create the scene manually by giving up our valuable time. But when you have it, you don’t need to give so much time to a single scene. So you can expand your creativity freely.
06. Supreme Brightness
External flashguns act as the photographic powerhouse. It provides an extraordinary level of brightness and zoom facilities for the subject. So it can give a beautiful picture with clear brightness.
07. Precision Control of Light
With an external flash, you get to decide exactly where the light goes. This means you can make your photos look just the way you want by adjusting the brightness and direction of the light.
08. Cool Artistic Lighting Tricks
Learn how to make your photos look better by bouncing the light off walls. This creates a soft and attractive effect that can make your pictures stand out. External flashguns are great at making this technique work effortlessly.
09. Customized Illumination- Make Light Your Own
Make the Light as Your Own: External flash guns act like a remote control for brightness, giving you the power to create the perfect lighting setup. You can adjust the light to match your preferences and the conditions you are shooting in.
10. Long-Lasting Battery
These flash guns use their own batteries, so they don’t drain your camera’s battery. This not only ensures powerful flashes but also lets you shoot for longer periods without worrying about your camera running out of not.
Download Benefits of Using a Flashgun Zoom Infographics
Practical Applications of Using a Flashgun Zoom
Practically applying a Flashgun zoom-in photography brings a lot of benefits. Also, now you can take fantastic images with the help of the flashgun. You have more control over the light’s brightness and the subject’s shadows.
This is very helpful for event photography and people photography. The Flashgun Zoom also helps when the lighting is not so good, like when it’s too dark or there are weird shadows. You can produce more effective and creative pictures by using this helpful tool.
The tool is like magic to make your photoshoots easier and amazing-looking. So stay updated with the latest technology and products that can help in your daily work. Become more productive to stand out from your competitors.
Flashgun Zoom Compatibility
Flashgun zoom compatibility refers to how well a flash works with different camera lenses. Compatible Flashgun Zoom ensures the camera lens and the flash perfectly match. If they match together, then they can provide the best lighting for your subject.
When a flash is zoom-compatible, it can adjust to the lens view and focus on the subject with the best lighting. This is good for indoor photography. The compatible flash can help you to avoid too much light or too little light.
A smart and zoom-compatible flash provides performance based on your lens. As a professional photographer, you may need to use various lenses for different types of photography. If the flash can not maintain compatibility with your lenses, you will need a lot of flashes. So be careful about Zoom compatibility when you are buying a Flashgun.
5 Secret Tips to Use a Flashgun Zoom
Utilizing effective techniques can enhance your photography experience. It is a very helpful tool if you can utilize it. But if you don’t know the uses of this smart assistant, it will not help you properly.
Here are Five Important Tips for Using Flashgun Zoom
01. Understand Your Lens
Get the full information of your lens in your brain. Understand how it works, zooms, and captures a photo. Explore all settings and features of your camera lens. Understand the compatibility of your lens and flash. If you can ensure these things, you will get perfect lighting on your subject.
02. Experiment with Various Angles
Explore the best angles for photoshoots. Be careful about the bouncing light from the walls and the ceiling. When you try to capture from different angles, you will get the best angle for the best photoshoots.
03. Avoid Pointing Directly to the Subject
Don’t point the flashgun Zoom directly at your subject. The harsh light of the flash can burn the picture. Try to cover the flash with white clothes or paper, diffusers, bounce cards, and colored gels. These help to provide a soft light. This technique provides a natural look to the picture without any shadows.
04. Ensure 60+ Guide Numbers for Powerful Flash
Checking the guide number is important before purchasing a camera flashgun. But it is often ignored. The guide number helps to predict how powerful the flashgun is, based on the aperture and distance. The higher guide number means a more powerful light. If you have a large room, you must go up to 60 guide numbers.
05. Rechargeable Battery
There are a lot of options available for the battery. Such as AA, AAs, or rechargeable lithium batteries. It can be a little costly initially, but a rechargeable lithium battery will be the best choice. You can use it for a long time without any hassle.
How Do They Stop Zoom on The Flash
Generally, it doesn’t need to stop zooming on the flashgun. But if you face any situation where the zooming feature is not set well, you can stop this. You can adjust the zooming feature in the settings.
Based on the coverage area, there is full control to set the zoom level manually. You can disable Zoom manually by fixing the Zoom level. Check out the use manual of the flash and lens focal length instructions to stop the zoom on the flashgun.
Photographer’s Feedback After Using Flashgun Zoom
Photographers all over the world have given their positive feedback through Amazon and various forum sites. They are sharing their experience with a lot of the benefits of Flashgun Zoom. They are happy to get better control of the lighting system. It enhances the photo quality and positively impacts their career.
The flexibility to adjust the flash angles and direction is a great feature. With this feature, photographers can explore various lighting setups. It is time-saving and more precise for the photoshoots. Overall, we can say that this innovation has a positive impact on photographers.
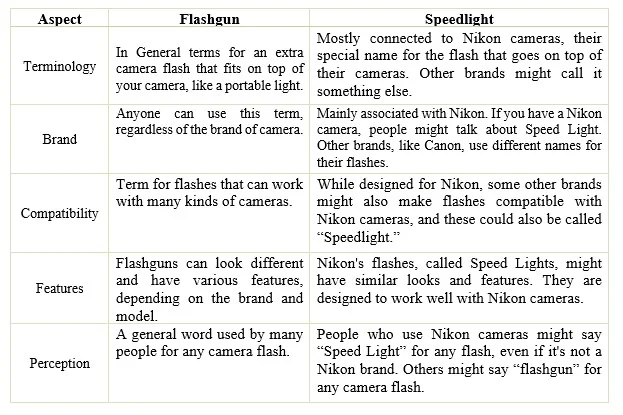
Differences Between a Flashgun and a Speed Light
Does Flash Make Photos Better
A camera lens, flashgun zoom can make photos better to the best version. It depends on how you can implement the flash for your photoshoots. The default setting can’t produce an awesome picture. It can show strong shadows and sharp edges.
If you adopt the advanced settings of your lens, camera, and flash, then you can produce the best photos. It is a very helpful tool when your main light source is behind the subject.
To make the light less harsh, there are some tricks you can try. Bouncing the flash off nearby surfaces, like a wall or ceiling, makes the light softer. You can do this easily with certain types of flashes. Another trick is diffusion. You use something translucent, like tissue, to soften the light without changing its direction.
Even though using a flash might sometimes give people red eyes in photos, you can fix that. The key is to use the flash in a way that makes the person look better, not worse.
Conclusion
Using the flashgun zoom feature on your camera can make your photos look cool. But you have to work with passion in photography. Explore more, and use your creativity to make something different.
This is a great tool for photographers if you can use it properly. The flashgun will give you full control of your light to the subject. So easily, you can expect the best photos using this smart assistant.
But you know that more than capturing a great picture is needed for delivery to the clients. There are a lot of responsibilities after taking pictures. Such as Background Removal, Image Masking, Photo Retouching, Color Corrections, and more.
Without post-production, photos are valueless. So here you can get help from the Graphic Cycle’s expert team of photo editing. We provide close attention to every single pixel of your photos. Make your photos more amazing!
Frequently Asked Questions
What is the Function of Flash Zoom?
The function of Flash zoom is to change how wide or narrow the light from the camera flash spreads. It gives you control over the area the light covers.
What is the Use of A Flashgun?
A flashgun is used to give extra light when the natural light is not enough for taking pictures. It makes the pictures look better, especially for indoor photography.
What are the Benefits of a Camera Flash?
Camera Flash helps to increase the light on the subject, reduce shadows, and clear the picture.
What is a Speedlight Used for?
A speedlight is also a flash. It gives extra light to the pictures. But it is small, mounted above the camera, easy to carry, and linked with only Nikon or Canon brands.
When Should You Use A Speedlight?
In the low light, for taking pictures of people, and for indoor photography.
What is the Difference Between A Camera Flash and A Speedlight?
“Camera flash” is a general term for any extra light for a camera. “Speedlight” is a specific term linked to certain brands like Nikon or Canon.
What is the Difference Between A Flash and a Speedlight?
In simple terms, “flash” is a general word for an extra light for your camera. “Speedlight” is a bit more specific and often connected to Nikon or Canon camera brands.