20 Creative Mother Daughter Photoshoot Pose Ideas & Tips

Best Mother Daughter Photoshoot Ideas, Mother Daughter Photoshoot

Hello, photographers! How is your time going? Have you ever practiced mother-daughter photography? It’s an awesome and eternal event in this world. Both mother and daughter have the purest love in this world and when you portray them through your camera you can feel the vibes. In this tutorial, we will give you some tips and tricks regarding the perfect mother daughter photoshoot. 

Plotting 

When we think about moms, we become emotional and remember all the good memories. It could be a picnic, an outing with your parents, having a matching dress, enjoying and having fun on Mother’s Day, etc. You can remember the best days of your life. We can say that certainly, you will feel the vibes when you remember those days. One of the most common photoshoot ideas is –

  • Twinning dress 
  • Forehead kiss and having the same dress
  • Having fun on the street 
  • A dancing pose with the babies. 
  • Hugging the babies and giving a pose. 

Let’s Discuss the 20 Best Mother-Daughter Photoshoot Ideas 

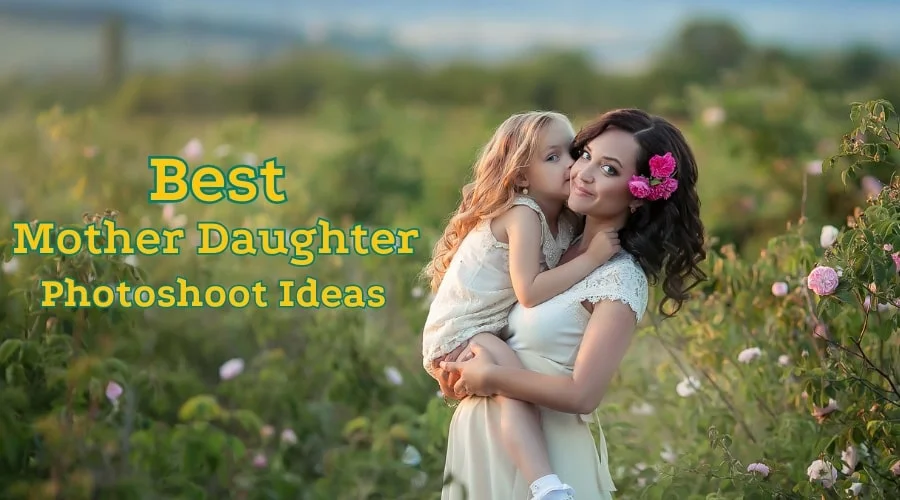
01. Having the Same Dress 

Having the Same Dress, Mother Daughter Photoshoot

It is a very common photoshoot technique and try it on a special occasion. Try to wear a light dress so that you can carry it perfectly. Have a look at the above dress! It looks amazing! Choose the perfect outfit according to your choice.

It could be a salwar, gown, zins, T-shirt, etc. Both mother and daughter should be comfortable wearing this outfit. And let me give you some advice! Smile and give an adorable pose! Blend yourself with nature. 

02. Forehead Kiss | Mother Daughter Photoshoot

Forehead Kiss, Mother and Daughter Photography

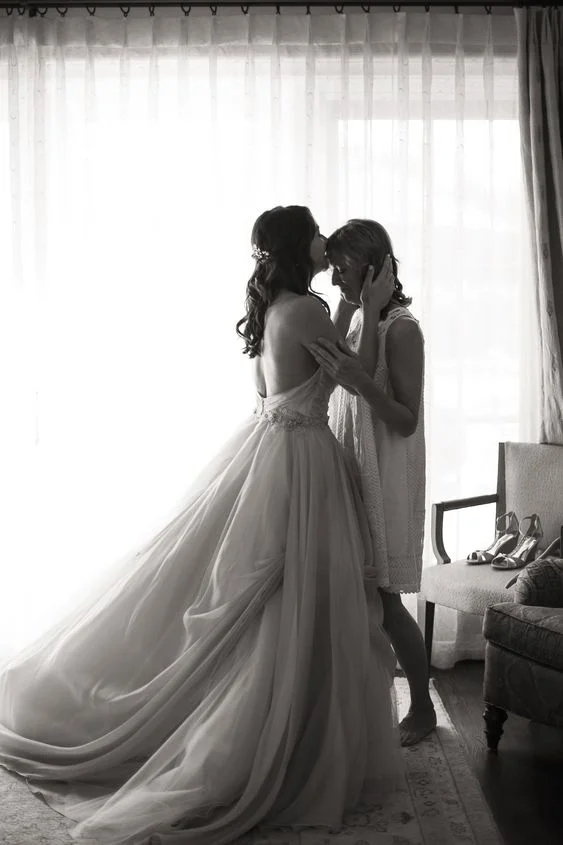
In my opinion, the above picture looks calm and majestic to me. So adorable! It reflects love, passion, and emotion all together in a single frame. Here, white color is the most suitable one for a photoshoot. Anyway, If you love pink, blue, black, or any other color, try it! I hope it will be an interesting mother-daughter photoshoot. 

03. Having Fun on the Street 

Fun on the Street, Mother Daughter Photoshoot

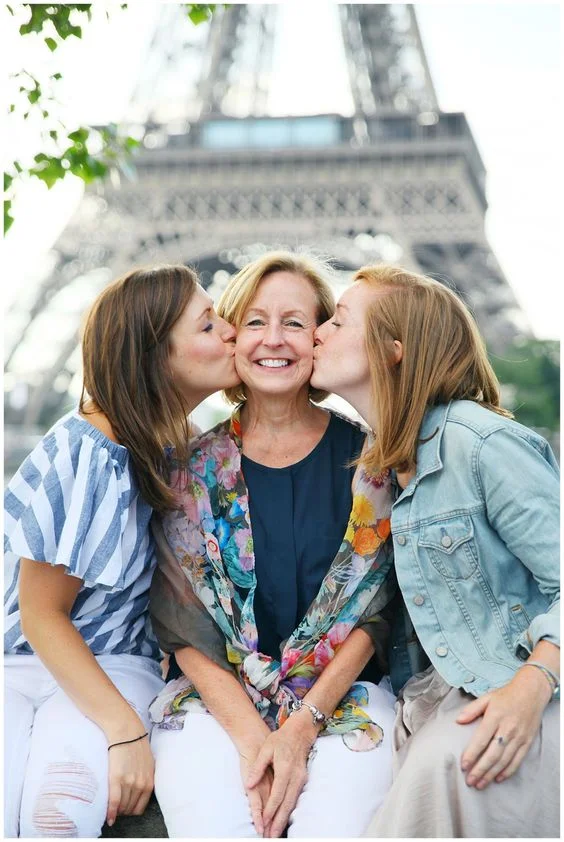
Wow! Such a lovely picture! I am truly amazed at the love. If you are planning to make a different type of mother-daughter photoshoot and living in an urban area. Try this pose! I hope you will love it. It is a symbolic pose in front of the Eiffel Tower. However, you can try it at your historical place and enjoy it with your mother. 

04. A Dancing Pose 

Mother Daughter Dancing Pose

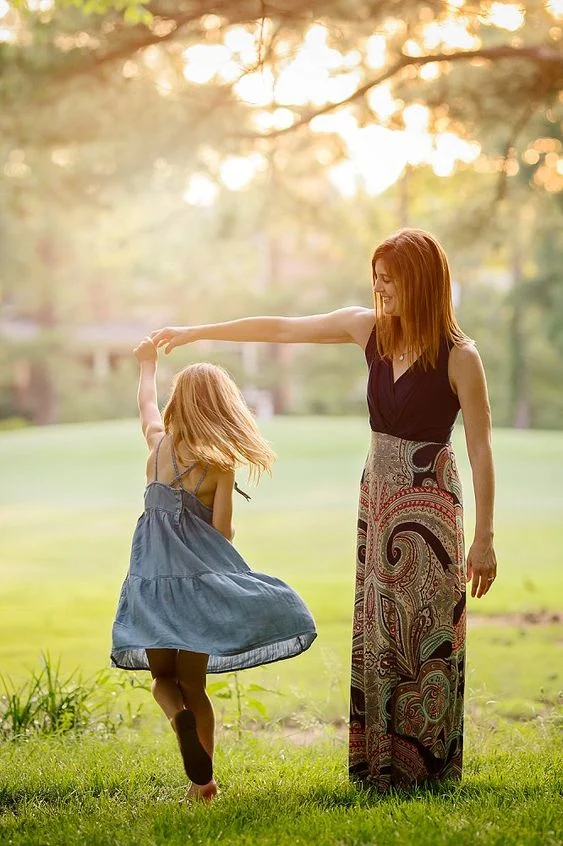
If you are planning to go on an outing with your mother, try this pose. I must say, it is the romantic and lovable pose on this bucket list. Looks amazing to me and reflects the bonding between the two.  Suggesting you try this pose in the middle of the flower garden or park. That will be nice. 

05. Mother-Daughter Hugging 

Mother Daughter Hugging, Mother Daughter Photoshoot

Mother-daughter hugging is the symbol of the purest love in this world.  Have a close look at the above picture! It looks aesthetic. You can pose in front of a sea beach, garden, roof, etc. Try to wear a matching outfit there. Smile, love, and have a great time with your daughter! 

Now Let Me Slice It Up. We will Discuss Cute Mother and Daughter photoshoot Ideas!!

06. Posing with two Babies in the Backyard

Posing with 2 babies on the backyard

Have a close look at the above picture! How does it look? Amicable. I must say it is a symbol of love, responsibility, and duty. If you are looking for a cute mother-daughter baby pose, try this one. You should ensure the matching dress for the intensity of the picture.

Those who have a twin baby and like to photoshoot with this pose, try it. It would be a fantastic experience. Make sure you are posing on the grass and the weather is fine to go for a photoshoot.

07. Smile and Pose in the Backyard 

Smile and pose in the backyard, Mother Daughter Photoshoot

Are you living in an urban area and looking for a cute mother-daughter photoshoot idea? If you have some trees in the backyard then try this pose. Otherwise, try it in a park. During this photoshoot try to wear a traditional dress. Keep a thing in mind that your facial expression should adjust with the outfit and the environment perfectly. 

08. A Back Pose with A Cowboy Hat 

A back pose with cowboy hat

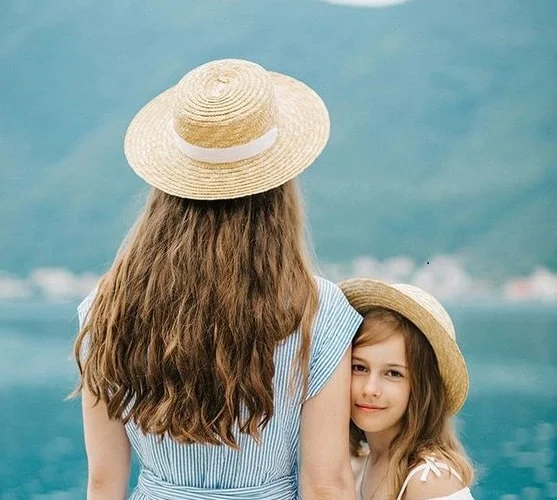
Both mother and daughter have the purest and safest relationship in the world. Their emotions, feelings, and goals are linked together. When you are traveling near a beach and have that cowboy hat on both you and your children, try this pose. It will be a lovely pic to see.

The emotions, bonding, and attitude all are linked together in a single frame. You can try this pose both in the winter and summer seasons with a different outfit and attitude. Hopefully, it will be fun! 

09. Casual Winter pose with Zins outfit | Cute mother-daughter photoshoot ideas 

Casual winter photoshoot, Mother Daughter Photoshoot Ideas

Do you like this pose? In my opinion, it looks gorgeous. If you like to shoot a cute mother-daughter photograph within a small budget, try this one! You do not need a professional studio to go for it. Rather, you can try it at your home by using a simple backdrop.

It could be white, blue or anything. I prefer day photoshoots. The night look can be serene but it needs more lighting and sometimes there will be a lack of facial expression. 

10. Dark Photoshoot 

Dark Pose

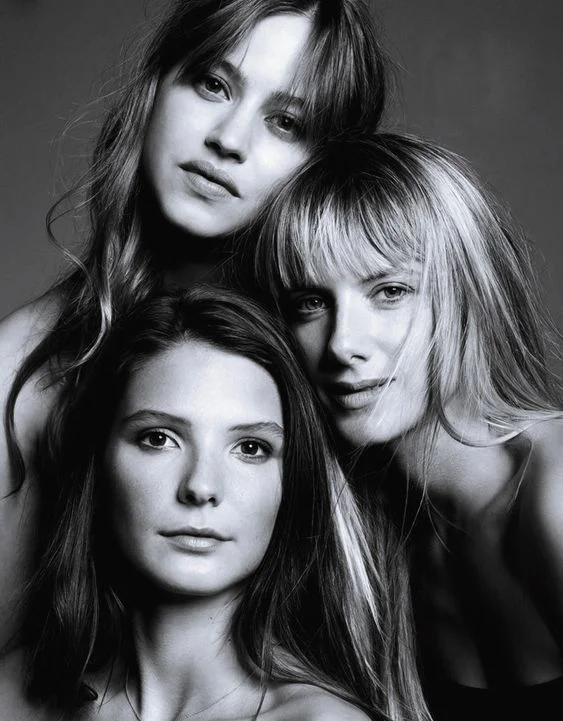
Have a close look at the above Photoshoot! It looks amazing to see. Her mother and two daughters are linked together in a single frame and they look amazing to see. The dark mood adds a specialty to the image so that it will look different than others. Try to wear the same outfit and smile together. 

11. Hugging each other during the winter season

Hugging each other during the winter time

Winter Photoshoots are always special for a lovely couple. If it is a mother-daughter photoshoot then you will see a new vibrant feeling here. Have a close look at the above picture! It looks serene to me. The smile, attitude, love, trust, and feelings are combined in a single frame. 

12. Posing with a nice hairstyle and dress

Posing with a nice hair style and dress, Mother Daughter Photoshoot

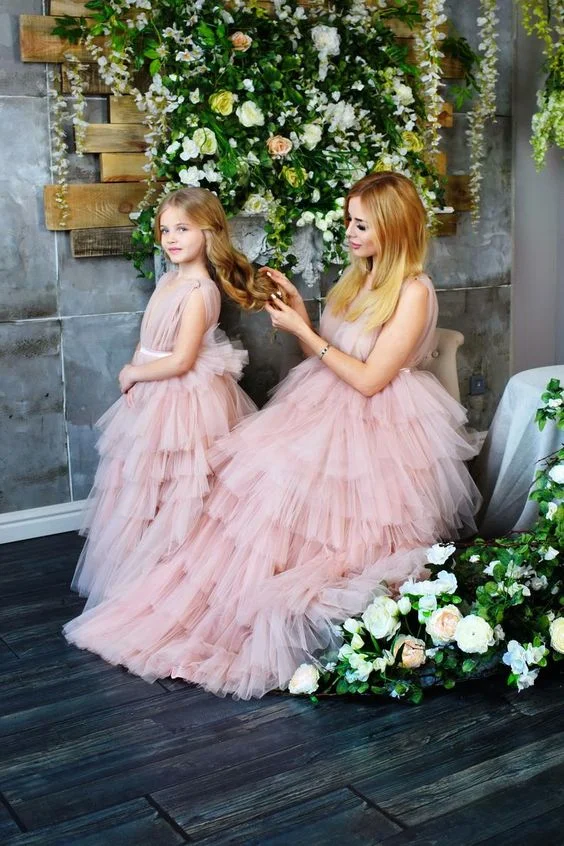
I must say that this one is one of the most exciting poses in this list. They look like princes. The outfit is simply stunning. If you look closely at them you might enjoy the charm of the picture.

One of the most interesting things regarding this picture is here the exterior design, outfits of both mother and daughter, smile, hair color all the components are linked together and it shows only one word. That is amazing. You can try this outfit on Mother’s Day. 

13. Creative mother-daughter Photoshoot Ideas | Posing on the staircase 

Posing in the staircase Autumn Photoshoot

How does it look? In my opinion, they look fresh and confident. If you like to go for mother-daughter photography within a small budget try this one. Try this look by wearing a casual dress. To make your photography special, you can try matching shoes, smart watches, sunglasses, and dresses. 

14. Wearing a crown | Creative mother-daughter Photoshoot ideas 

Creative mother daughter photoshoot ideas wearing a crown

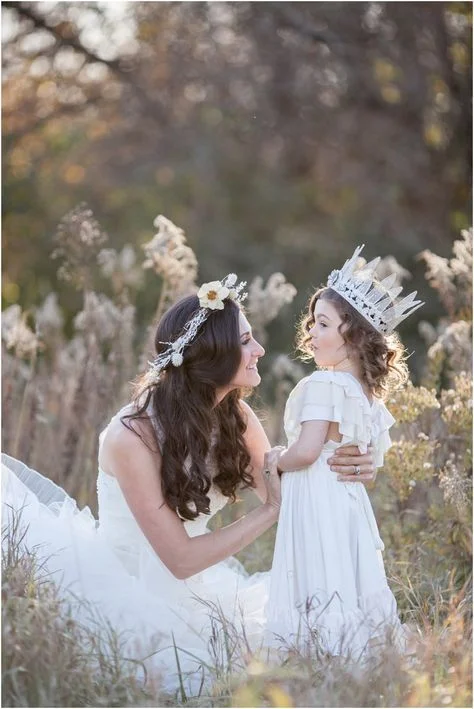
You can try this mother-daughter pose during the summertime in the garden. It looks beautiful. They look like princes and their attire is gorgeous. We suggest you try this pose during the summertime.  

15. Black mother daughter photoshoot ideas

Black mother daughter photoshoot

This one is a little bit different from the others. Try a long dress with a high heel. Matching jewelry is fine. We suggest you do this photoshoot during the daytime. That will be fine. At night, there will be a problem with exposure. However, if you manage a good light source then go ahead. 

There should be a strong connection between the mother and daughter. The visitor will notice the intensity of the picture rather than its physical appeal. 

16. Mother daughter posing with a white flower 

Mother daughter posing with a white flower

If your skin is white, you can try a long-sleeved black matching outfit with your daughter. That will be fine. It looks gorgeous to me. Try to use a white flower packet and pose with a loud smile. We are suggesting you use this pose at your home or yard. No need to go to the studio for that pose. 

If you like to experiment more, try this pose in an open place. 

Let me give you some tips regarding outdoor mother-daughter photoshoot

17. Outdoor photoshoot in the Blake garden 

Outdoor mother daughter photography, Mother Daughter Photoshoot

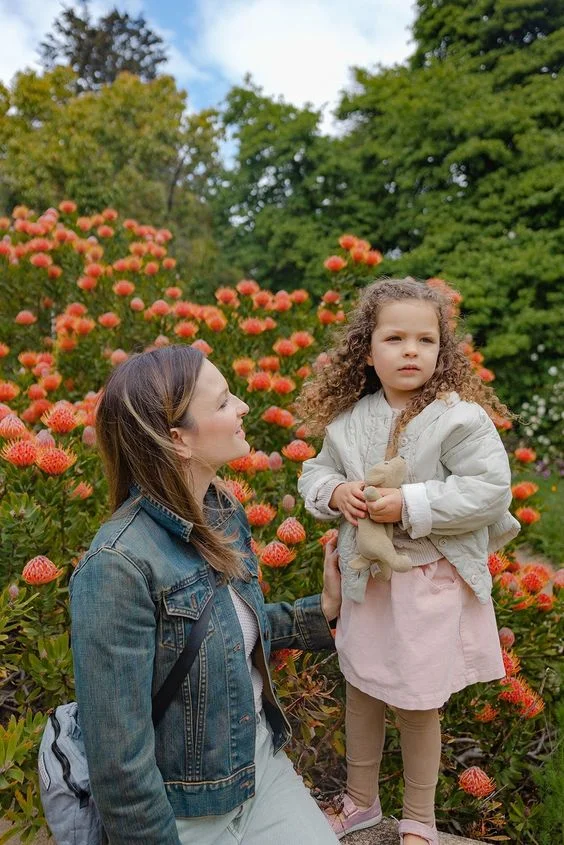
In my opinion, it looks serene and fantabulous. You can enjoy the reflection on the baby’s face. Blake Garden is open for people of all ages and you can go there in the evening and have a picture with your daughter. Try to wear a casual outfit here. It would be nice if you wore a matching dress. 

18. Outdoor mother-daughter photoshoot beside the hill tracks 

outdoor mother daughter photography

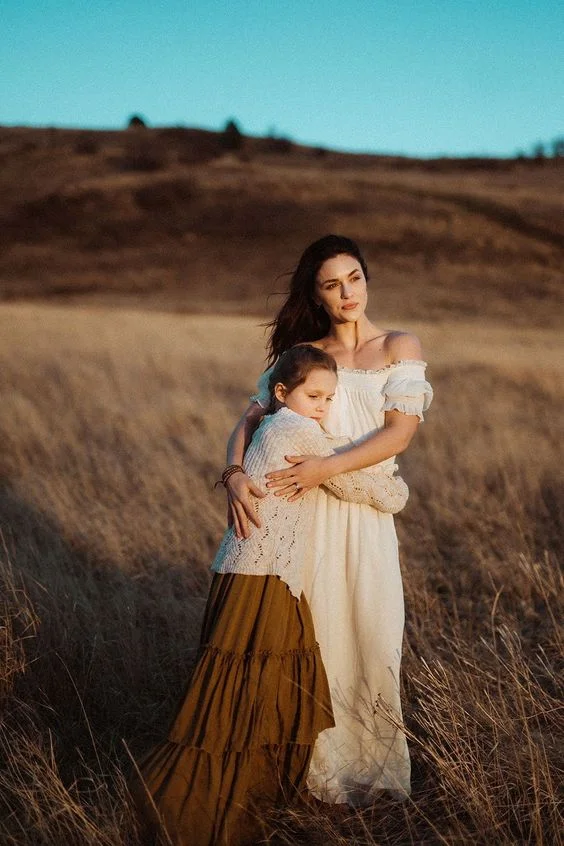
If you are planning to go out and have fun with your daughter, try this pose. I believe it looks awesome. The picture was taken during the evening time and the background was amazing. We suggest you shoot this pose during the summer season. 

19. Outdoor mother-daughter posing ideas with a cowboy hat 

outdoor mother daughter photography

How does it look? One Of the cutest poses on this list. During the evening time, you can pose with your daughter. The white matching dress looks fantastic. The atmosphere is perfectly suited to the attire. If you closely look at the picture you will notice a strong bonding between the mother and daughter. 

20. Casual mother-daughter photoshoot ideas 

outdoor mother daughter photography

If you like to blend yourself with nature and like to portray a realistic face this one will be a low-budget mother-daughter photoshoot idea. As a new mother, you can try this pose during the summer season. 

Here we have used the white backdrop to portray the scenario perfectly. You can use any other method as you wish. Try to shoot during the evening time and that will give you a clear idea. 

Final few words | Mother-daughter photoshoot ideas & tips 

Now, you can pick up the most effective ideas from this list. We have discussed so many popular methods and chosen the best one that suits your personality and passion. Both mother and daughter have a divine relationship and they love each other more than anything in this world. You have to choose the pose according to your weather, mentality, financial condition, and children’s health, etc. 

Don’t Miss Out

FAQ

How do I pose with my daughter? 

Intimacy is the vital factor here. When you are promoting mother-daughter photography it will give a message to the audience that how strong their connection is! 

Kissing and hugging poses are more popular than others. Try to wear a long suit and flowers to make the photoshoot interesting. 

Why is a child’s pose so relaxing? 

It will relax the body and refresh energy for the users. The child’s pose is always special and it means a lot to the viewers. The little children are always becoming the source of happiness to the parents. Children’s poses are relaxing for their facial appeal and attitudes. 

How long should you hold a child’s pose? 

As long as you need. However, you should not make it monotonous. Try to behave with him so that he or she will be supportive and give the proper expression.

Show your love

How to Do Social Media Marketing on LinkedIn in 2024

How to Do Social Media Marketing on LinkedIn, Graphics Cycle

More than 1 billion professionals worldwide have an account on LinkedIn. 16.2% of members daily use LinkedIn and 48% of people visit this professional platform once a month. The number of members is increasing every year. Do you know why people are using this platform? They are using it to connect industry-based professionals and increase productivity for success.

Now let’s take a look, at how you can succeed by using the social media marketing channel ‘LinkedIn’. A startup who have no customers and the biggest company (Google) that has 32 million+ followers, you can find all here. So if you know the effective use and marketing of this platform, you can easily reach your destination.

If you don’t know about it, after reading this post, you will become a master of how to do social media marketing on LinkedIn. Otherwise, you can also get Social media marketing services from the Graphic Cycle.

How to Do Social Media Marketing on LinkedIn

Mainly, there are two ways of social media marketing on LinkedIn. Free/organic marketing or paid/advertisement marketing. Both are very powerful marketing methods if you can properly implement them. Facebook and Instagram have grabbed the majority part of the advertising market of social media. But when it comes to B2B Marketing, LinkedIn is the King of B2B marketing or advertising.

We have discussed paid and organic social media marketing using LinkedIn. First, we will explore how to do social media marketing on LinkedIn for free, then we will go through investing in LinkedIn Ads

5 Rules for Free Marketing on LinkedIn [SMM $0 Budget]

Free Marketing on LinkedIn, How to Do Social Media Marketing on LinkedIn

If you have no money to invest in LinkedIn ads, you need to invest your time in this platform. So when you have decided to free marketing, remember it will take time. Be passionate and work smartly by following Graphic Cycle’s premium tips and secret strategies.

01. Become a Member of LinkedIn and Create a Company Page

Most of the professionals already have an account on this platform, If you don’t have then simply sign up to it. The sign-up process is very easy but optimizing the profile is a bit tactical and important. Most beginner LinkedIn users make mistakes in this part.

So if you want to succeed on LinkedIn, you must know how to do social media marketing on LinkedIn with proper optimization of your profile and page.

02. LinkedIn Profile and Company Page Optimization

There are a lot of things involved in profile or page optimization. Also, it required expertise to rank on the search results for LinkedIn. So initially you can’t rank on the top list. You have to focus on the ‘recent post’ and suggested feed to reach your target audience. These are things to keep in mind for optimizing your profile or company page.

  • Profile Picture or Logo: Use professional photos with a smiley face for profile pictures. Make sure that your face is visible in front of other LinkedIn users. Avoid distracting backgrounds and too many stylish photos, Because it is different from Facebook or Instagram. When you want to market through a business page, you must have a professional business logo.
  • Cover Photos: The cover photo is the first impression of your audience when they visit your profile or company page. You have to express a clear idea about what service or products your company provides.
  • Bio or Intro: Optimize the Bio and Intro section to clearly explain your service or products. Bio also plays an important role in your overall profile or company page.
  • Add Skill and Keywords: Add skills and keywords on your profile or page as much as you can. But remember that you have to put keywords on your page or profile naturally, not by keyword stuffing. 
  • Link Up: Link to other social media platforms and the main website of your business from your LinkedIn page or profile.
  • #Hashtags: This is one of the most significant things you have to use on your profile and your business page. Hashtags express your brand’s connection, and they also help to rank in the search feeds of people.

03. Grow Your Connection and Page Followers

You have already completed the basic setup of how to do social media marketing on LinkedIn. Now you have to do some regular work strategically, by following LinkedIn Guidelines and Graphic Cycle’s secret methods. 

  • Connect Industry-Related People: Only several connections or followers from various industries couldn’t be worthy of your brand. Because these people will never engage with your content.
  • Connect Industry Top Persons: Engage with your industry topper’s content and their followers. So that you might be one of this industry. @mention them in your content so people can trust you. Because they are already known face to your audience.
  • Analyze your competitor Pages or Profile: You will have a clear and concise idea about the market of your products or services from your competitor. It is one of the most important tasks to keep following competitors. 

Rules for Free Marketing on LinkedIn, How to Do Social Media Marketing on LinkedIn

How to Do Social Media Marketing on LinkedIn

04. Create Engaging LinkedIn Posts

Creating engaging content is crucial to reaching your targeted audience. If people find helpful posts from you, they must obey your recommendations. So try to find out their pain point and help them to overcome these problems. Let’s see how to do social media marketing on LinkedIn by publishing engaging content:

  • Write Like an Expert: When you are writing a LinkedIn post, make sure it has value for the audience. If you can solve their problems, they will engage in your content. 
  • Avoid AI Content: As an engaging content writer, I have explored AI tools to create posts for LinkedIn. AI content is not usable in your LinkedIn posts, because AI has no expertise. They follow existing content to write your peace. People love to hear about life’s recent experiences from industry experts on this platform.
  • Use visual Elements: Photos and videos are the best things to hook people and grab their attention. So you must include these on your LinkedIn content for social media Marketing.
  • Utilize Analytics Tool: The analytics of LinkedIn provides you with the type of followers you have, how they are acting, and their expectations. So you have to provide such content that can help them.

05. LinkedIn Groups Activities

LinkedIn has different communities for different industries. You need to join your industry-related groups on LinkedIn for Social media marketing. If you can help people in these groups, they will follow you. So LinkedIn group is one of the best places to grow your network on LinkedIn. 

Posting different posts in different groups is best. When you have no time, you can repost your existing post on other groups. But Graphic Cycle’s social media experts do not recommend reposting a LinkedIn post. If you can create a new post, then avoid this. Otherwise, it is better to share something, without sharing anything.

Commenting and reacting to others’ posts is another way to increase your visibility for social media marketing. I have noticed that when I usually comment on another post, my profile views and impressions both increase. 

Note: Consistency is the key to success on LinkedIn. If you post 10 pieces of content in a day, then no post in the following 10 days, will not work. You have to maintain a content schedule and active work on LinkedIn to provide value to your audience. 

However, we are trying to provide value for your time and hope you are getting answers to the question of how to do social media marketing on LinkedIn for free. Let’s take a look at some advanced marketing strategies.

Paid Social Media Marketing on LinkedIn

Paid Marketing on LinkedIn is one of the best options to get real customers in 2024. But you may hear that many people don’t get ROI from LinkedIn Ads, even if they have lost a lot of money by investing in LinkedIn Ads.

They are not telling lies, Ad costs on LinkedIn are higher than on other social media platforms. Because the traffic value is very high on LinkedIn rather than on others.

The average CPC of LinkedIn ads is around $15 to $350. In Latin America, $60 is the lowest cost per lead. So you must be careful about the paid ad, it can make or break your marketing flow.

If you are not confident about social media marketing, using LinkedIn Ads, don’t try this. Graphic Cycle has a dedicated LinkedIn Marketing Expert team for Ads. You can discuss with the team for FREE about your goal.

5 Steps of How to Do Social Media Marketing on LinkedIn Ads

How to Do Social Media Marketing on LinkedIn Ads

To get the best ROI from your ad campaign on LinkedIn, you need to run the campaign smartly and tactically. Otherwise, you also fall on the loser’s list. Be careful and follow these 5 steps to get the most ROI from your LinkedIn Ads campaign. 

01. Set Your Brand Goal

Your brand must have a clear goal so that your ads can focus on that goal. LinkedIn ads have different types of ad goals for different purposes. There are mainly three types of goals awareness, consideration, and conversion.

Awareness helps to reach your target audience as much as possible. Consideration increases your website visits, engagements, video views, etc for your brand. The conversion helps to collect leads, applicants, sales products or services, etc.

02. Understand Your Target Audience

Business or brand marketing is not just selling a product, it is all about a psychological game with your audience. So it is very important to have a good knowledge about your audience. If you don’t know your audience, how can you help them?

However, try to know their culture and needs, identify their pain points, and give them solutions. I hope you have cleared the importance of knowing the audience for How to do social media marketing on LinkedIn. 

03. Explore Types of Ads on LinkedIn for SMM

Primarily, there are four types of ads available on LinkedIn. These 4 are Dynamic Ads, Message Ads, Text Ads, and Sponsored Content. They are different for their different characteristics and uses. All of these ad categories have subcategories under them. 

If we count all subcategories, these are around 11 ad formats: 

  • Single image ads
  • Follower ads
  • Lead generation forms
  • Carousel ads
  • Document ads
  • Video ads
  • Conversation ads
  • Event ads
  • Thought leader ads
  • Spotlight ads
  • Single job ads

You have must proper knowledge about them to reduce the ad cost of your brands. You don’t need to run all types of ads at once. It will break your investments but will not return. So, find out which category is perfectly aligned with your brand goal for SMM.

04. Start with a Follower Campaign (Useful for New Business)

A follower ad is one of the cheapest ads on LinkedIn. When you have a new brand, you have to think about an effective and cheap solution. At this time, you can use follower ads to grow your brand presence cost-effectively. 

Remember that you can’t convert leads or make sales from this type of ad, but it will increase your visibility to your audience.

05. Don’t Cross the Borderline (Stay in Your Budget Limit)

Make a strategic, logical plan for your ad campaigns on LinkedIn. There are very low possibility of success in your first campaign. So if you spend your all budget on the first campaign, there is a high possibility of losing your money without gaining success. 

So don’t fall on emotion, or don’t listen to anyone’s advice who never succeed in LinkedIn ads. LinkedIn is a professional and serious place, you can expand your business from 0 to hero here. If you walk through our guide on how to do social media marketing on LinkedIn, success is not far from you. 

Bonus Tips for Paid Social Media Marketing on LinkedIn

Bonus Tips for Paid Social Media Marketing on LinkedIn

Maintain Schedule for LinkedIn Ads

You don’t need to activate your LinkedIn ad campaign 24/7. Advertising is not your service or support, it is your marketing materials. So when the target market is open, high possibility of getting real-time traffic, and you have to run ads.

Set Hook on Ads

You have only 7.9 seconds to stop someone’s scrolling. So if you are running ads on the LinkedIn newsfeed, you have to hook within 8 seconds.

Utilize A/B Testing

A/B testing is a popular method among digital marketers. The A/B testing feature helps to compare two different ad campaigns. Suppose you have created 2 or more campaigns at the same time, all of them will not perform the same. So now you will deactivate all campaigns without the best one. 

Analysis Analytics

Track your ad’s analytics and modify based on the performance of the ads. It will also help to understand the audience.

Optimize Your Campaign

There are a lot of things involved in Ad Optimization, including all the steps we have given above. Audience narrow down is another one of the crucial task for campaign optimization. Optimize your campaign and get the best result.

Conclusion | How to Do Social Media Marketing on LinkedIn

In this comprehensive guide to how to do social media marketing on LinkedIn, we have shown you all the secrets about LinkedIn Marketing. First, we have shared FREE marketing strategies, which are cost-effective, but time-consuming. 

On the other hand, paid marketing for LinkedIn might be risky for beginner users. Because LinkedIn has high-quality traffic and ad cost is too much. That’s why it requires an expert LinkedIn marketer to increase ROI successfully. 

Still, do you have any problems or queries about LinkedIn’s social media marketing strategy? We are waiting to discuss your brands. Feel free to contact the best digital marketing solution, the friendly support team of Graphics Cycles.

FAQ | How to Do Social Media Marketing on LinkedIn

How Do I Use LinkedIn for Social Media Marketing?

You can use LinkedIn for social media marketing in two ways, free and paid Marketing. Free marketing is time-consuming, and paid marketing is costly and requires expertise. Create an ad campaign and sponsor it to your targeted audience for effective results.

How Do I Start Marketing on LinkedIn?

You can start marketing on LinkedIn by creating a free account. First, you need to sign up for free and optimize your account or company page. Then start sharing useful content and grow your network. We have provided detailed guidelines about starting marketing on LinkedIn.

Does LinkedIn Charge A Fee?

LinkedIn offers a free account (Basic) and does not charge a single penny. You can use a free account without any problem. But LinkedIn also offers a premium service for $29.99 which is very useful for your business. Especially the Sales Navigator tool is one of the best features of LinkedIn.

What is the 5-3-2 Rule in LinkedIn?

The 5-3-2 rule is a ratio of content uploading on LinkedIn for every 10 content. 5 content should be from other sources, 3 content should be your work experience related, and the rest 2 are about nonwork content of your life.

Show your love

Topaz Gigapixel AI Review | Boost 43X Image Quality

Topaz Gigapixel AI review, Topaz Gigapixel, GraphicsCycle

Do you want to enhance your blurry and low-resolution photos without losing further details? Read our content on The Topaz Gigapixel AI Review.

Image enlargement refers to the process of image transformation that makes the shape of the image bigger. It is done by the multiplication of the lengths and widths of the image by a factor. Thus we get a large-sized photo by counting more pixel information.

We may need to create a specific-sized photo for printing, online sharing, or analysis. Whatever the reason is, we need high-quality photos to achieve our goals. 

There are different image editing software that offers the photo enlargement feature. However, most of these software reduce the quality of the photo in the processing period. Topaz Gigapixel AI is a smart solution for this purpose. Using this program, you can get the desired photo size without affecting its quality. 

I have been using this tool for 2 months now. Here you will get a “Topaz Gigapixel AI review” based on my experience with it. 

What Is Topaz Gigapixel AI? 

Topaz offers several AI photo and video editing software including the Gigapixel AI. The file is downloadable from its official website free of cost.  

This AI photo editing program is now very popular among editors. The user-friendly interface with a lot of photo editing features has made it one of the most used programs nowadays. 

The Gigapixel AI incorporates artificial intelligence to upscale your photos. It can enlarge your photo by as much as 600% without deteriorating the resolution. You will get a more polished-looking photo using the Gigapixel AI. Thus the Gigapixel AI is making photo editing much easier for beginner-level photo editors. 

The powerful algorithm created by the Topaz team has made the Gigapixel AI irresistible. It upscales your photo in the most natural way which is hard to do using the other image editing software. Moreover, the latest update of their algorithm allows you to get a more detailed look. Now face upscaling features are more improved.

So, you can upscale portraits while improving the details. So, your low-resolution photos will no longer be a disgrace to you. Meanwhile, you can sharpen your old memories captured in old cameras. 

The Gigapixel AI also gives high-quality results in enlarging landscapes. So, photographers do not need to worry about the details anymore. You just take a shot, make a concise composition, then take the photo to the Gigapixel AI and get the details back. 

What It Does | Topaz Gigapixel AI Review

As mentioned, it increases the resolution of your photos using AI technology. 

The deep learning network trained on a massive dataset of high-resolution images across various subjects and scenes. This network learns the intricate relationships between pixels, textures, and features.

Generative Adversarial Networks (GANs) analyze the low-resolution photo and recognize the patterns and details.  Meanwhile, the discriminator network evaluates the generated image. This constant back-and-forth battle between the two networks refines the generated image and provides us with the final photo.

Moreover, the Gigapixel AI reduces the noise. The noise reduction technology cleans up unwanted artifacts. In this way, the programs, enhance the overall image quality and sharpen the details. 

When Do You Need the Gigapixel AI?

The Gigapixel AI is one of the most used photo editing programs. Both the beginner-level editor and the professionals make different uses of this AI editor. 

Here are the photo editing areas where I can think of nothing but Gigapixel AI software: 

  • Photo enlargement for printing: You can turn your smaller files into stunning wall art or high-quality prints.
  • Enhancing details and sharpness: Your old and less detailed photos will get a new life with the help of this program. 
  • Crop and zoom: Crop a particular area of the photo while maintaining quality even after zooming in.

Benefits & Drawbacks | Topaz Gigapixel AI Review

Benefits Drawbacks
Results are impressive even at high magnification. Subscription-based pricing might not be ideal for occasional users.
Noise reduction, sharpening, and face recovery cater to different needs. Processing can be slow on older computers.
Upscale multiple images in one go. Currently supports only JPEG, PNG, and TIFF files.


How to Download and Install Topaz Gigapixel AI?

Downloading and installing the Gigapixel AI software is super easy. Go to the Topazlabs website and you will see the download option on the top bar. Click on the “Download” button. A new downloading dashboard will open. 

Scroll down to find the Gigapixel AI. Here you will get both the Windows and Mac options. If you are installing this software for the Windows operating system, click on the Windows button. It will start downloading. 

After downloading the file, click on it. Then click on the Next option and accept the agreement. Click the Next button and choose the location where you want to install the files. 

Again, click the next option and select the subdirectory. Click the Next button one more time and it will start installing. As the installation is complete, click the Finish button. 

Now open the application and select “Yes” to start the additional files. 

Pricing Policy 

The Topaz Labs offers two main pricing options. 

The first one is the standalone purchase. Here they offer a time payment of $99.99 for the software license. This option provides access to the latest version of Topaz Gigapixel AI and one year of free updates and upgrades.

The second option is the Topaz utility bundle purchase. Here they offer a bundle of four Topaz Labs AI tools at the cost of $199.

So, you get access to Gigapixel AI, DeNoise AI, Sharpen AI, and JPEG to RAW AI. This is a good value for money if you regularly use multiple Topaz Labs tools for different image enhancement tasks.

One more thing to note, Topaz Labs offers a 30-day return policy without any questions. So, you will get your money back if you are unsatisfied with the services. 

Interface

Interface, Topaz Gigapixel AI Review

Topaz Gigapixel AI has a user-friendly interface (UI). It is suitable for both the beginner and expert. Here you will see perfect professional-grade features with approachable design. 

The interface is free of visual clutter, with a focus on the essentials. And the functionally labeled buttons and icons make it easy to navigate. You need a few minutes to understand the steps of its interface. 

After launching the Toapz Gigapixel AI for the first time, you will see the File, View, Account, and Help in the top section. Then you will get the Single view, split view side-by-side view, comparison view, and zoom option. 

There is a Drop folder or Images option. Clicking on the Browse images you can Import images and folders. After opening an image in the Gigapixel AI, at the right side of the application, you will get resize mode and crop options. 

Here you will get both the AI option and manual setting options. By moving the suppress noise slider and removing the blur slider you can edit your images. The scale, height, and width options allow you to resize your image more precisely without affecting the quality. 

Under the scale mode, there are some magnification presets.  Also, you can input the value of 0.2 up to 6.0 to scale the image. The face recovery mode and face recovery slider help you to recover your face from low-quality photos. This feature works amazingly detecting even small faces.

Then using an AI algorithm, the Gigapixel AI upscales the photo.  Clicking on the Save Image button, you can save them in your preferred location. 

Areas for Improvement

The user interface of Gigapixel AI is neat and clean. Yet there are a few areas of improvement. Here are some of them I have noticed: 

  • The learning curve for advanced features
  • Hovering over elements doesn’t always provide enough information about their specific functions. 
  • The ability to fine-tune existing presets or create custom ones would offer more flexibility for experienced users.
  • Output options could be more granular

Performance and Processing Speed 

Though I have loved the performance and processing speed of the Topaz Gigapixel AI, it offers a mixed bag of experiences. The performance of the software depends on your hardware setup and the complexity of your images. 

Newer multi-core CPUs and powerful GPUs like the RTX 3000/4000 series provide higher processing compared to older or weaker hardware. Moreover, upscaling larger, more complex images with intricate details naturally takes longer than small, simpler ones.

I have observed that the Gigapixel AI’s AI-powered upscaling takes more time compared to basic image editing software. Processing a single medium-sized image can take minutes, depending on your setup.

Hardware Recommendations

Topaz Labs recommends a minimum of an Intel Core i5-6500 or AMD Ryzen 5 1600 CPU and an NVIDIA GTX 1070 or AMD RX 560 GPU for smooth performance. Stronger hardware significantly improves processing speed.

Online forums and user reviews reveal diverse experiences. Some users with high-end hardware report relatively quick processing times while others with older machines complain about significant wait times.

Adding Image Details Using the Gigapixel AI

Original Image

Topaz Gigapixels Before Image

Gigapixel AI

Topaz Gigapixel After Image

Using the Gigapixel AI, you can add details to low-resolution blurry photos. This program removes the fuzzy square artifacts that may affect the visibility of the image. The extensive data set of this program will make your photos look impressive. 

Here are the Settings

Setting Gigapixel AI, Topaz Gigapixel AI Review

Recover Blurry Face Using the Face Recovery AI

Original Image

Original Image, Topaz Gigapixel AI Review

Gigapixel AI

Gigapixel AI image

The face recovery AI is a groundbreaking technology. Now you can recover the blurry faces of your photos. The face recovery AI of the Gigapixel AI brings significant details to the faces. It upscales photos by  600%.

Setting to follow

Topaz Gigapixel AI Setting, Topaz Gigapixel AI Review

Enhance Cityscapes Photos

Original Image

Original Photo of Cityscape

Gigapixel AI

Gigapixel AI Photo

Using the Lines AI we add details to the architectures. 

The Landscape Presets and the Architecture Preset are also helpful for getting sharp lines and geometric details.  Adjust the slider based on the level of noise present in your image. Higher values smooth out noise but might soften details. Then enhance clarity and definition, especially for distant features. 

Settings:

Gigapixel AI Setting

Alternatives to Topaz Gigapixel AI

The Topaz Gigapixel AI works amazingly but it isn’t the only one in town! Let’s see some strong alternatives worth considering, each with its strengths and weaknesses:

GIMP

GIMP is a powerful and free software that offers basic image upscaling functionalities. However, you may need some plugins like Lanczos resampling and Resynthesizer. It is not a dedicated AI tool but provides a decent edited photo. 

Waifu2x

This open-source AI-powered upscaling tool focuses on anime and cartoon styles. You will see improved clarity and sharpness while preserving the characteristic style. 

Let’s Enhance

Let’s Enhance is a cloud-based service that offers impressive AI-powered upscaling. Also, it has features like features like noise reduction, sharpening, and face recovery. The flexible pricing plans and a free trial make it a good option for the occasional user.

Adobe Photoshop

Photoshop’s powerful tools like “Bicubic interpolation” and “Super Resolution” can achieve decent results. If you already own Photoshop, it might be a sufficient solution for occasional needs.

Final Thoughts | Topaz Gigapixel AI Review

So, Gigapixel AI can be a handy software to get enhanced photos. The program can provide you with impressive results for your photos. But you need a higher configuration computer to get the best performance from this program. Also, the results vary with the complexity of the images. 

The face detection technology is good enough but still, there are a lot of areas to improve. And the pricing of this software seems unattractive for the occasional users. However, it offers a free trial version too. 

Still, I want to say that if you need a professional level of editing, you should go for a professional editor. The Graphics Cycle and other image editing agencies like Clipping World can deliver high-quality editing at a lower rate than the Topaz Gigapixel AI. 

But the Topaz Gigapixel can deliver you quick results and you can edit the photos with only a few clicks. So, the decision is yours. 

Don’t Miss Out

Midjourney AI Review | The Best AI Image Generator

FAQ | Topaz Gigapixel AI Review 2024

Is Gigapixel AI better than Photoshop?

It depends on what editing you need. If you need some quick upscaling, noise reduction or sharpening, Gigapixel AI is a good choice. But if you need more detailed editing of your photos, Photoshop is unbeatable.

Is Topaz Gigapixel AI worth buying? 

Based on my experience in using this program, you should buy this program, if you need regular upscaling of your photos.  But the pricing seems higher to me for the occasional users. 

Is Topaz Gigapixel free?

Although Topaz offers a free trial version, you have to buy it to access the full range of features.

Show your love

How To Convert RAW To JPEG Photos

How To Convert RAW To JPEG Photos

You can use different methods to convert raw to jpeg

For example, you can use dedicated photo editing software. Also, the free online image converters help convert image formats.

In this article, I will be discussing the three different ways to convert your images from raw to jpeg. Also, you will get bonus tips on batch conversion.

However, you need a good understanding of these two image formats. It will help you to choose the right format for your projects. Let’s start.  

Understanding the RAW and JPEG Image Formats

Feature RAW Format JPEG Format
Data Processing Unprocessed, like fresh ingredients Compressed, pre-cooked dishes
Flexibility in Editing Maximum flexibility in post-processing Limited flexibility due to pre-processing by the camera
File Size Larger file size Smaller file size
Control in Editing Full control over image parameters Limited control, as decisions are made by the camera
Efficiency in Editing Efficient for extensive editing Limited efficiency due to pre-processing

As a photographer or image editor, it is important to choose the right image format. However, both raw and jpeg image formats are the most commonly used image formats. Each has distinctive features that allow you to use them for different needs. 

The raw images are like the fresh ingredients of a recipe.  You capture all the raw details through your camera lens. 

That’s why the raw images contain unprocessed information. It gives you the maximum flexibility in photo editing. Moreover, in the raw images will have the control in your hands. So, altering the image parameters such as white balance or shadows becomes more efficient. 

On the other hand, JPEG or JPG is the more compressed image format. You can compare it with the pre-cooked dishes. Here your camera will process the data. It will take decisions on certain image parameters including white balance and sharpness.

Thus you will get a more manageable and smaller file format. 

RAW Vs. JPEG Image Format: Which One Should You Choose 

The choice between JPEG and raw format for your photos depends on your needs. So, you have to know the advantages and disadvantages of both formats. 

Let’s learn about some key points to consider for each format:

JPEG File Format

Advantages

  • The JPEG files are compressed. So, you will get smaller file sizes. 
  • This is beneficial for storage and sharing.
  • JPEG is a versatile image format. It is supported on most of the devices. 
  • JPEG files require minimal post-processing. So, it saves time for the photographers. 

Disadvantages

  • The lossy compression of the JPEG format discards some image data during compression. 
  • Loss of image quality during editing
  • JPEG has a limited dynamic range compared to raw

Raw File Format

Advantages

  • Raw files contain all the data without any lossy compression
  • Provides more flexibility in post-processing
  • Preserves maximum image quality
  • Have a higher dynamic range
  • Provide greater control over the image parameters

Disadvantages

  • Raw files are larger than JPEGs.
  • Not all devices and software support raw formats
  • Raw files require more post-processing to achieve the desired look 

Choosing the Right Format

Choose RAW if

  • You prioritize maximum editing flexibility and control.
  • You plan on heavy post-processing or printing your photos.
  • Storage space is less of a concern.

Choose JPEG if

  • You need to share your photos quickly and easily.
  • Storage space is limited.
  • You prioritize a faster workflow.

Convert RAW to JPEG Using Adobe Photoshop 

Converting RAW photos to JPEGs in Photoshop is the easiest way if you have Photoshop on your PC. It is the best raw-to-jpg converter software for PCs.

Let’s learn about the individual file conversion and batch photo conversion techniques: 

Individual File Conversion

Step 1: Open the raw file in Photoshop. 

Step 2: Go to File > Export > Export As.

Here, you have to choose JPEG as the file format. Moreover, you will get a slider to adjust the quality. Then choose the destination folder, rename the file, and hit the “Export” button. 

Individual File Conversion

Batch Conversion | Convert RAW to JPEG

Step 1: Go to File > Scripts > Image Processor.

Step 2: In the “Source Folder” section, click “Select Folder” and choose the folder containing your RAW files.

Step 3: In the “Destination Folder” section, click “Select Folder” and choose where you want the converted JPEGs to be saved. 

Step 4: Make sure “Save as JPEG” is selected in the “File Type” section. Then click “Run” to start the batch conversion. 

convert raw to jpeg in Photoshop, convert raw to jpeg

Following these steps, you can convert raw to jpeg in Photoshop.

Converting RAW to JPEG Online: 10 Top Converters for Occasional Use

Capturing photos in RAW format unlocks the full potential of your camera. However, you have to convert them into JPEG before sharing or storing them. 

Photoshop may require some time for the conversion. Also, you may not have access to Photoshop on your computer. 

In this scenario, you can use the online converter for the quick conversion of RAW photos to JPEG. These websites are free and you need only one click on the “generate” button to get the file. 

Let’s learn about the 10 most used raw to jpg converters online free: 

1. iLoveIMG | How To Convert RAW to JPEG

 iLoveIMG Converter, convert raw to jpeg

This user-friendly platform has a clean interface. The iLoveIMG supports over 200 formats, including RAW and JPEG.

How to Use

Step 1: Drag and drop your RAW file or click “Select Image.”

Step 2: Choose JPEG as the output format.

Step 3:  Click “Convert Now.”

Step 4: Download the converted JPEG.

2. Convertio

Convertio

Convertio offers an extensive file format library.  It supports over 300 formats. You can easily convert the RAW images to JPEGs.

How to Use

Step 1: Click “Choose Files” or drag and drop your RAW file.

Step 2: Select JPEG as the target format.

Step 3: Click “Convert.”

Step 4: Download the converted JPEG.

3. Zamzar

Zamzar, convert raw to jpeg, graphicscycle

 Zamzar is a popular online platform for image format conversion. It is a veteran in the online conversion field. It is convenient, super speedy, and supports 1200+ formats. 

How to Use

Step 1: Click “Choose File” or drag and drop your RAW file.

Step 2: Select JPEG as the “Convert To” format.

Step 3: Enter your email address to receive the converted file.

Step 4: Click “Convert Now”

4. CloudConvert

CloudConvert

CloudConvert supports almost all types of audio, video, image, and document file formats. It offers the highest data safety to its users. 

How to Use

Step 1: Click “Select Files” or drag and drop your RAW file.

Step 2: Choose JPEG as the “Output format.”

Step 3: Click “Start Conversion.”

Step 4: Download the converted JPEG.

5. FreeConvert.com

Free Convert File Converter, how to convert raw to jpeg

Highly convenient image conversion tool. FreeConvert.com excels at basic file conversions like you can convert raw to jpeg. It supports more than 1500 formats. 

How to Use

Step 1: Click “Choose File” or drag and drop your RAW file.

Step 2: Select JPEG as the “To format.”

Step 3: Click “Convert Now.”

Step 4: Download the converted JPEG.

6. Online-Convert

Online-Convert, Free Online File Converter

What type of file do you need to convert? You will get all the file conversion services at the same place. 

How to Use

Step 1: Click the convert button. From the drop-down menu select Image. Then select RAW.

Step 2: Now click the To button. Again, from the drop-down menu select Image and then select JPEG.

Step 3: Click “Choose File” or drag and drop your RAW file.

Step 4: Click “Convert File.”

Step 5: Download the converted JPEG.

7. ConvertImage.io

image conversion tool

Another veteran image conversion tool. It is a minimalist platform with a focus on user experience. 

How to Use

Step 1: Click “Browse” or drag and drop your RAW file.

Step 2: Choose JPEG as the “Convert to” format.

Step 3: Click “Convert.”

Step 4: Download the converted JPEG.

8. Aconvert

Aconvert, Convert Raw to JPEG

The Aconvert is another online tool that allows conversion of raw image files to jpg or jpeg. 

How to Use

Step 1: Click on Add Files. Then select the raw image.
Step 2: From the drop-down menu of Target, select the JPEG file format.
Step 3: Click the Convert Now button.
Step 4: Download the file. 

9. Pixlr.com

Pixlr

This online image editor includes a free conversion tool with support for RAW formats.

How to Use

Step 1: Click “Open Image” and select your RAW file.

Step 2: Click on the “Download” icon and choose “JPEG” as the format.

Step 3: Adjust quality settings if desired.

Step 4: Click “Download” to save the converted JPEG.

10. ImageResize.org | Convert RAW to JPEG

ImageResize.org

This platform specializes in image resizing but also handles conversions. This is one of the best tools to convert raw to jpeg

How to Use

Step 1: Click “Upload Image” and select your RAW file.

Step 2: Choose “Convert to JPEG” from the format drop-down.

Step 3: Optionally adjust image size and quality.

Step 4: Click “Start Processing” and download the converted JPEG.

Convert RAW to JPEG with Built-in Apps: A Mac & Windows Guide

Your operating system might already have the answer to your RAW-to-JPEG conversion needs. Let’s dive into the built-in apps of macOS (Preview) and Windows (Photos). Here is how to use them for the image file format conversions: 

macOS (Preview)

Preview, the default image viewer on Macs.  can surprisingly handle RAW conversion!

Process:

Step 1: Right-click your RAW file and select “Open With” > “Preview.”

Step 2: Click “File” > “Export.”

Step 3: In the “Format” pop-up menu, choose “JPEG.” You can adjust the quality further using the slider.

Step 4: Select the folder and rename the file. 

Step 5: Click “Save” to convert your RAW file to JPEG.

Windows (Photos)

Windows Photos app also offers basic RAW conversion features.

Process

Step 1: Open your RAW file with Photos.

Step 2: Click the three dots (…) in the top right corner and select “Edit in Photos.”

Step 3: Click “Edit” > “Save a copy.”

Step 4: In the “File format” dropdown, choose “JPEG.” You can adjust the quality using the slider.

Step 5: Click “Save” to convert your RAW file to JPEG.

Convert RAW to JPEG on iPhone

If you are an iPhone user, you will get the easiest way to convert the raw photos to JPEG. It will take less than a minute to get your files. 

However, you can do it in two different ways. The first one is the Photos app on your phone. And, the other method is a third-party raw to jpg converter app. 

Amongst the two methods, the Photos app is readily available and secure. So, open the Photos app and select the RAW image you want to convert. Then click the Share button. You will get in at the bottom part of the app.

After that,  scroll down and tap “Save to Files.” Choose the folder to save the file. Then tap “Save” in the top right corner.

As you have completed this process, now we can convert raw to jpeg.

Here are the Steps You Need To Take

Step 1: Open the Files app and locate your saved RAW image.

Step 2: Long press on the image thumbnail and tap “Quick Actions.”

Step 3: Select “Convert image.”

Step 4: Choose “JPEG” as the format.

Following this process you can convert the RAW image into JPEG on your iPhone. 

Final Thoughts | Convert RAW to JPEG

Every file format has specific benefits. You have to use the file format according to your requirements. The RAW files give more flexibility in editing while the JPEG files need less storage capacity. 

However, you can convert raw to jpeg by the methods that we have discussed in this article. These methods are also helpful for converting any type of image file format. Moreover, some online conversion tools offer PDF and document conversions. 

So, make the best use of these tools and improve your project.

Read Our More Articles-

FAQ | How to Convert RAW to JPEG

Should You Convert RAW to JPEG?

Converting the RAW images to JPEG may affect the resolution, but you need the JPEG format for different purposes. The JPEGs are more manageable and need less storage. 

Why does JPEG Look Better than RAW?

The JPEGs are the compressed files. The camera sensors process the information and image parameters and give the final image to you. Meanwhile, the RAW images are the unprocessed photos. That’s why the JPEG looks better than the RAW.

Show your love