How To Make A Transparent Background [5 Easy Ways]

How to Make Transparent Background

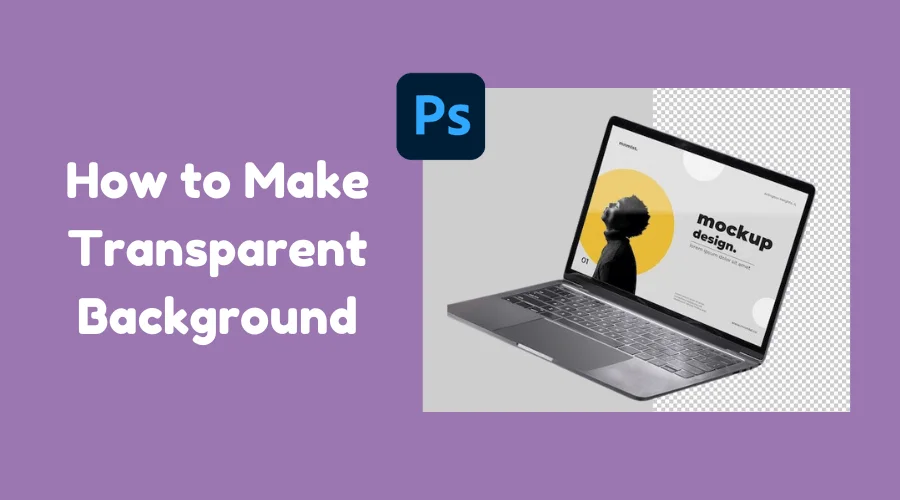
 How to make a transparent background? This article will drive you to it following simple steps.  A photo with a transparent background has no muss. It is only the subject floating, with no background stealing the spotlight. Thus, photo editors eliminate the messy photo background that may affect the beauty of the photo. 

A Photoshop transparent background allows you to place the subject according to your requirements. So, you can create new designs by image manipulation. This is a great way to create exciting effects.

Moreover, the Transparent background photo looks more professional. However, you must know how to create transparent background photos professionally. Let’s learn the process using Photoshop. 

How to Make A Transparent Background in Photoshop? 

Background removal is a go-to option for e-commerce photography. It allows the creation of effective marketing material. So, businesses can reach their customers with better representations. As a result, it increases sales. Here is how you can make a transparent background  in Photoshop

Add A Background Image in Photoshop

Add a background image in Photoshop

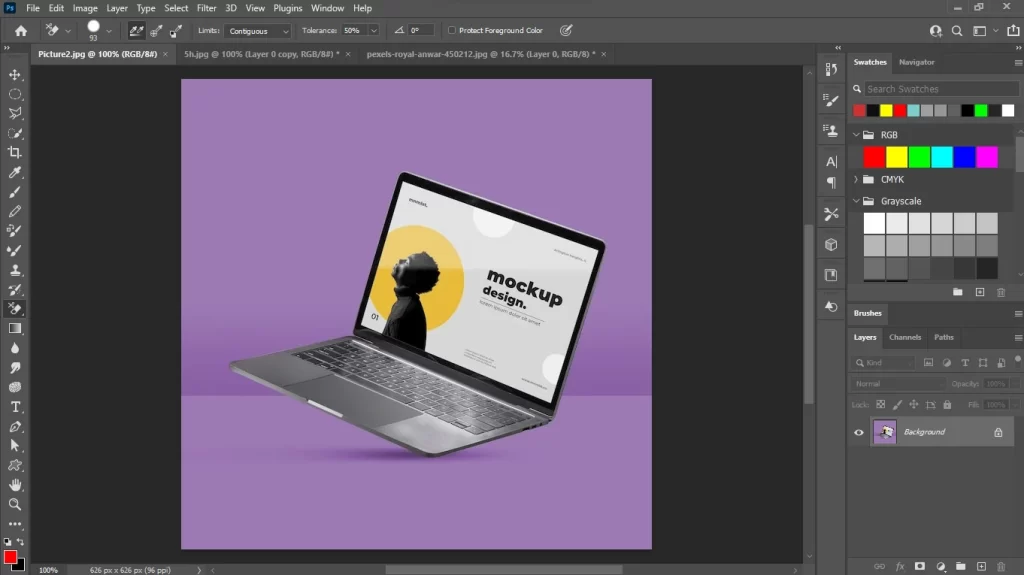
This is the first step of removing the background from an image. Launch Photoshop and then click on File to open the image. Thus, you can add background images in Photoshop

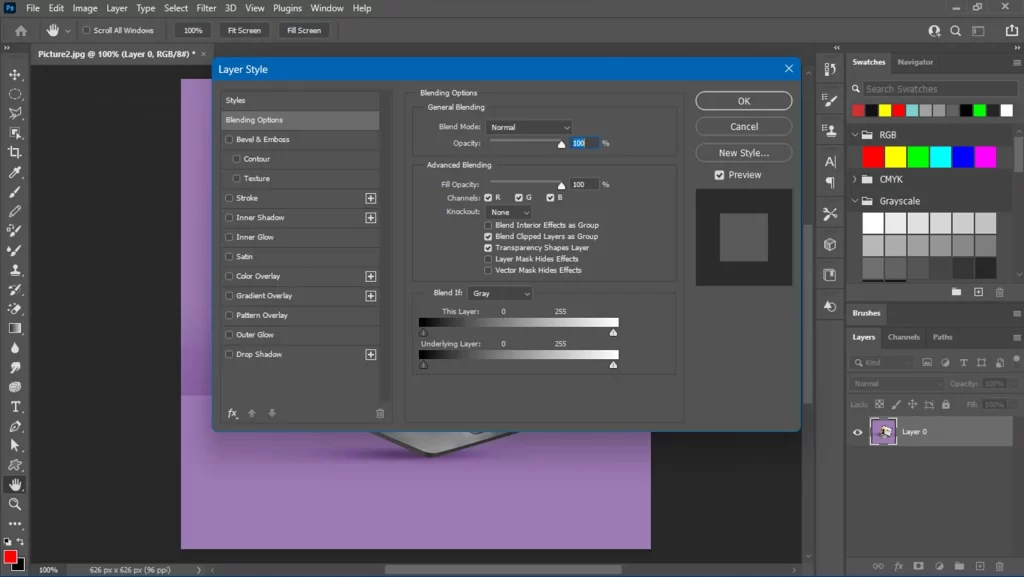
You will get the background image on a new layer in your Photoshop document. Using the Transform tool (ctrl+t for Windows), you can drag and drop the background image layer. You can also adjust the layer’s opacity using the Opacity slider in the Layers panel. Now we will start to replace the background.

Layer Style in Photoshop

Select The Subject Using A Selection Tool

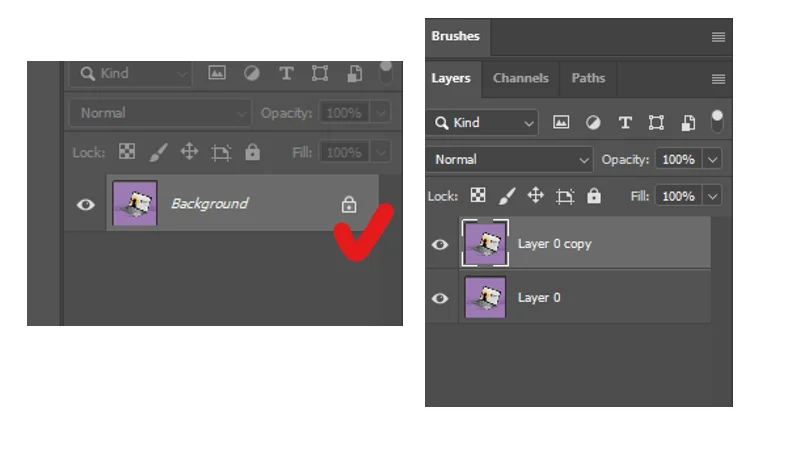
Now, you have to select the subject from the background layer. So, double-click on the lock icon of the background layer in the layers panel. Make a duplicate layer of the layers panel by pressing ctrl+j. So, your original image will remain unaffected. 

Select the subject using a selection tool, How To Make Transparent Background

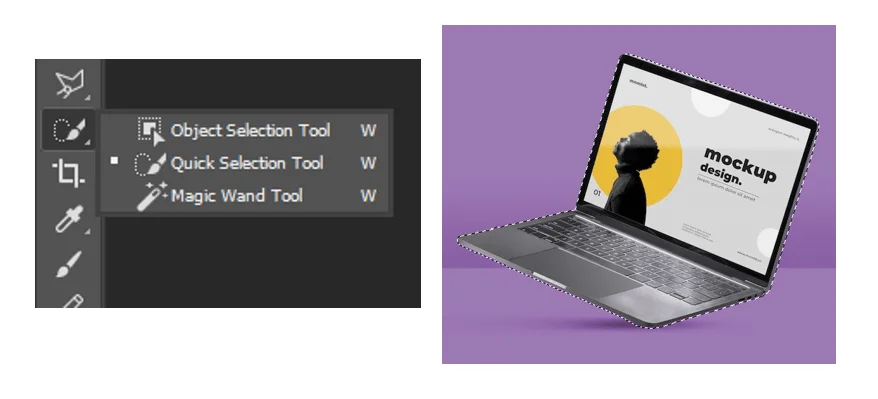
Select a Photoshop image selection tool from the toolbar. Here, you will find different image selection tools like the lasso, polygonal, quick selection, object selection, magic wand, and Photoshop pen tools. 

The experts love to use pen tools to make a selection for a Photoshop transparent background. You will have complete control over the device, so you can select the object precisely using this tool. However, the Photoshop AI is so improved now. You will get a perfect selection using the other selection tools. 

That’s why we will use the Object Selection Tool for this tutorial. Select the tool from the toolbar. Then, drag the rectangle box around the object. Photoshop AI will automatically select the background image

Selection Tool in Photoshop, How to Make Transparent Background

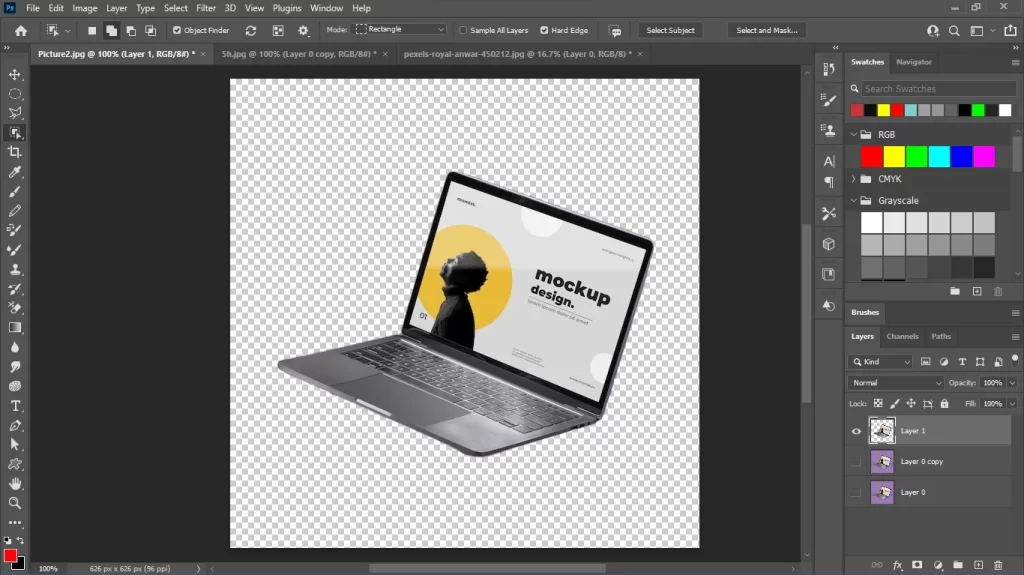
Take The Selected Subject To A New Layer

You can directly copy it and place it on a new transparent layer. Also, press ctrl+j to take the subject to the new transparent layer.

Take the selected subject to a new layer

Here, you can fill a new layer with a suitable color to change the background. Or, leave the file as a transparent background.

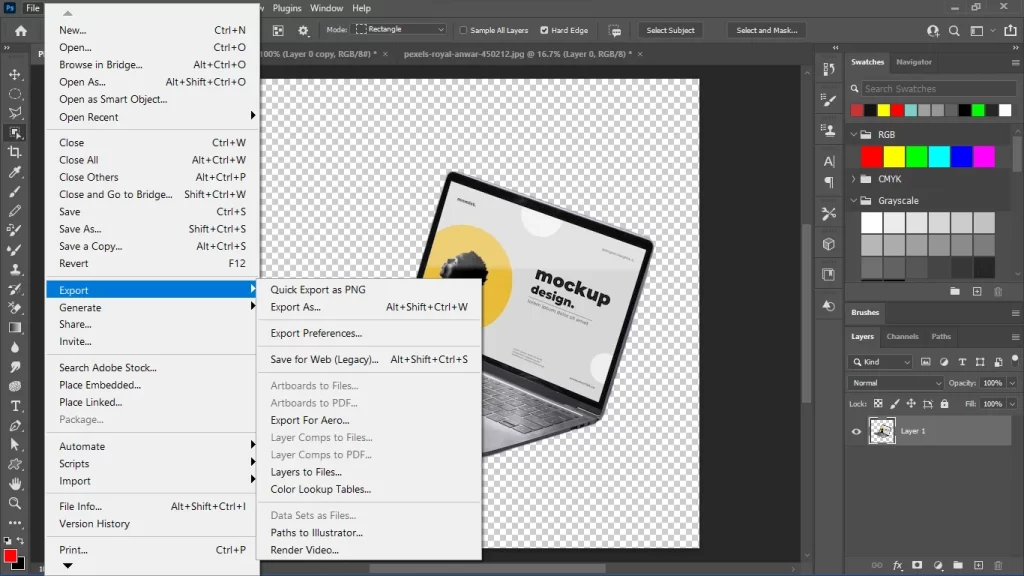
Save As A PNG Format File

Delete the background layer and navigate to File>Expeort> Quick Export as PNG. Thus, you can save the file as a transparent background. 

Save As A PNG Format File, How to Make Transparent Background

Transparent Background Using Background Eraser in Photoshop

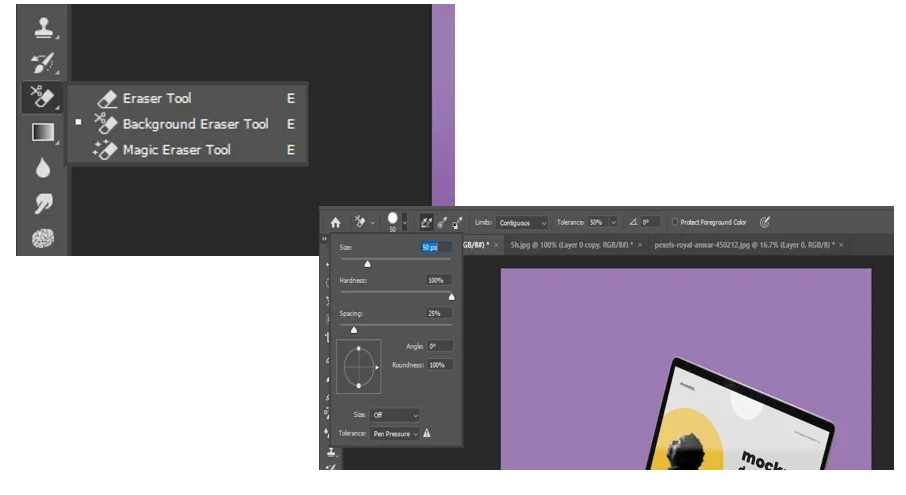
The background eraser of Photoshop is another amazing tool to create a transparent background. The process is simple and easy, but you need patience to achieve the result. Here is how you can use this tool:

Background Eraser Tool in Photoshop, How to Make Transparent Background

Create a duplicate layer of the background layer so that it remains unaffected. I have already discussed creating the same layer from the layers panel. Now, select the background eraser tool. You can find it in the toolbar on the left of the screen. Adust the tool setting, such as the brush size, hardness, and opacity.

Start erasing the background by dragging the eraser tool over the image. Finally, refine the subject’s edges and export the file in the PNG format. Thus, you can use a background eraser for a Photoshop transparent background.

Photoshop Transparent Background Using Eraser

Transparent Background in Photoshop By Applying Clipping Path 

This is the professional way to create a transparent background photo in Photoshop. Professional photo editors earn a lot of money by providing this service. So, you are going to learn a professional skill! However many of us think that creating a clipping path is a hard task and you need professional skills to create a perfect clipping path.  But all you need is to practice the following steps. So, open your image in Photoshop, and let’s start.

Step 1: Convert The Background Image To A Layered File

If your image opens as a background layer (common with JPEGs), you’ll need to convert it. Right-click on the layers panel. Then choose “Convert to Layer” from the option.

Step 2: Create A Clipping Path

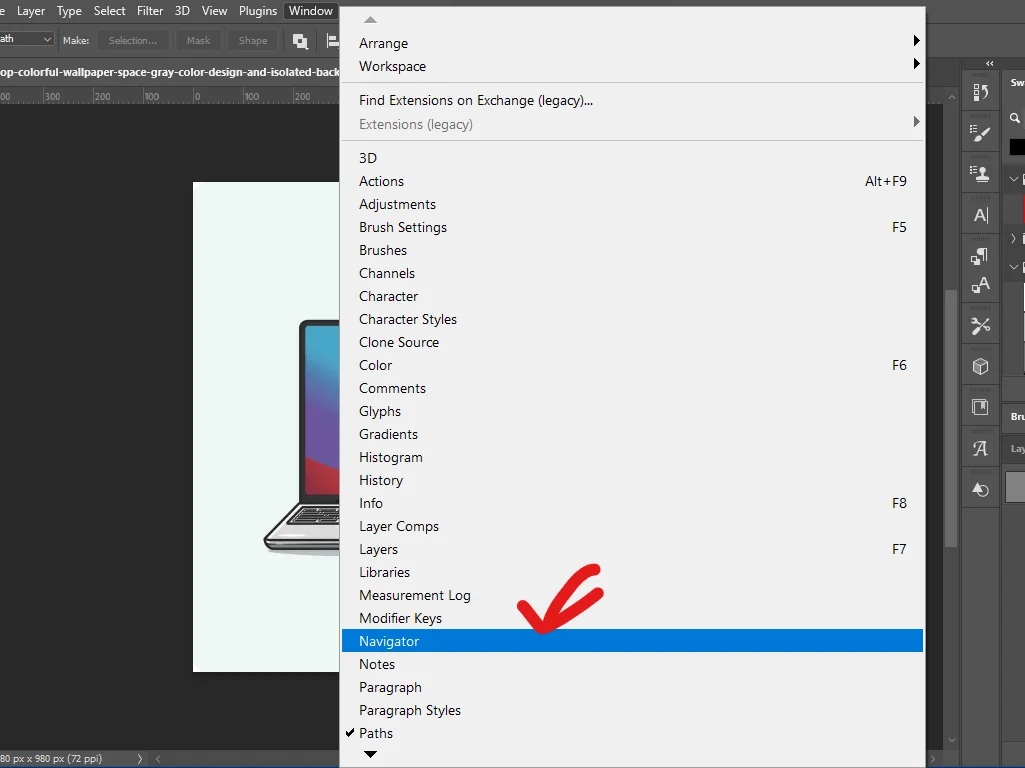
You can use different Photoshop tools to create a clipping path. However, professional editors use the pen tool. Now click on the “Window” button from the option bar in Photoshop and select “Navigator.” 

Navigator in Photoshop

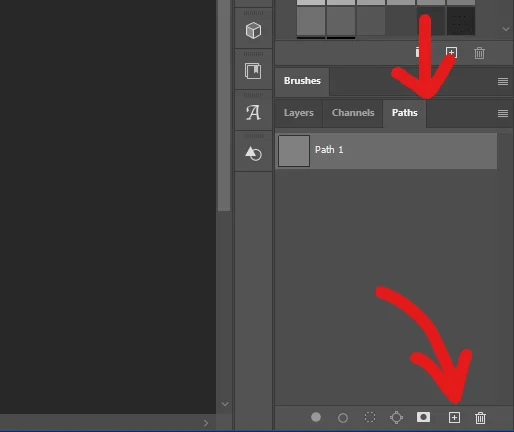
Zoom in 300% by holding the ctrl and “+” buttons on your keyboard. And to zoom out the photo hold ctrl and press “-” from the keyboard. You can confirm the zoom size from the navigator window. Now create a path layer by clicking on the add button (“+” sign).

Select Clipping path in Photoshop

Click on the three dots of the path panel and select Clipping path. Click on the three dots of the path panel and select Clipping path. A new dialogue box will appear. Make sure the flatness box is blanked and hit OK.

Path Panel Dialog Box, How to Make Transparent Background

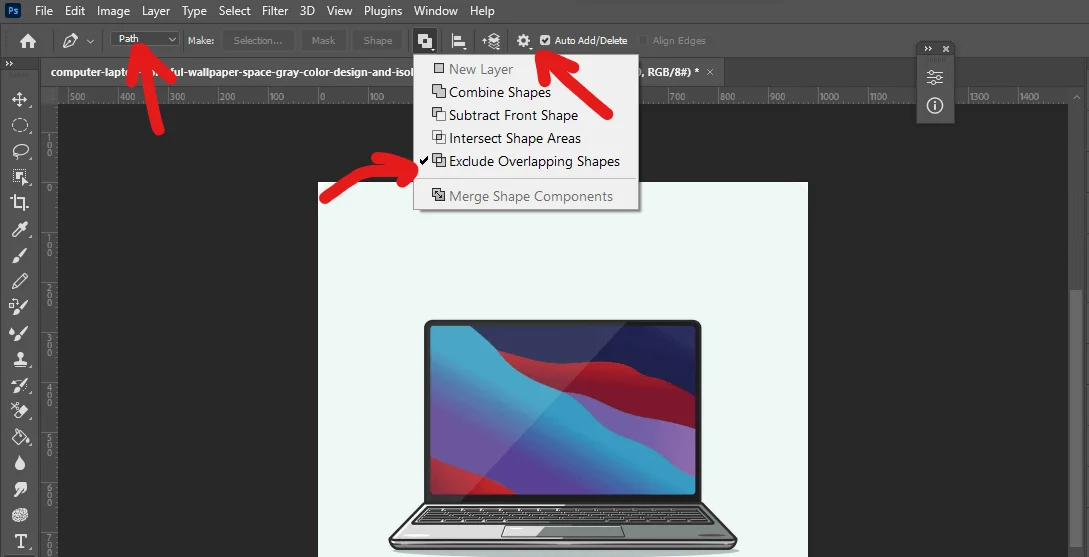
After that, select the pen tool from the Photoshop toolbar. Before start drawing the path, make sure the “path” is selected from the pen tool optionbar. And make sure the “exclude overlapping shapes” is selected from the path operation option. Then check the “rubber band” from the “start additional path and path options”. Make sure the auto-add and delete options are checked. 

Exclude Overlapping Shapes

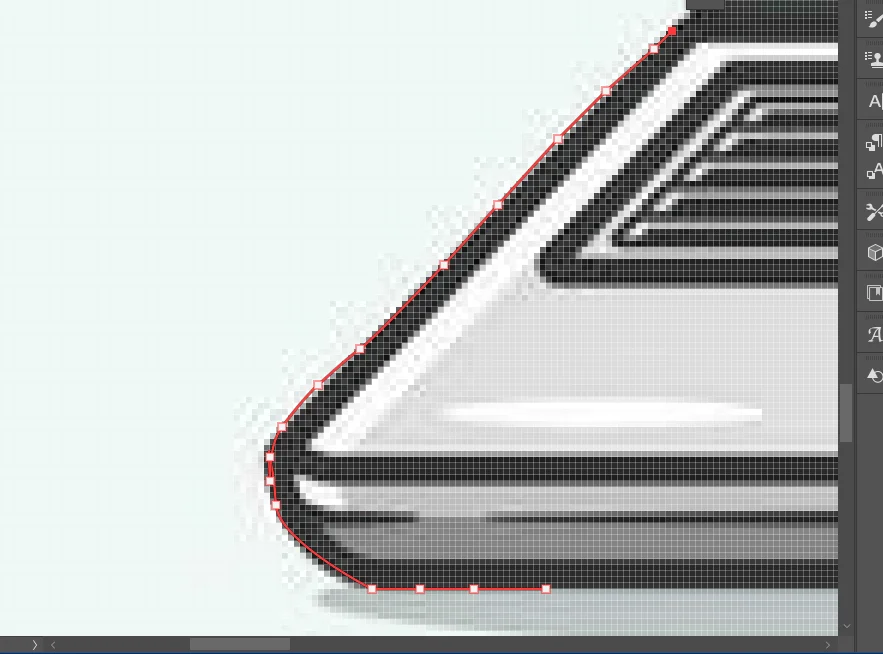
Click around the edges of the object you want to isolate, creating anchor points. Hold Shift while clicking to create straight lines. Patiently draw the path. 

Path Drawing, Transparent Background in Photoshop By Applying Clipping Path 

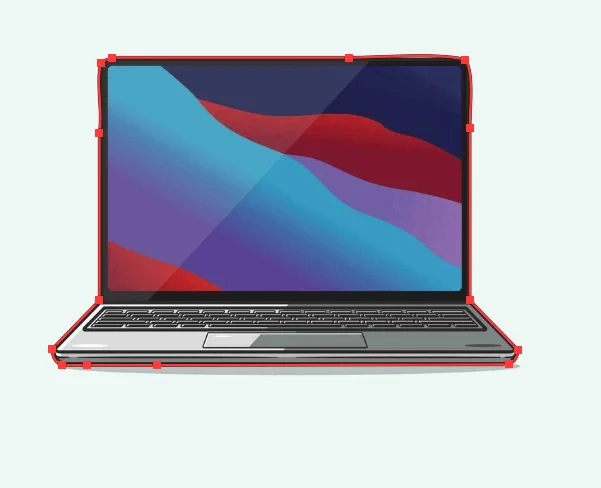
Once you’ve traced the object, click the topmost anchor point to form a closed path.

Make Selection, Clipping Path

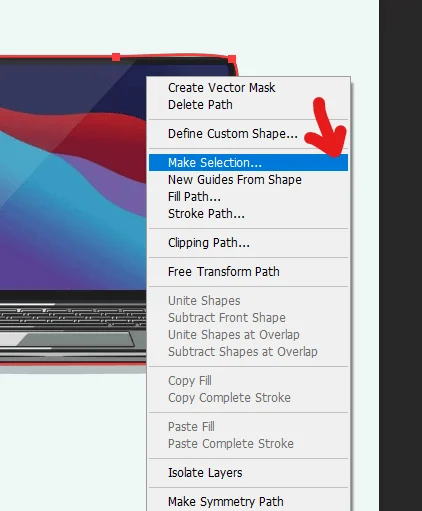
With the path active, right-click inside the path and choose “Make Selection.” Alternatively, press Ctrl+Enter (Windows) or Command+Enter (Mac). This creates a selection around the object based on your clipping path.

Make Selection Option in Photoshop

You can change the feather radius. We have chosen 0.5 for this image. 

Step 3: Add a Layer Mask

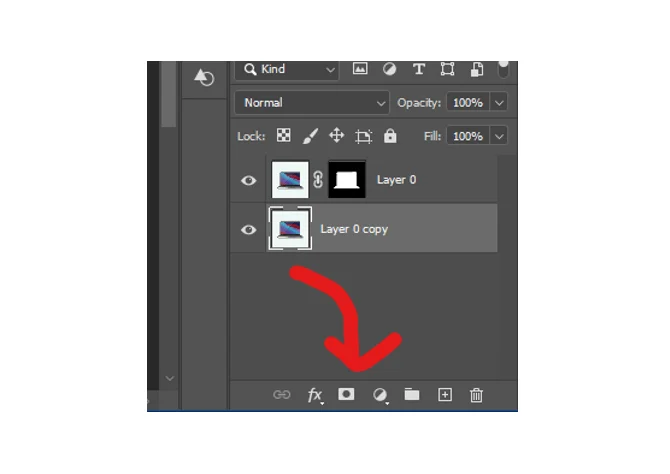
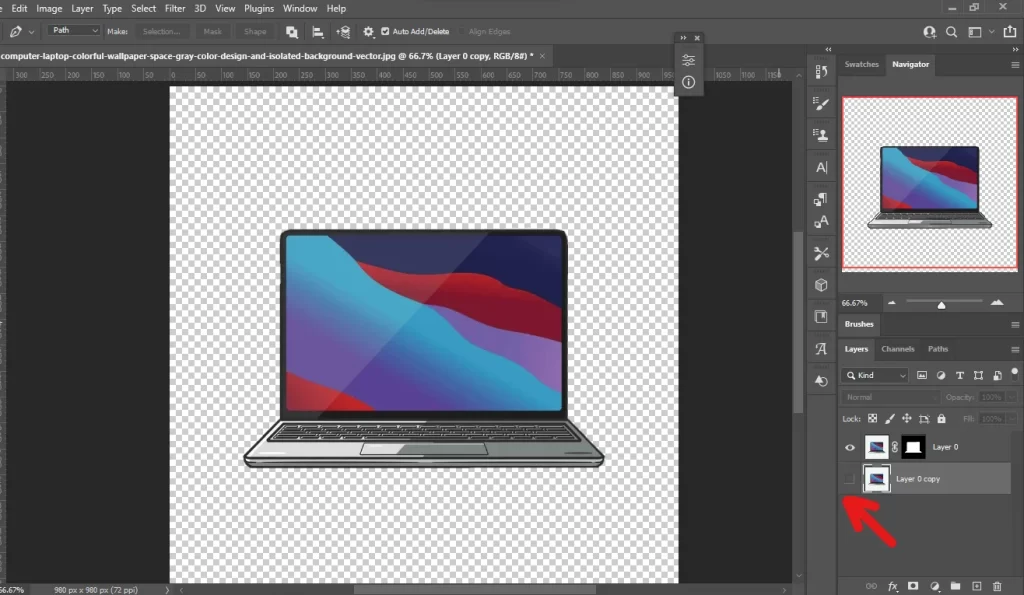
After that make a duplicate layer of Layer 0. In the Layers panel, click the “Add Layer Mask” button (rectangle with a minus sign). Then delete the original layer. If you want to keep it then off the layer eye. Thus your transparent background photo is created using the Photoshop clipping path

Duplication Layer Creation in Photoshop

However, it may seem so time-consuming for a single image. But you will get professional-level photos with this method.  Meanwhile, you can automate the process for batch photo editing. It saves time and allows you to edit a large number of photos with a few clicks. 

Transparent Background Using the Photoshop Clipping Path, How to Make Transparent Background

How to Make A Transparent Background in Paint?

You can also use MS Paint to make the background transparent. Here is how to make a transparent background in paint

Method-1

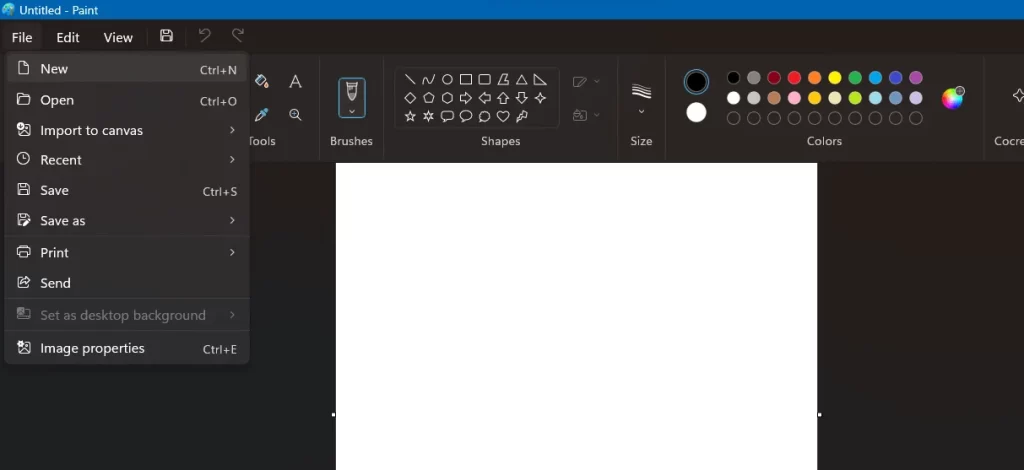
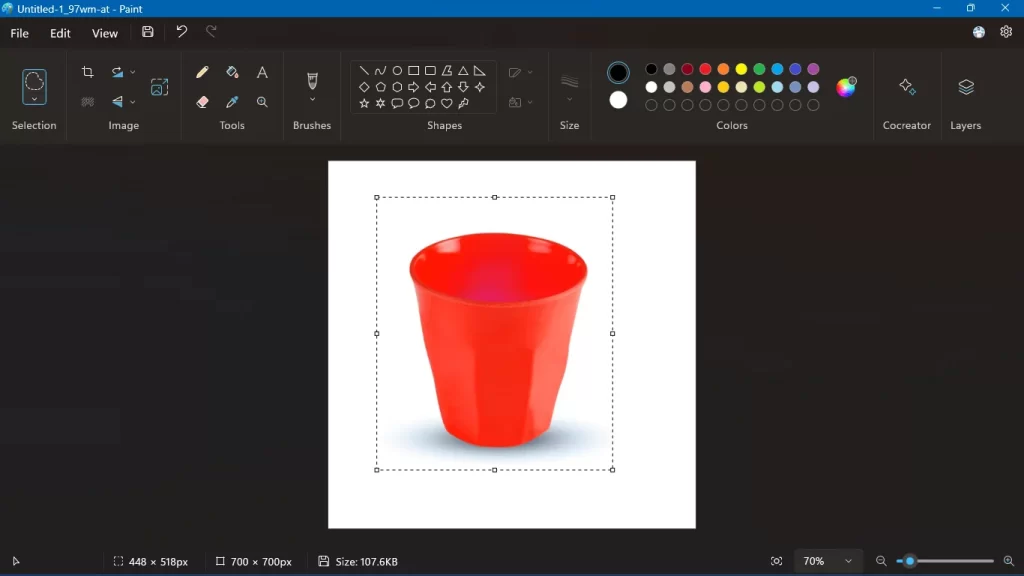
Step 1: Open the image in Paint by navigating File>Open 

New File in Paint, How to Make A Transparent Background

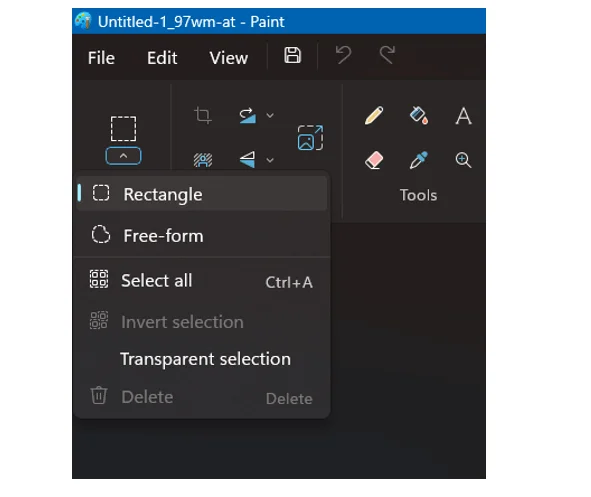
Step 2: Now click the Selection on the left corner of the bar. Then, from the drop-down menu, select Transform Selection. 

Rectangle Shape in Paint

Step 3: Again, click on Selection. This time, select free-form. Now trace around the area you want to preserve. 

Tracing The Area

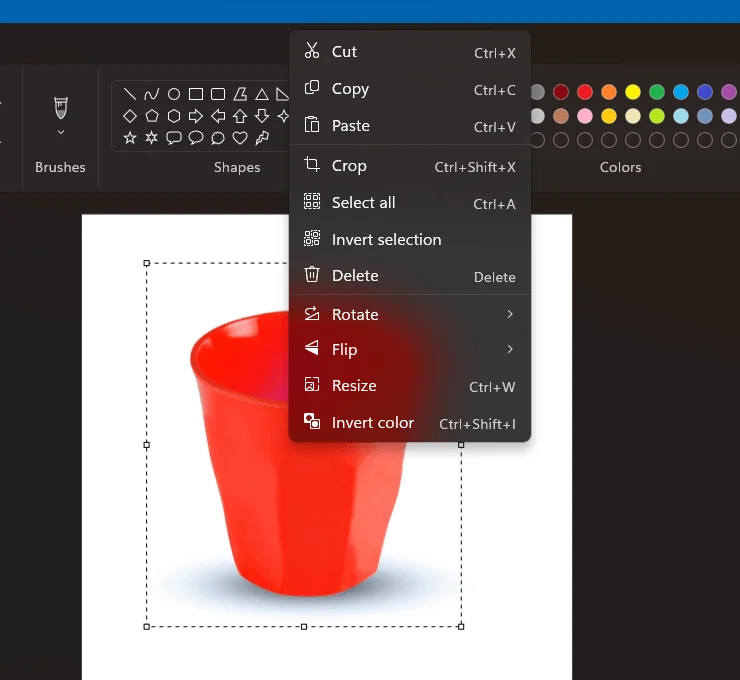
Step 4: Right-click on the rectangle area and cut the selected portion. 

Cut the Selected Option, How to Make A Transparent Background

Step 5: Open a new page or image in Paint. Paste the cutout portion. Then, save the new image as a PNG in paint.

Method-2 

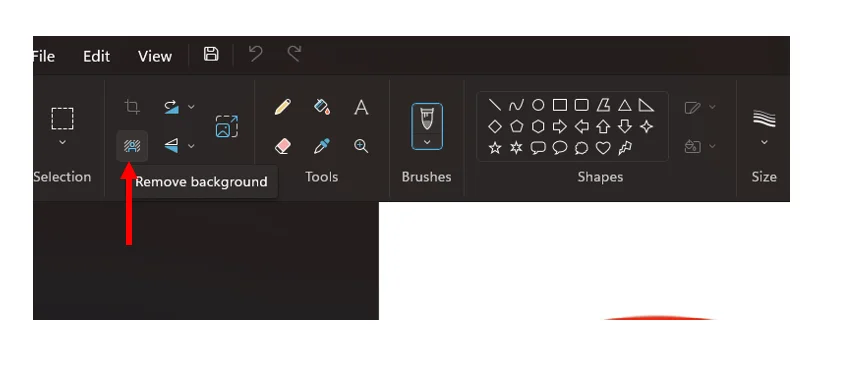
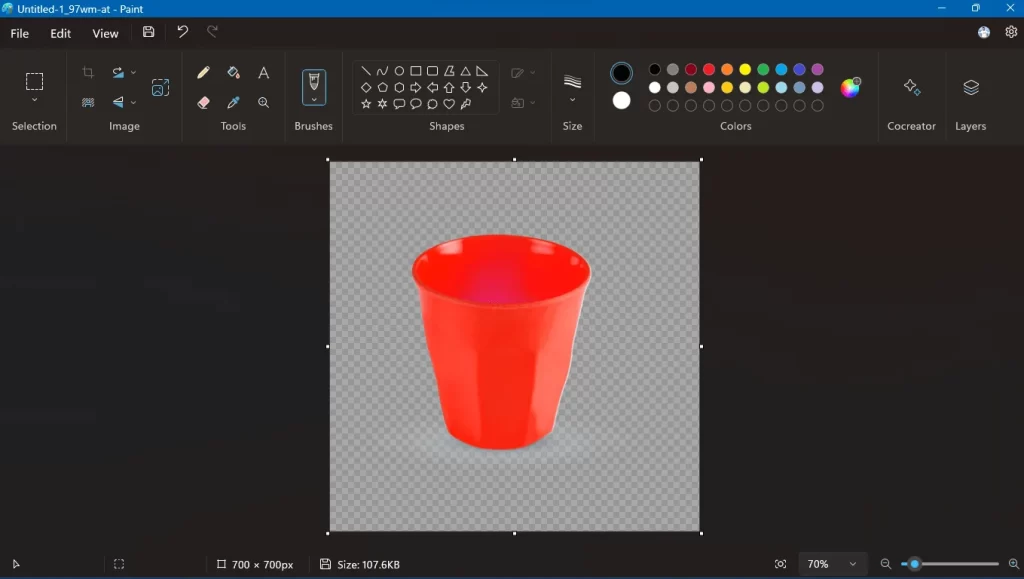
This is the easiest way to make the background transparent in the paint with a single click. You will get the Remove Background tool on the toolbar panel in Paint. You only need to click on the tool, and the Paint AI will do the rest. It’s fun, isn’t it?

Remove Background Tool on the Toolbar Panel in Paint

Transparent Background in Paint, How to Make A Transparent Background

Why Do You Need to Create A Transparent Background Photo?

A transparent background photo offers several advantages. That’s why the demand for this service is so high. Even professional photos have the most clients on the background removal services. 

  • Increased Focus on the Subject: This is one of the main reasons for removing the background of an image. Thus you can have the most focus on your main subject. 
  • Versatility in Design: A transparent background allows you to place the image on any colored background. This flexibility allows you to manipulate the images and create mockups, website designs, or collages.
  • Professional Look: Transparent background photos help you to bring a professional look to the raw photos. Clean, transparent backgrounds give a professional and polished feel to your designs. 
  • File Size Benefits: Transparent backgrounds can sometimes lead to smaller file sizes compared to images with solid backgrounds. This can be advantageous for web applications where fast loading times are important.

7 Best Free Apps To Remove The Background for iOS & Android

There are several programs available for background removal. You can use them for the IOS and Android mobiles. Here are the top 7 apps that provide amazing background removal features. 

01. Picsart 

Picsart

Picsart has become the most popular mobile photo editor. This is the best free app to remove background a versatile program that you can use to create unique designs.  It is a helpful program for background removal on both iOS and Android. Here, you will get both the manual and automatic tools. 

Moreover, you will get the option to change your background. You can use both color and image as a new background. Picsart also allows you to edit videos. So, you can add or trim a part of a video and use audio files like other professional video editing programs.

02. PhotoRoom 

PhotoRoom

PhotoRoom also gives you the option to get rid of unwanted backgrounds. Its AI allows you to create professional, transparent background photos. Therefore, it is effective for product photo editing. 

You will also love its batch photo editing feature. It is like a high-quality desktop program. That’s why it is one of the best choices for small-sized online businesses. They get quality photos without any hassle. 

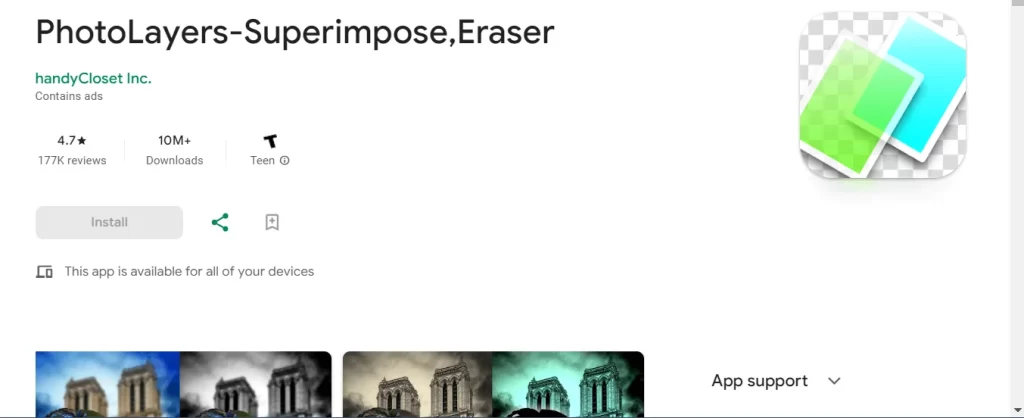
03. PhotoLayers

PhotoLayers

The PhotoLayers is an easy-to-use software for a beginner. However, the accuracy can be a question for complex photos. Still, you will get almost precisely cutout pieces. This program also helps the professionals to unleash their creativity. By manipulating several transparent background photos, you can create exclusive designs. So, PhotoLayers provides an instant background removal feature with exclusive image editing tools. 

04. TouchRetouch

Touch Retouch

TouchRetouch is another best free background remover app. You can also use this app to remove unwanted objects from the image.  This app’s advanced features make it ideal for professional tasks. You will achieve manual background removal within seconds, almost equal to that.  

Moreover, this program’s AI can help you restore your old photos. It is even spot on when removing a particular object or people. This versatile image editing app can significantly help you. However, the app is not free. So, you have to purchase it. 

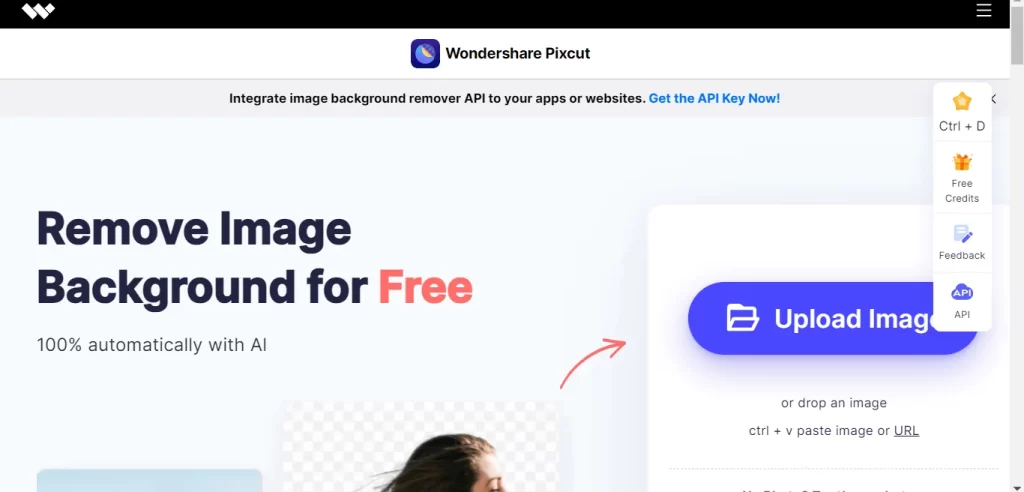
05. PixCut

PixCut

PixCut is the easiest background removal app. You can use this program for almost any type of image editing. Moreover, this is the fastest app for background removal in the market. It will take up to 5 seconds to remove the background, even for the complex photos. 

This app is also available for iOS, Android, and computers. It requires skill and can remove the background from mobile and computer images. Again, PixCut allows you to eliminate the Watermarks in the photo. The bulk background removal feature is also practical. 

06. RemoveBg

RemoveBg, Remove the Background from Photos

RemoveBg is my favorite program to remove the background from photos. You can use it online and remove the background with a few taps.  You will get the transparent background photos in the PNG file format. So, the images will take up almost no space on your device. However, iOS users cannot download remove.bg on mobile devices. They can still use the website version. 

07. Slick

Slick, Program for Removing the Unwanted Background

Slick is also a handy program for removing the unwanted background. After viewing the image, click the button to obtain the PNG file. You will also get various eraser tools to modify the image. This app is available only for Android users. 

FAQ | How To Make A Transparent Background

How To Do Color Correction in Photoshop?

There are different ways to adjust colors in Photoshop. You can change the white balance, exposure, contrast, etc. Also, you can use Photoshop curves to make quick adjustments. However, image masking is the best way for professional color correction. 

How To Add A New Background in Photoshop? 

Open your transparent background photo in Photoshop. Then open the background image. Then position the transparent background photo on that new background.

Checkout Our Latest Articles

Final Thoughts | Transparent Background in Photoshop

A transparent background photo is a must. But you should know the tools well enough to create a transparent background. This article encompasses the easiest process to get rid of the messy background. You can use Photoshop for professional photos. However, you need a lot of practice to get the perfect photo. 

Moreover, you can use the MS Paint and other image editing tools. These tools allow you to remove the background with a few clicks. So, use the tool that fits your requirements best. You can also hire an expert photo editor like Clipping World. They are experienced and have done plenty of successful projects. 

Show your love

13 Best Men & Women Professional Headshot Examples

Professional Headshot Examples

In the professional world, the headshots in a CV give the first impression of the candidate. So, it has to be eye-catching and flawless. The professional headshot examples in this article will help you capture impressive headshots.

Your professional portraits or headshots work for you creating a first impression to the recruiters. A high-quality image can even build credibility. But what are the definitions of a professional headshot?

Is it only the photo where you have to be in formal dresses? Or is it like looking directly into the camera with a big smile or with a serious face and capturing only your head? Well, a headshot can be your brand. It has to be captured in a way that viewers can connect with you through the photo.

People are more likely to connect with someone who appears approachable and reliable. So, we have to be cautious about it while taking the photos. Considering all these facts we have discussed with the top-rated photographers and professionals of this genre.

Tips for Professional Business Headshot Pose

Professional Business Headshot Pose, Professional Headshot Examples

A professional headshot isn’t just about how you look; it’s about how you project yourself. When you are posing for professional business headshots a few things you must consider. Here are some tips for professional business headshot poses:

Body Language

Body language plays the most vital role in professional business headshots. You have to be confident in the photos to give viewers a positive impression of you. That’s why, avoid slouching forward. Again, most of them stand straight while posing for a headshot. But, a slight turn of the body creates a more dynamic and flattering pose.

Head and Expression

A slight head tilt adds personality to the photo. However, avoid tilting too far. Then make direct eye contact with the camera. It is the way to project confidence and engagement. A closed-mouth smile or a subtle smile conveys professionalism. Moreover, you can have a wider smile for creative and lifestyle corporate headshots.

Technical Tweaks for Top-notch Quality Headshots

Top-notch Quality Headshots

A professional headshot is more than just a snapshot. It’s a carefully crafted image that conveys confidence, competence, and approachability. Let’s start:

  • Lighting is King (or Queen): Harsh shadows are a headshot’s worst enemy. Opt for even, diffused lighting. A studio setting offers controlled lighting, but natural light can work wonders too. Find a well-lit spot outdoors or near a window, avoiding the midday sun for its harsh glare.
  • Background Bliss: A clean, clutter-free background is essential. Solid colors like white, grey, or blue are popular choices. Avoid busy patterns that compete with your face. Remember, the focus should be on you!
  • Sharpness is Key: A high-resolution image ensures crisp details. Whether you use a professional camera or your trusty smartphone, ensure good quality to avoid a blurry, unprofessional look.

Professional Headshot Photo Editing Tips

Professional Headshot

Photo editing is like a second chance to the photographers. They use photo editing techniques to remove the inconsistencies from the photos. Thus, the photo becomes so flawless. All modern photographers use photo editing techniques.

Even the great professional headshots examples received a photo editing treatment. It gives them the freedom to concentrate on the composition more than the beautification of the subjects.  There are a lot of photo editing techniques that a portrait photographer usually uses for editing portrait photos.

However, the main focus of portrait photo editing is to make the subject look flawless. That’s why the photo editors usually work on the beautification of the subjects. In the process, they remove blemishes, spots, and dust, fix skin tones, and correct the background and overall color of the photos.

However, do not over-edit the photo. Excessive editing can make the photo look unnatural. So, the goal is to enhance the features while still keeping them natural. For color correction of the image, fix the brightness, white balance, shadow, exposure, and contrast of the image.

You can use different photo editing programs to edit your photos. But the professionals love to use Adobe Photoshop to edit portrait photos. The Photoshop brush tool works amazingly for skin retouching. You can soften any blemishes or imperfections using the healing brush or clone stamp tool.

However, make sure that the texture doesn’t go off while editing. Otherwise, it will create a plastic appearance. Then work on the teeth and eyes of the subjects. You can use the dodge tool or clone stamp tool of Photoshop to lighten these areas.

Remove any unwanted object from the image. Use the crop and straighten tool to get rid of these elements. Also, you use the content aware fill of Photoshop. Thus, you can create perfectly looked professional headshots.

13 Best Men and Women Professional Headshot Examples

You will get several professional headshot examples by searching on Google. But all of these photos are not unique in style. Let’s learn about the top 13 trending professional headshot examples:

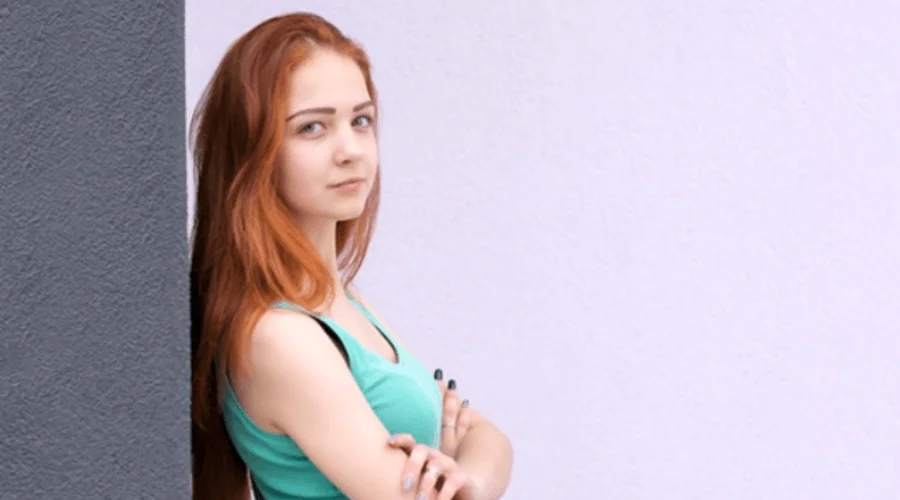
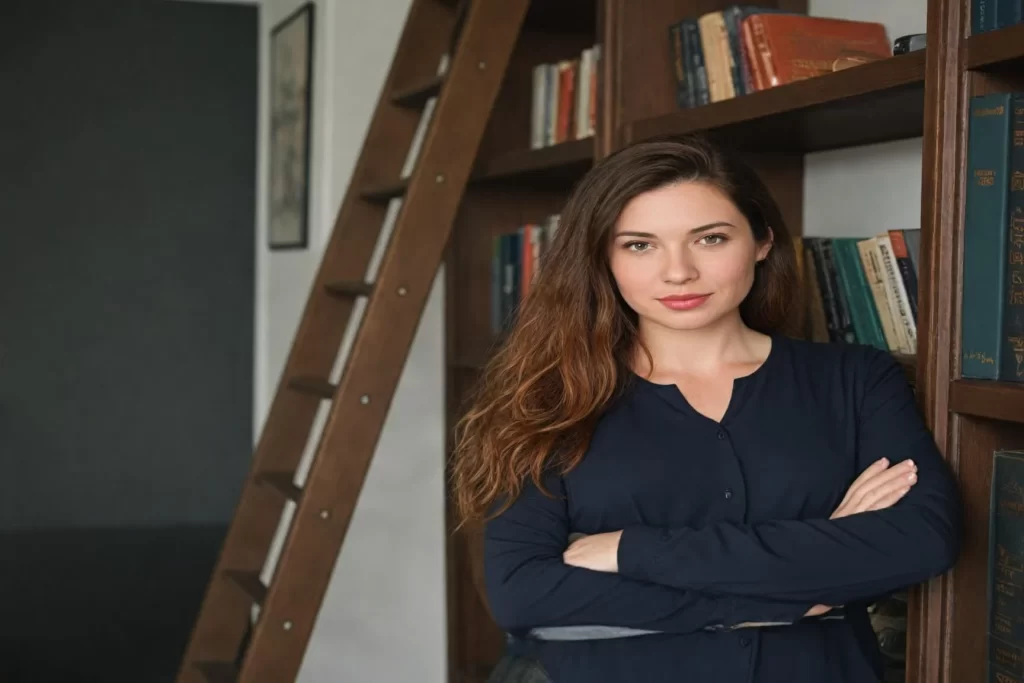
01. Arm Crossed | Professional Headshot Examples Female

Arm Crossed Headshot, Professional Headshot Examples

Though crossed-arm photos are generally not recommended as corporate photos, it has been getting popular in recent times. People are using the crossed arm professional headshots on their social media accounts.

You can use these photos as a cover or profile pictures on social media platforms. Additionally, freelancers use these photos to create promotional materials for their services.

02. Confident Gaze Looking Directly at The Camera

Confident Gaze Looking Directly at The Camera, Examples of Professional Headshots

It is one of the most popular professional headshot ideas. The model needs to maintain good posture for this photoshoot. So, keep the model’s shoulders back and relaxed, chin slightly lifted. The body angle can be straight or slightly turned. Keep the arms relaxed at the sides and make strong eye contact with the camera.

03. Leaning Slightly with A Warm Smile

Leaning Slightly with A Warm Smile, Professional Headshot Examples

In professional headshots, the photographers usually have very little scope to showcase the personality of the model. But this pose allows to portray a more approachable characteristic of the model. So, slightly lean towards the camera. Have a warm smile that reaches your eyes. It makes you more approachable.  

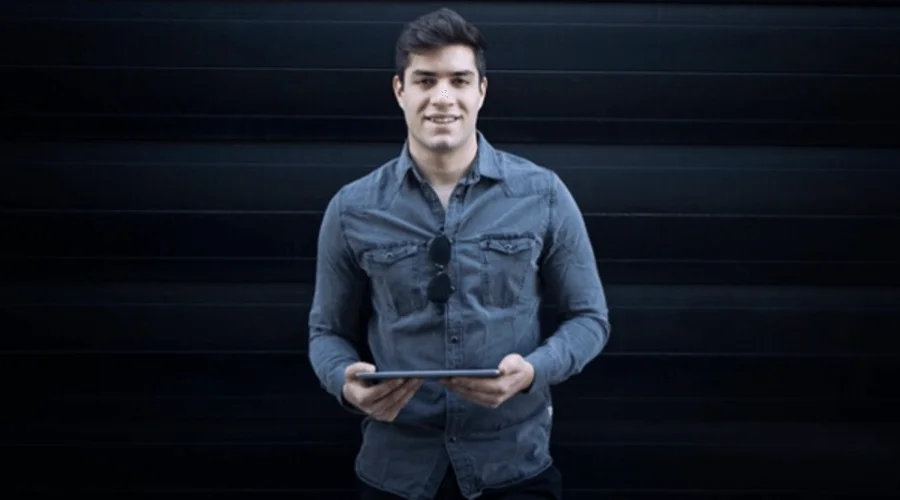
04. The Tech Entrepreneur

The Tech Entrepreneur Headshot, Professional Headshot Examples

The tech entrepreneur headshot pose is slightly different from the other corporate photoshoots. Here the subject will be in a more casual attire. You can use a laptop, tablet, or other electronic devices as props.  The tech entrepreneur headshots project authority and competence.

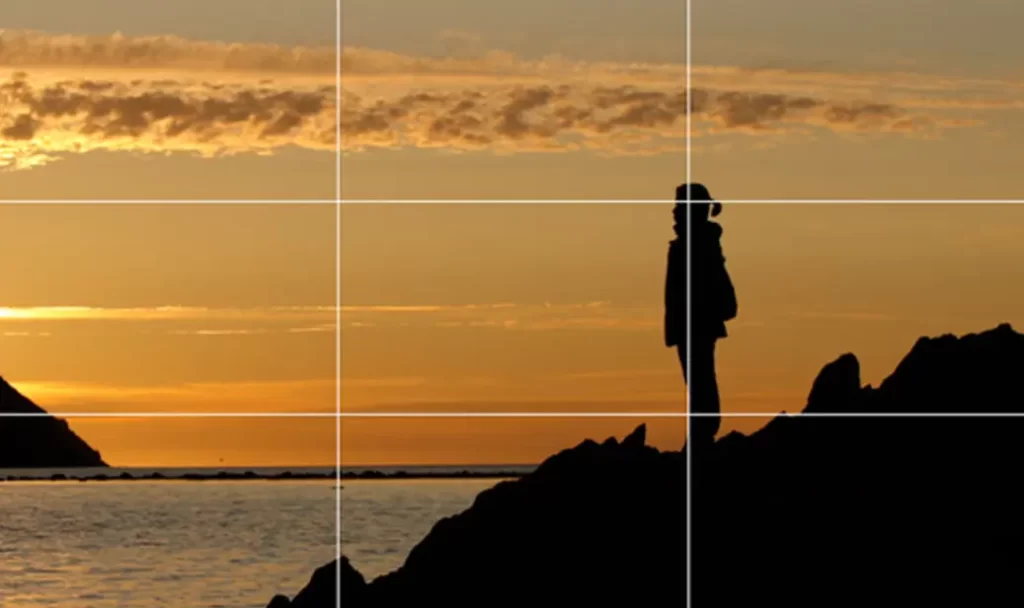
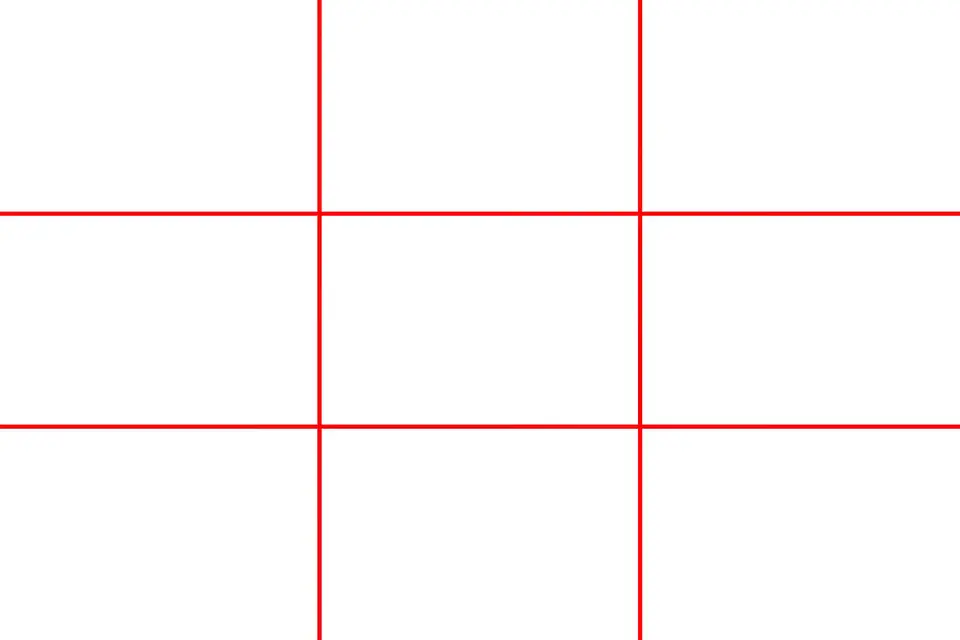
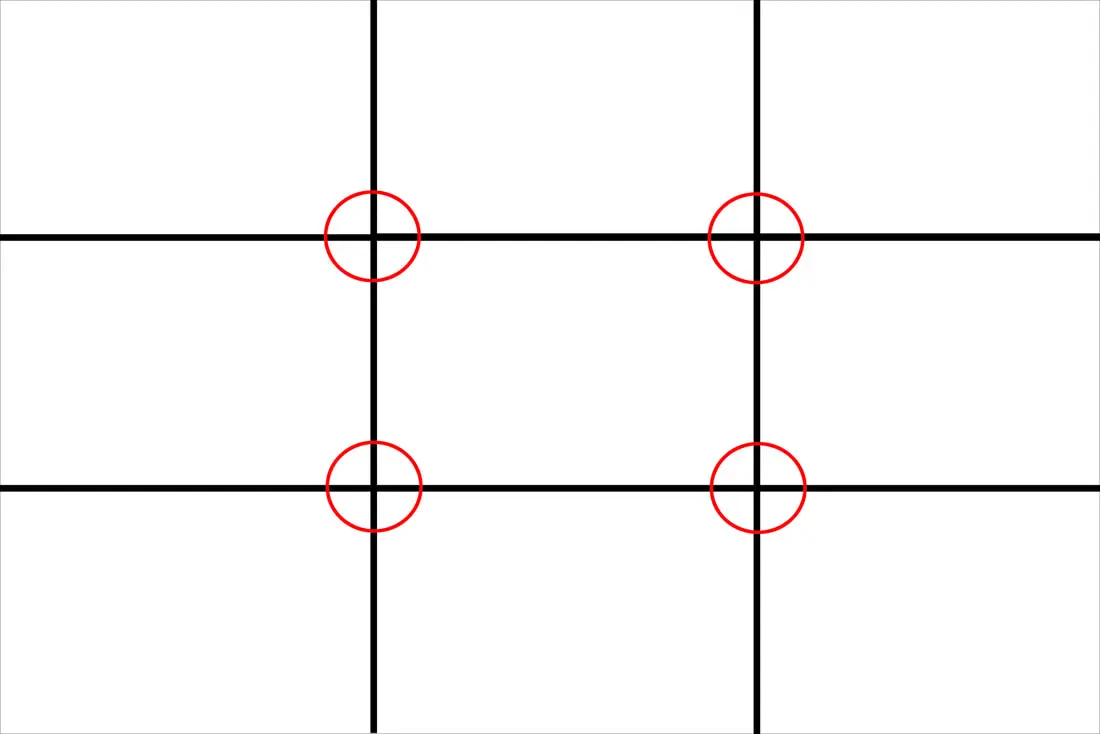
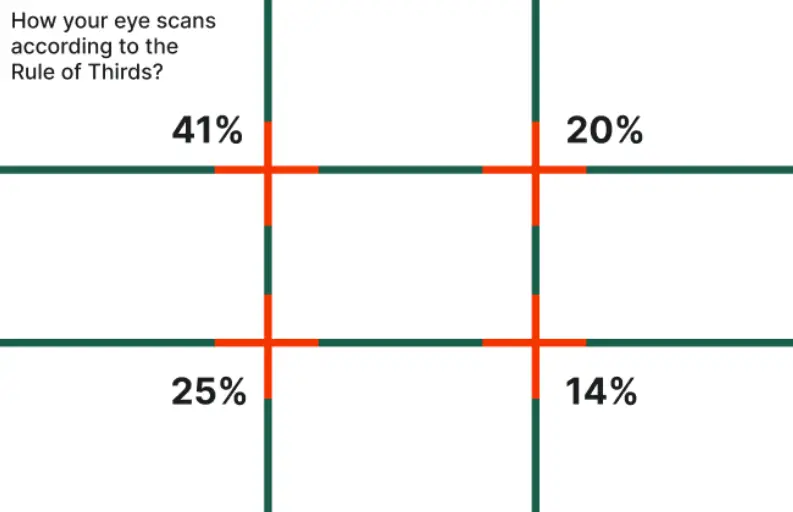
Make sure the background is neutral-colored or blurred. Keeps the focus on the model. The rule of thirds will help you to create a better composition.   

05. Glass-Wearing Portrait Shots

Glass-Wearing Portrait Shots, Female Professional Headshot Examples

Professional photos with glasses can be fun. But you have to ensure that the glasses don’t become a distraction. Also, ensure your eyes remain the center of focus. Clean your glasses with a lens cloth before the shoot. It will remove any dust. Additionally, you can wear glasses with an anti-reflective coating. Thus, you can minimize the glare from lights.

06. Lean Against a Wall

Lean Against a Wall, Professional Headshot Examples

It is another example of a professional headshot. Avoid an excessive lean. A slight leaning against the wall is sufficient. Also, ensure there are no distracting elements in the background, such as clutter or busy patterns.

07. Hand on the Hip With A Confident Posture

Hand on the Hip With A Confident Posture

The hand-on-hip pose is a classic headshot choice for the professional. This pose adds a fun element to professional headshots. Place one hand gently on your hip. However, you can experiment with different hand positioning.

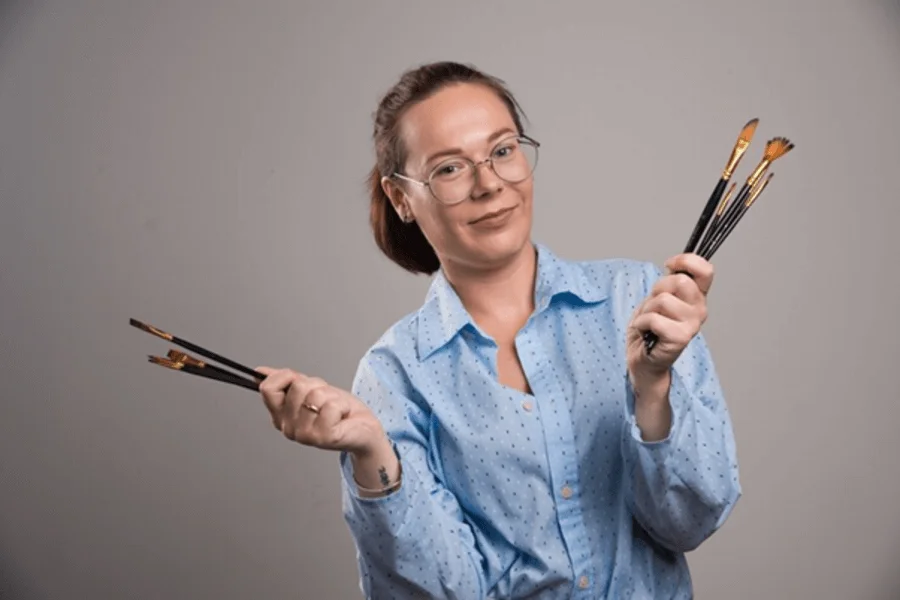
08. Artist In the Studio Holding a Paintbrush

Artist In the Studio Holding a Paintbrush, Professional Headshot Examples

This pose is for professional artists. It is a way to showcase your creativity and passion for art. Hold the brush handle close to your face. Wear more casual attire for this pose. You can make direct eye contact with the camera or look slightly off-camera for a mindful photo.

09. In Front of a Bookshelf

In Front of a Bookshelf, Professional Headshot Examples

Choose a bookshelf filled with books relevant to your profession. Ensure the books are neatly organized. The body angle should be slightly turned towards the camera. Moreover, you can pose by leaning slightly with one hand resting on the bookshelf.

10. Fitness Enthusiast Headshots

Fitness Enthusiast Headshots

Choose clothing that showcases the best definition of the mode. Action-oriented poses work best for this category. A genuine smile on the face of the model brings energy to the photo. For trainers specializing in specific areas, a determined expression can showcase focus and discipline.

11. Smiling With A Slight Head Tilt

Smiling With A Slight Head Tilt

It is a great professional headshot example for men and women. A good posture is also key to this headshot photography. Yet, the body angle can be around 15-30 degrees.

However, do not tilt your body or head too excessively. Tilt your head slightly to one side. Then have a gentle smile on your face. In this type of photo, the model will get the most focus.

12. Outdoor Headshots in Motion

Outdoor Headshots in Motion, Professional Headshot Examples

You can try this pose to create a more engaging image that sets you apart. So, engage in an activity that is related to the profession. Also, you can simply follow the example showing the photos.  So, wear your corporate look.

Then hold your coffee on one hand and a tab or a notebook on the other hand. Now capture the photo in a motion that you are walking to your office.

13. Relaxed Hands Headshot

Relaxed Hands Headshot, Professional Headshot Examples

A relaxed hand pose for the professional headshot is the most classic and safe option. Let your arms hang naturally at your sides with your hands slightly open or gently curled. You can slightly bend your elbows to prevent your arms from appearing rigid.

FAQ | Professional Headshot Examples

What is A Good Professional Headshot?

A good professional headshot shows your personality. Ensure the lighting is good and choose clothes that match the concept. Have a gentle smile on your face and ensure it doesn’t look unnatural.

Is A Selfie OK for A Headshot?

No, a selfie is not acceptable as a professional headshot. It has been captured by the rear camera.  

Can I Wear Makeup in A Headshot?

Yes, you can wear makeup for the headshots. Yet, ensure that the makeup looks natural. Excessive makeup can ruin the photo.

Don’t Miss Out

Final Thoughts | Professional Headshot Examples

So, these are the 13 professional headshot examples. You can follow these techniques to capture impressive professional portraits. Moreover, you can experiment with new ideas to explore this genre. Follow the experts in this field to understand their procedures for creating high-quality headshots.

Finally, the image editing methods are here to help you make the photos look flawless. However, a professional photo editing agency like Clipping World and Graphics Cycle can help you edit a bulk number of images. The company has experts in professional headshot editing. So, make an order now and get a discount based on it.

Show your love

How To Create Pokemon Text Effects in Photoshop

Pokemon Text Effects in Photoshop

Pokemon is a popular game. It is one of the most played games in the world. The effects of this game have been driven us crazy. What if you can create these effects by yourself? Here we will learn about the Pokemon text effect in Photoshop

Writing a text in Photoshop is easy. However, creating text effects requires unlocking the artistic mode. In this regard, you must know the basics of art effects to get your desired design. So, how favorite electric Pokemon attack? Well, look no further!

Here we will start from the basics. Then we will move to the advanced text effects. So, don’t worry if you are a newbie in Photoshop.  Let’s harness the power of Photoshop to create stunning Pokemon text effects.

Steps for Creating Pokemon Text Effect in Photoshop

Here you will get step-by-step guidance for creating Pokemon text effects in Photoshop. Strict to basics and follow the guidance to get your desired text effect. 

Step 1: Setting Up the Document

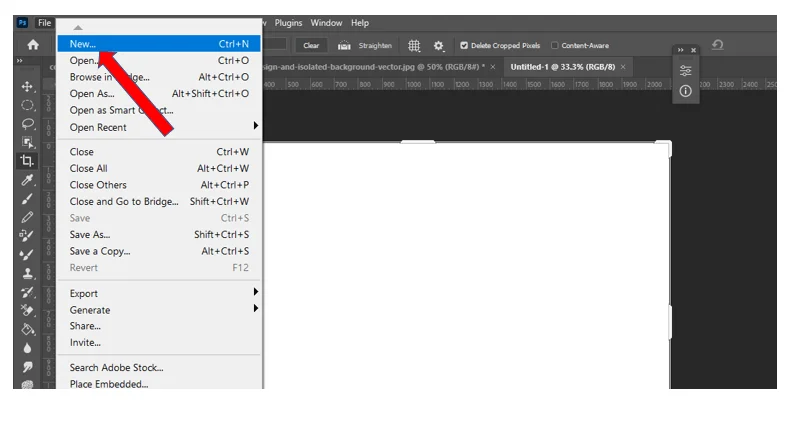
We will start with creating a new document for this text effect. Those who have already used Photohahop may know how to create a document in Photoshop. But it’s important to create documents with appropriate dimensions. It is necessary to get the desired resolution.

So, launch Photoshop on your computer. Then go to File > New or try the keyboard shortcut Ctrl + N for Windows and Command + N for Mac. Here you will get the option to choose the dimensions. I choose the default one for this tutorial.

Setting Up the Document, Pokemon Text Effects in Photoshop

However, if you’re creating a Pokemon text effect for social media, you should choose a dimension that is suitable for Facebook, Instagram, or Twitter. Then set the resolution. I am going for the 72-pixel as it is standard for digital designs. You can aim for higher resolution for high-quality output. 

Now set the color mode to RGB if it is set to CMYK.  You can use a background color or leave as it transparent. Finally, give your document a name and save it by going to  File>Save as. 

Step 2: Downloading and installing Pokemon Font

You have to download the Pokemon font and install it on your computer. Search on Google to get the websites for downloading this font.

Then open the downloaded zip file. Most of the websites provide two types of Pokemon font files.  For this tutorial, we will use the Pokemon Solid. Click on the font file. It will open in Notepad. You will get the install button on the top. Click on this button to install the file.

Step 3: Adding Text

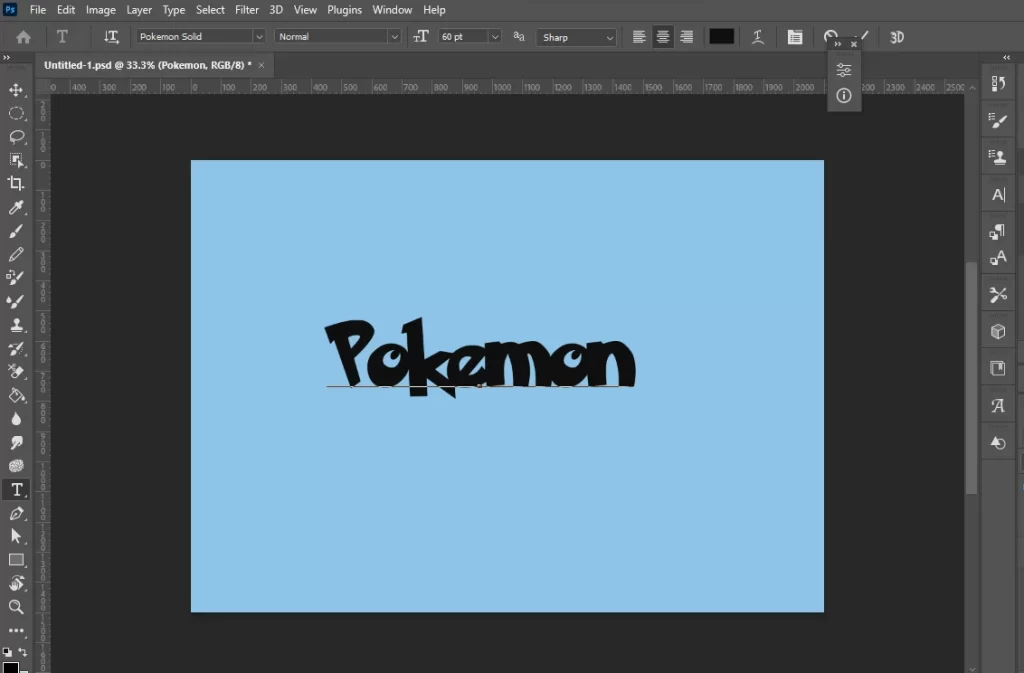
Adding Pokemon Text, Pokemon Text Effects in Photoshop

Now we are going to add text to this newly created Photoshop document. To write any text on the document select the text tool from the Photoshop toolbar. You will get the tool in the Photoshop toolbar. The capital letter “T” in the toolbar is the Text Tool. Click on it or type T from the keyboard to select it.

After selecting the tool, you will get some options for the text effects in the options bar. Here you can choose your font, font size, and other text properties. We will start with selecting the font size to 60 pt.  Keep the text style Regular and select the font type “Pokemon Solid”.

Now click on the canvas to add text. Click anywhere in the document. We can change the text position later if it is necessary. Now you can resize or change the position of the text using the Move tool. You will get this tool in the toolbar (the arrow sign). 

Again if you want to add different effects on different parts of the text consider duplicating the text layer. Thus you can work on each layer. Finally merging the layers will create a Mesmerizing effect. 

Step 4: Applying Layer Styles

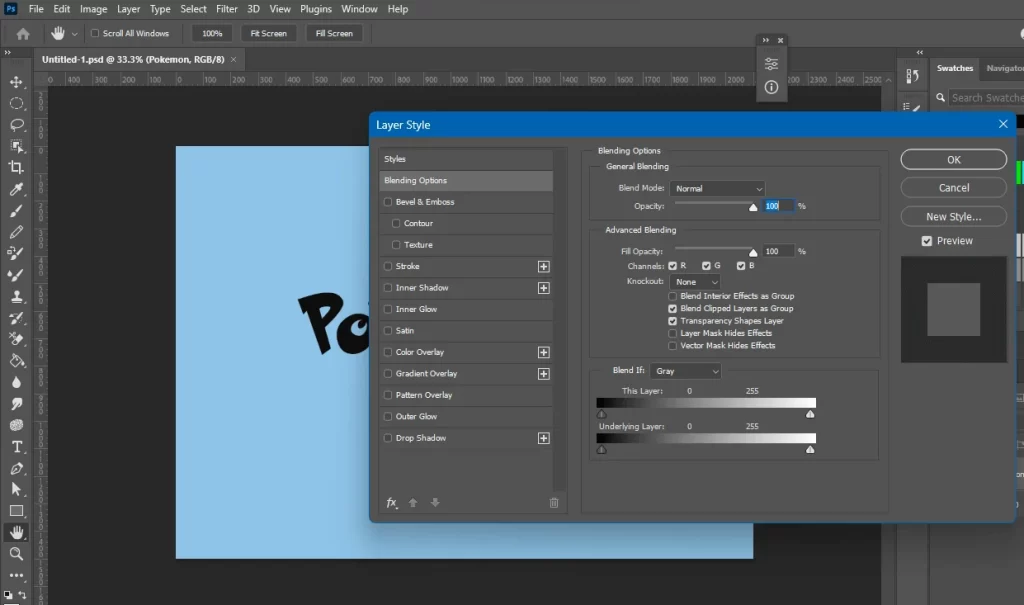
You have added your text, now it is time to apply some layer styles. The layer styles in Photoshop allow you to add different effects to your text. Thus the overall look of the text will be enhanced. 

Here are the three popular layer styles  we need to add to our Pokemon text effect in Photoshop:

01. Stroke Effect

The Pokemon text effect has a stroke in it. Select the text layer to apply the stroke effect in the Layers panel. With the text layer selected, go to the bottom of the Layers panel and click on the “fx” icon. From the dropdown menu, choose “Stroke.” Also, you can double-click on the layer to get the layer-style dialogue box. 

Layer-style Dialogue Box

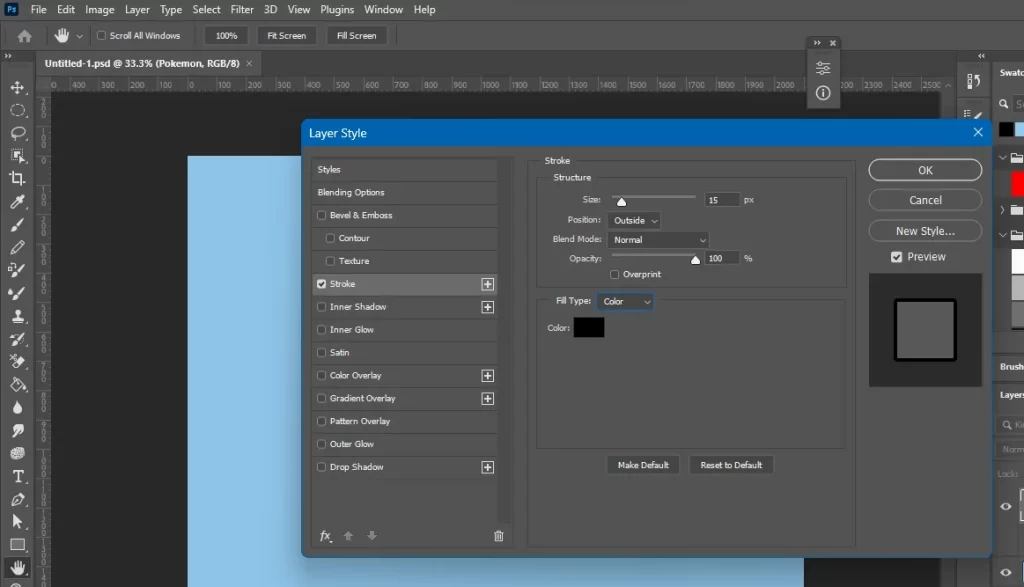
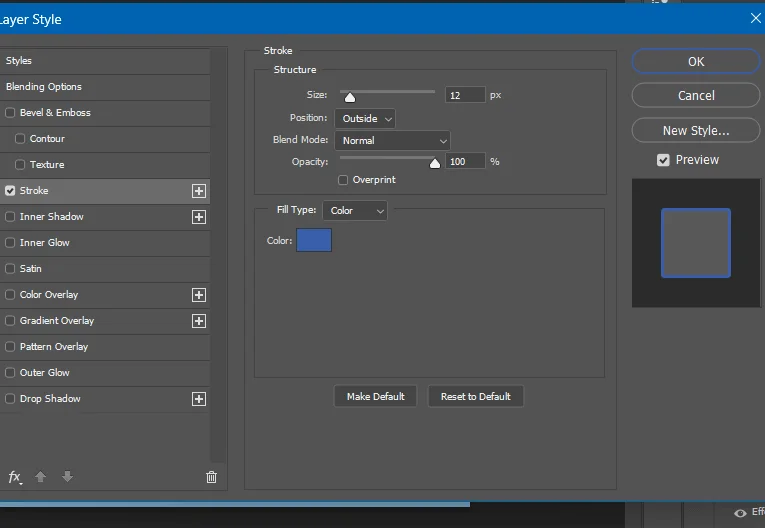
Now, you can customize the stroke options to your preference from the appeared box. We will start by adjusting the thickness of the stroke. We will increase the stroke by 15 px by moving the slider. 

You can choose the position of the stroke. You can apply the stroke inside, outside, or centered on the edge of the text. We choose outside for this tutorial. The blend mode will be normal and the opacity will be 100%. 

Stroke Settings, Pokemon Text Effects in Photoshop

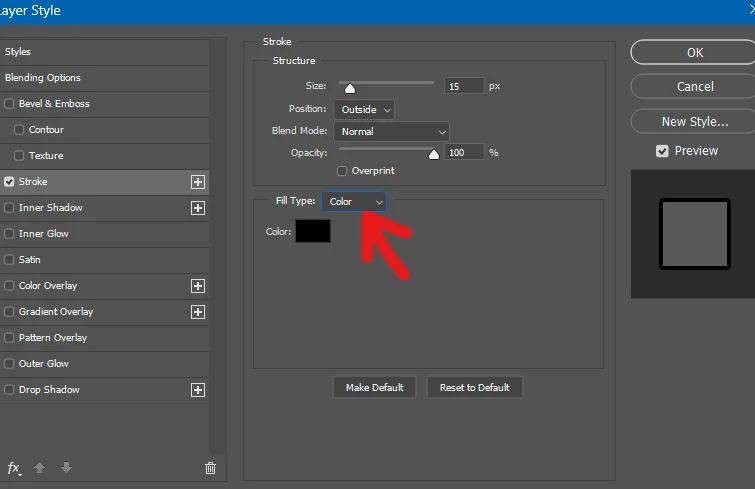
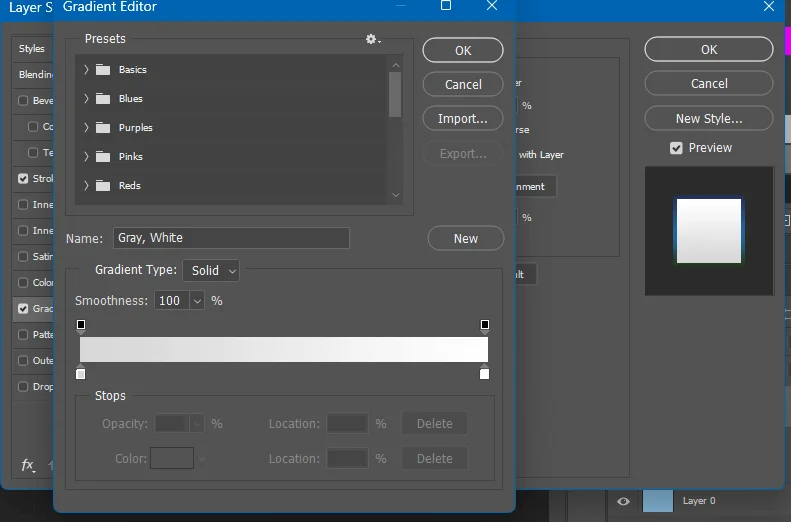
Then click on the fill type drop-down and select Gradient from the dropdown menu.

Gradient Setting in Photoshop

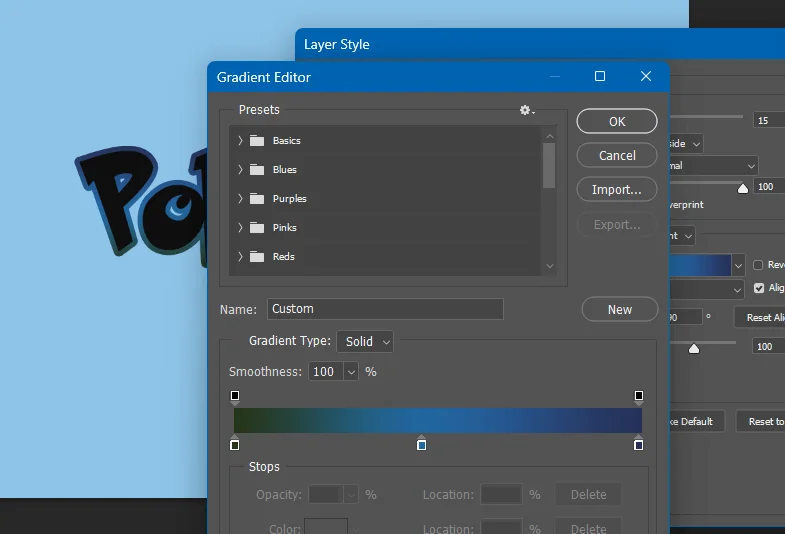
Here style will be normal and the angle at 90 degrees. Then set the scale at 100%. Then click on the gradient option. We have used #263159 for the first point. For the second point, we have set the color to #20659E and for the last point, we again set the color to  #263159. 

Gradient Editor, Pokemon Text Effects in Photoshop

Once you’re satisfied with the stroke settings, click “OK” to apply the effect.

Then create a duplicate layer of the text layer. Use the keyboard shortcut ctrl+j to create the duplicate layer. Name it the “color layer”. 

Then got to the layer style by double-clicking on the duplicated layer. Click on stroke again, with the outside stroke selected set the stroke size to 38 px. Now fill type will be color and set to #395faa. Hit ok to move to the next step. 

Stroke Color Setting in Photoshop

02. Gradient Overlay

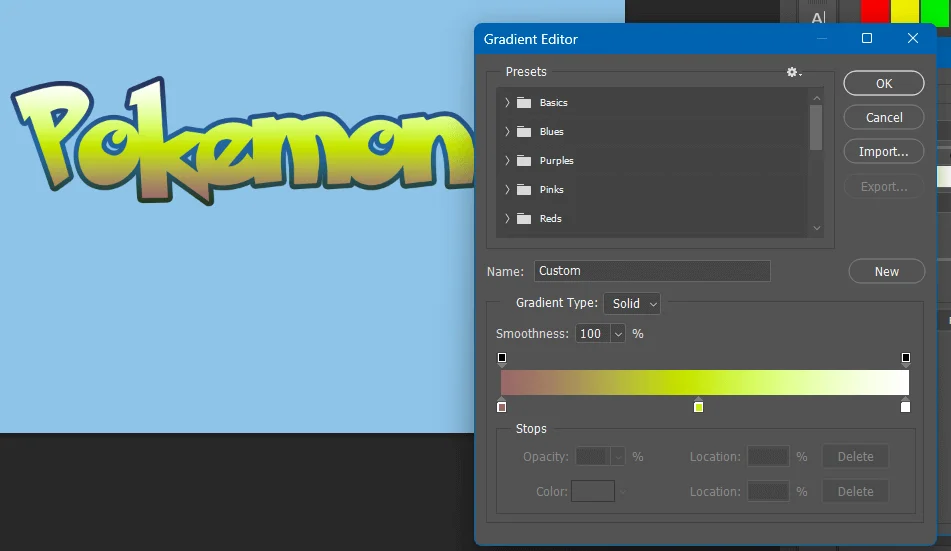
Now it is time to apply the gradient overlay. In the layer style dialogue box, you will also get the Gradient Overlay option. Click on it to make adjustments. You can customize the gradient overlay options like blend mode, opacity, gradient, angle, scale, and style. 

Layer's Gradient Editor

We are going to use #996868 for the first point, and #caeb11 for the second point.

Gradient Overlay Pokemon Text Effects

Instead, we can use the color overlay. Let’s see how to use the color overlay option to get the yellow color. 

03. Color Overlay

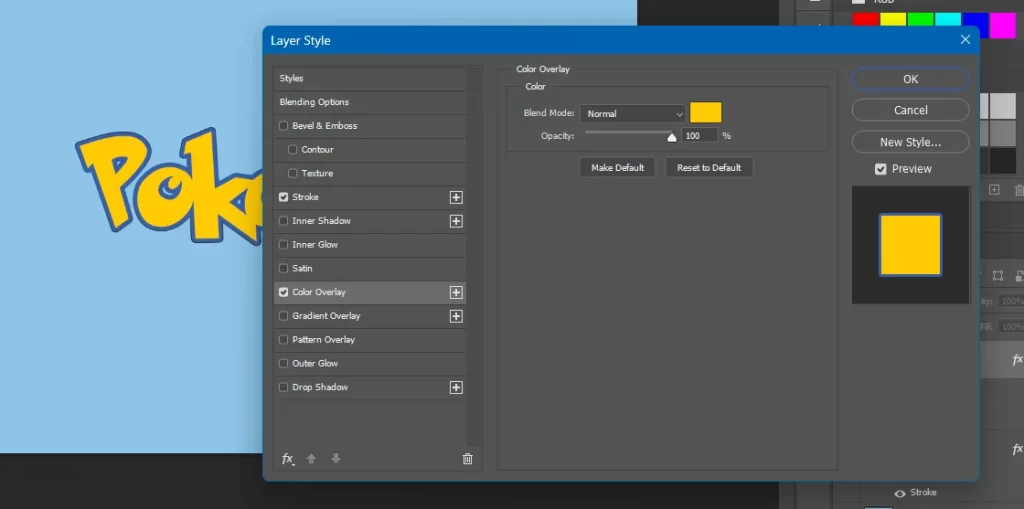
Color Overlay Pokemon Text Effects in Photoshop, Pokemon Text Effects in Photoshop

Again go to the layer-style dialogue box. This time select the Color Overlay option. Set the blend mode to Normal and Opacity to 100%. 

Then click on the color box to set the color. We have used #ffcb05 for the Pokemon text effect. Once you’ve set the color overlay to your liking, click “OK” to apply the effect.

Adding Inner Shadows

It is time to add inner shadows. Shadows add depth to a picture. The Pokemon text effect has an inner shadow in it. Go to the layers style by double-clicking on the “color layer”. Now go to the Inner Shadow option from the layer style. 

In the Layer Style dialog box, you will get some options to adjust the shadow. Experiment with the blend mode to see how the shadow blends with the underlying layers. Then play with the Color slider. Also experiment with opacity, angle, distance, spread, and size. 

Adding Inner Shadows, Pokemon Text Effects in Photoshop

Here we are going to set the blend mode to normal. Then click on the color box and set the color to #c7a008. Opacity has been set to 100%. Now uncheck the “Use Global Light” and set the angle to 27. For this Pokemon effect, we have set the distance to 7, the choke to 100, and the size to 2. 

Once you’ve configured the drop shadow settings, click “OK” to apply the effect. However, never forget that experiment is the key to creating authentic art. Play with different settings and combinations to achieve the desired look for your design. 

Adding Pokemon Elements

Adding Pokemon Elements

Now we have created the Pokemon text effect.  We can use the Pokemon images or sprites to make our image look more crispy. 

So, find high-quality Pokemon images or sprites by searching them on Google. You can download the official artwork, fan art, or sprites from the Pokemon games.

  • Open the downloaded image in Photoshop by navigating File > Open.
  • Then use the move tool to place the Pokemon element onto your text. You can use the Move Tool (shortcut: V).
  • Now you have to position the Pokemon to the right place. Think about aesthetics when you place the element. 
  • Use the transform tool to resize and rotate the Pokemon as needed. To get the transform tool use the keyboard shortcut Ctrl + T on Windows or Command + T.
  • Use different Pokemon elements around the text. Use these elements strategically so that the overall composition gets a spicy look.
  • Use the arrow keys from your keyboard to position the elements precisely. 
  • Then you can experiment with the layer blending modes. Thus you can create a comprehensive design where the text and Pokemon elements complement each other.
Downloading Pokemon Mockup Templates Free

Here we have another way to create outstanding designs in Photoshop using Pokemon text effects. You can download free Pokemon text PSD templates and use them to create your desired designs. Here is a list of three  websites using which you download the Pokemon mockup templates:

PS Files

PS Files, Pokemon Text Effects in Photoshop

The PS files is a popular website for downloading the PSD files. You can download free Photoshop mockup templates from this website. Then open the downloaded template in Photoshop and edit it according to your requirements. 

Freepik

Freepik, Downloading Pokemon Mockup Templates Free

Freepik is a reliable and free photo-downloading platform. Freepik offers 100+ high-quality free Pokemon mockup templates. 

Here you will also get different Pokemon cards including birthday cards. These are high-quality Pokemon templates that you can edit according to your requirements. So, download Pokemon text effects in Photoshop for free

365 Web Resources 

365 Web Resources 

The 365 Web Resources also allows downloading free PSD templates for Photos. This platform has a vast library. So you will get a lot of relevant PSD files to edit in Photoshop to create unique designs. 

FAQ | Pokemon Text Effects in Photoshop

How to Make Text Effects in Photoshop?

Though this article is about the Pokemon text effect, you can create different text styles following the same technique.  So, download different fonts and edit them in Photoshop to create your unique design.

Who is the Affordable Text Effect Service Provider?

The Graphics Cycle is the best text effect service provider. They offer high-quality services at affordable prices. Also, they offer other high-quality image editing services. So, you will get all the services under the same roof.
Can I Sell Pokemon Text Effects?

Yes, you can sell the Photoshop text effects. There are a lot of websites that allow you to showcase your designs and let the purchasers buy them. The Pokemon text effect is so famous. Yet most of the purchasers like to get the PSD file rather than the photo.

Don’t Miss Out

Final Thoughts | Pokemon Text Effects in Photoshop

Creating an eye-catching design depends on several aspects. It depends on how you plan your workflow and your dedication to executing that plan. Here I tried to give an insight into Photoshop text effects. 

Using this idea you can create stunning Pokemon text effects in Photoshop. However, experiment is the key to creating authentic designs. So, do not only be strict with the provided methods in this tutorial. Try different combinations to create your effect. 

However, if you need photos at a bulk number, you should hire an expert photo editor. The Photo editing agencies like Clipping World can be a help in this regard. They are the leading image editing service provider in the market.

The 200+ professionals of this agency are ready to provide the required photos within the deadline.  Additionally, they have the best pricing policy in the market. So, consult with them today to get your required photos. 

Show your love